RsyncUI is a macOS application developed using Swift and SwiftUI, designed for macOS Sonoma and subsequent versions. It leverages the command-line tool rsync for file synchronization. Notably, rsync executes the synchronization tasks, while RsyncUI provides a graphical user interface (GUI) on top of rsync. RsyncUI is digitally signed and notarized by Apple. RsyncUI is 100% open-source software and will remain absolutely free for all time.
As a safety precaution, the –delete parameter is not set as a default parameter when adding new tasks. To ensure that the source and destination are in complete synchronization, the –delete parameter must be enabled. If you are new to rsync, I strongly recommend reading the “Important” and “Limitations” sections as a minimum.
A note about the terms source and target vs local and remote, the last is used in RsyncUI. ChatGPT says the following: In rsync documentation and usage, the most common terms are source and destination. These clearly indicate where the data is coming from and where it is going. While local and remote can be used when specifying locations across different systems, source and destination are universally applicable for both local and remote transfers.
In future versions of RsyncUI, I may change the terms to source and destination.
A note about the Calendar function: the schedule is implemented by using the Timer library. If your Mac goes to sleep, the schedule will NOT fire. If you lock your Mac, the schedule will NOT fire. The schedule will only fire as long as your Mac is “awake” and you are logged in. Refer to the Limitations section.
Privacy statement
RsyncUI is a desktop application only, there is no server component. It does not generate any logs that are transmitted from your Mac. Data pertaining to tasks and logs is stored locally on your Mac as files. You can backup all files created by RsyncUI to the Document directory on your Mac from the Settings view. The sole data transferred from your Mac to a server occurs only if you enable tasks with a remote server destination. You bear sole responsibility for securing your own data if synchronized to a remote server.
Changelog and Installation
For the most up-to-date information, please refer to the changelog. RsyncUI is constructed as a Universal macOS Binary, ensuring native execution on Apple Silicon and Intel-based Mac computers.
If installed via Homebrew, the SHA-256 hash is automatically verified. For downloads from GitHub, please verify the SHA-256 hash manually.
1 - Important
The User Interface of RsyncUI may pose challenges for users unfamiliar with the rsync command. The primary objective is to simplify the usage of rsync, rather than providing a comprehensive introduction of rsync to macOS users. This scope is beyond the intended purpose of the interface. RsyncUI is a graphical layer atop the command-line tool rsync. It does not directly perform the underlying operations; rsync is responsible for the actual synchronization of data.
Setting incorrect parameters for rsync can result in the deletion of data. Furthermore, RsyncUI does not prevent you from performing such actions.
RsyncUI is a complimentary and open-source application. Kindly review the MIT license.
Before executing a new task in RsyncUI, please perform an estimation run, a –dry-run, and inspect the result. If you inadvertently set an empty directory as the source and the delete parameter is enabled, rsync will delete all files in the destination.
For instructions how to verify a task, new or changed tasks, refer to the Getting started or New tasks section.
The delete parameter
The –delete parameter, herein referred to as the parameter, enables rsync to maintain absolute synchronization between the source and destination directories. When a file is deleted from the source, the parameter instructs rsync to delete the corresponding file from the destination. Conversely, if the parameter is disabled, the destination directory will contain additional data after deleting files from the source.
Therefore, it is crucial to ascertain whether the parameter is enabled or disabled. Enabling the parameter ensures complete synchronization between the source and destination directories.
ChatGPT about the parameter as a default parameter to rsync: The –delete parameter in rsync is not enabled by default to prevent accidental data loss. It deletes files in the destination that are no longer present in the source, which can be risky if used unintentionally. To use it, you must explicitly include –delete in your command.
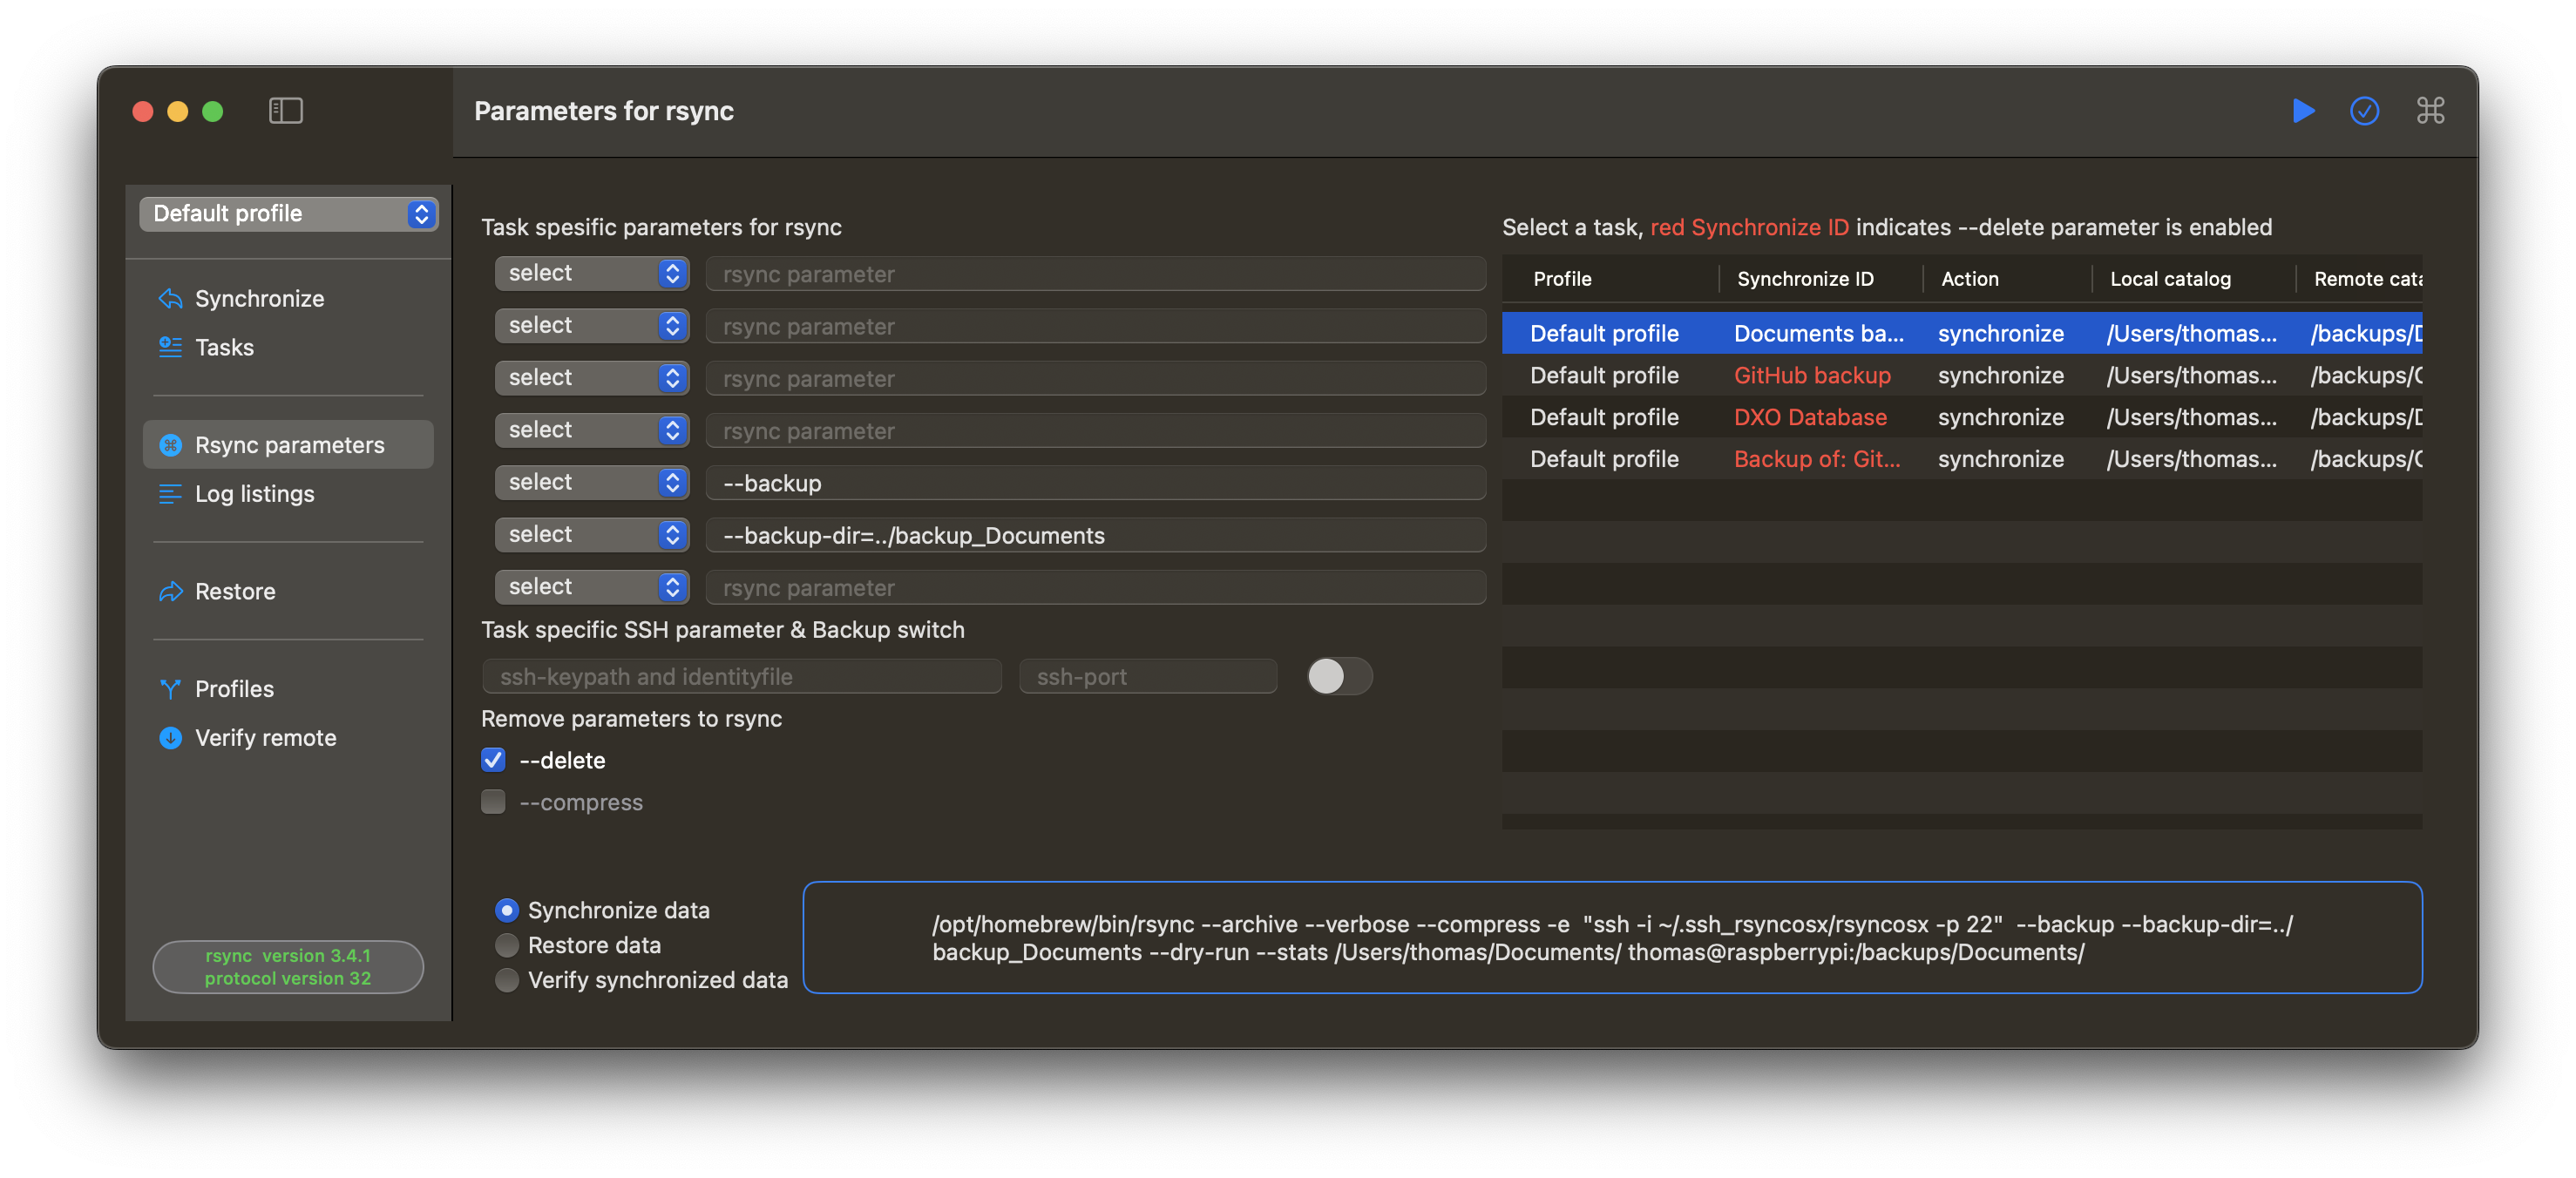
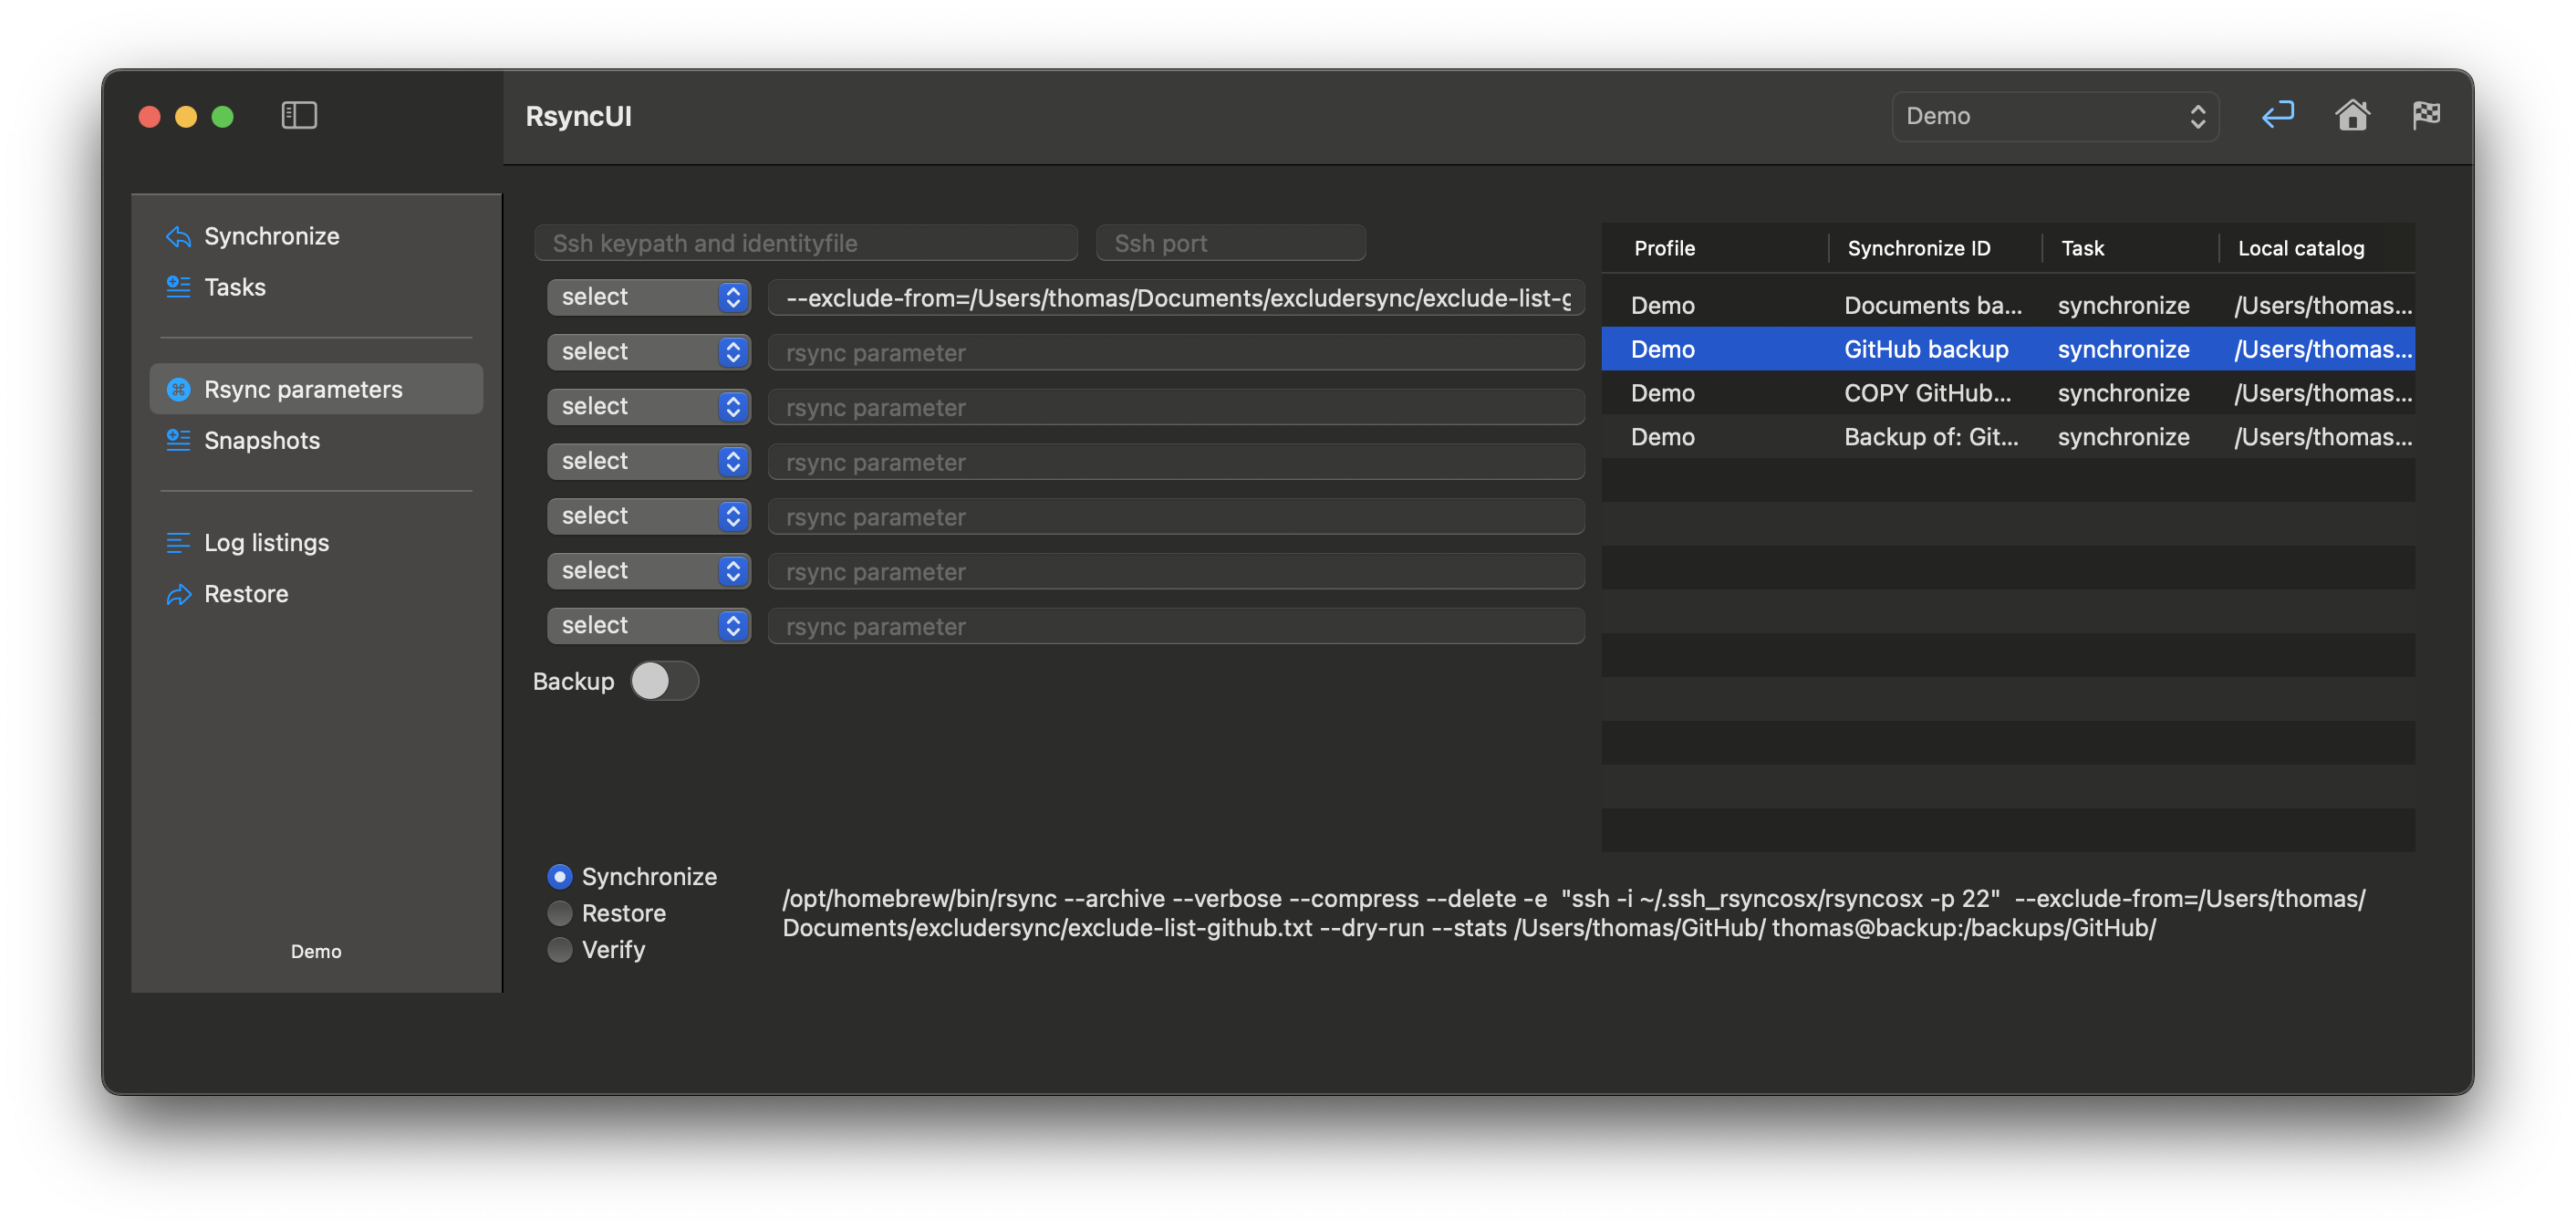
How to remove and add the delete parameter
Select the Rsync parameters from the primary Sidebar menu. Select the task for which you want to add or remove the --delete parameter. And then toggle the Add –delete parameter, ON is added . After toggle, remember to update the task.
if ON, the –delete parameter is included
if off, the –delete parameter is removed
The complete rsync string is updated when parameters are changed.
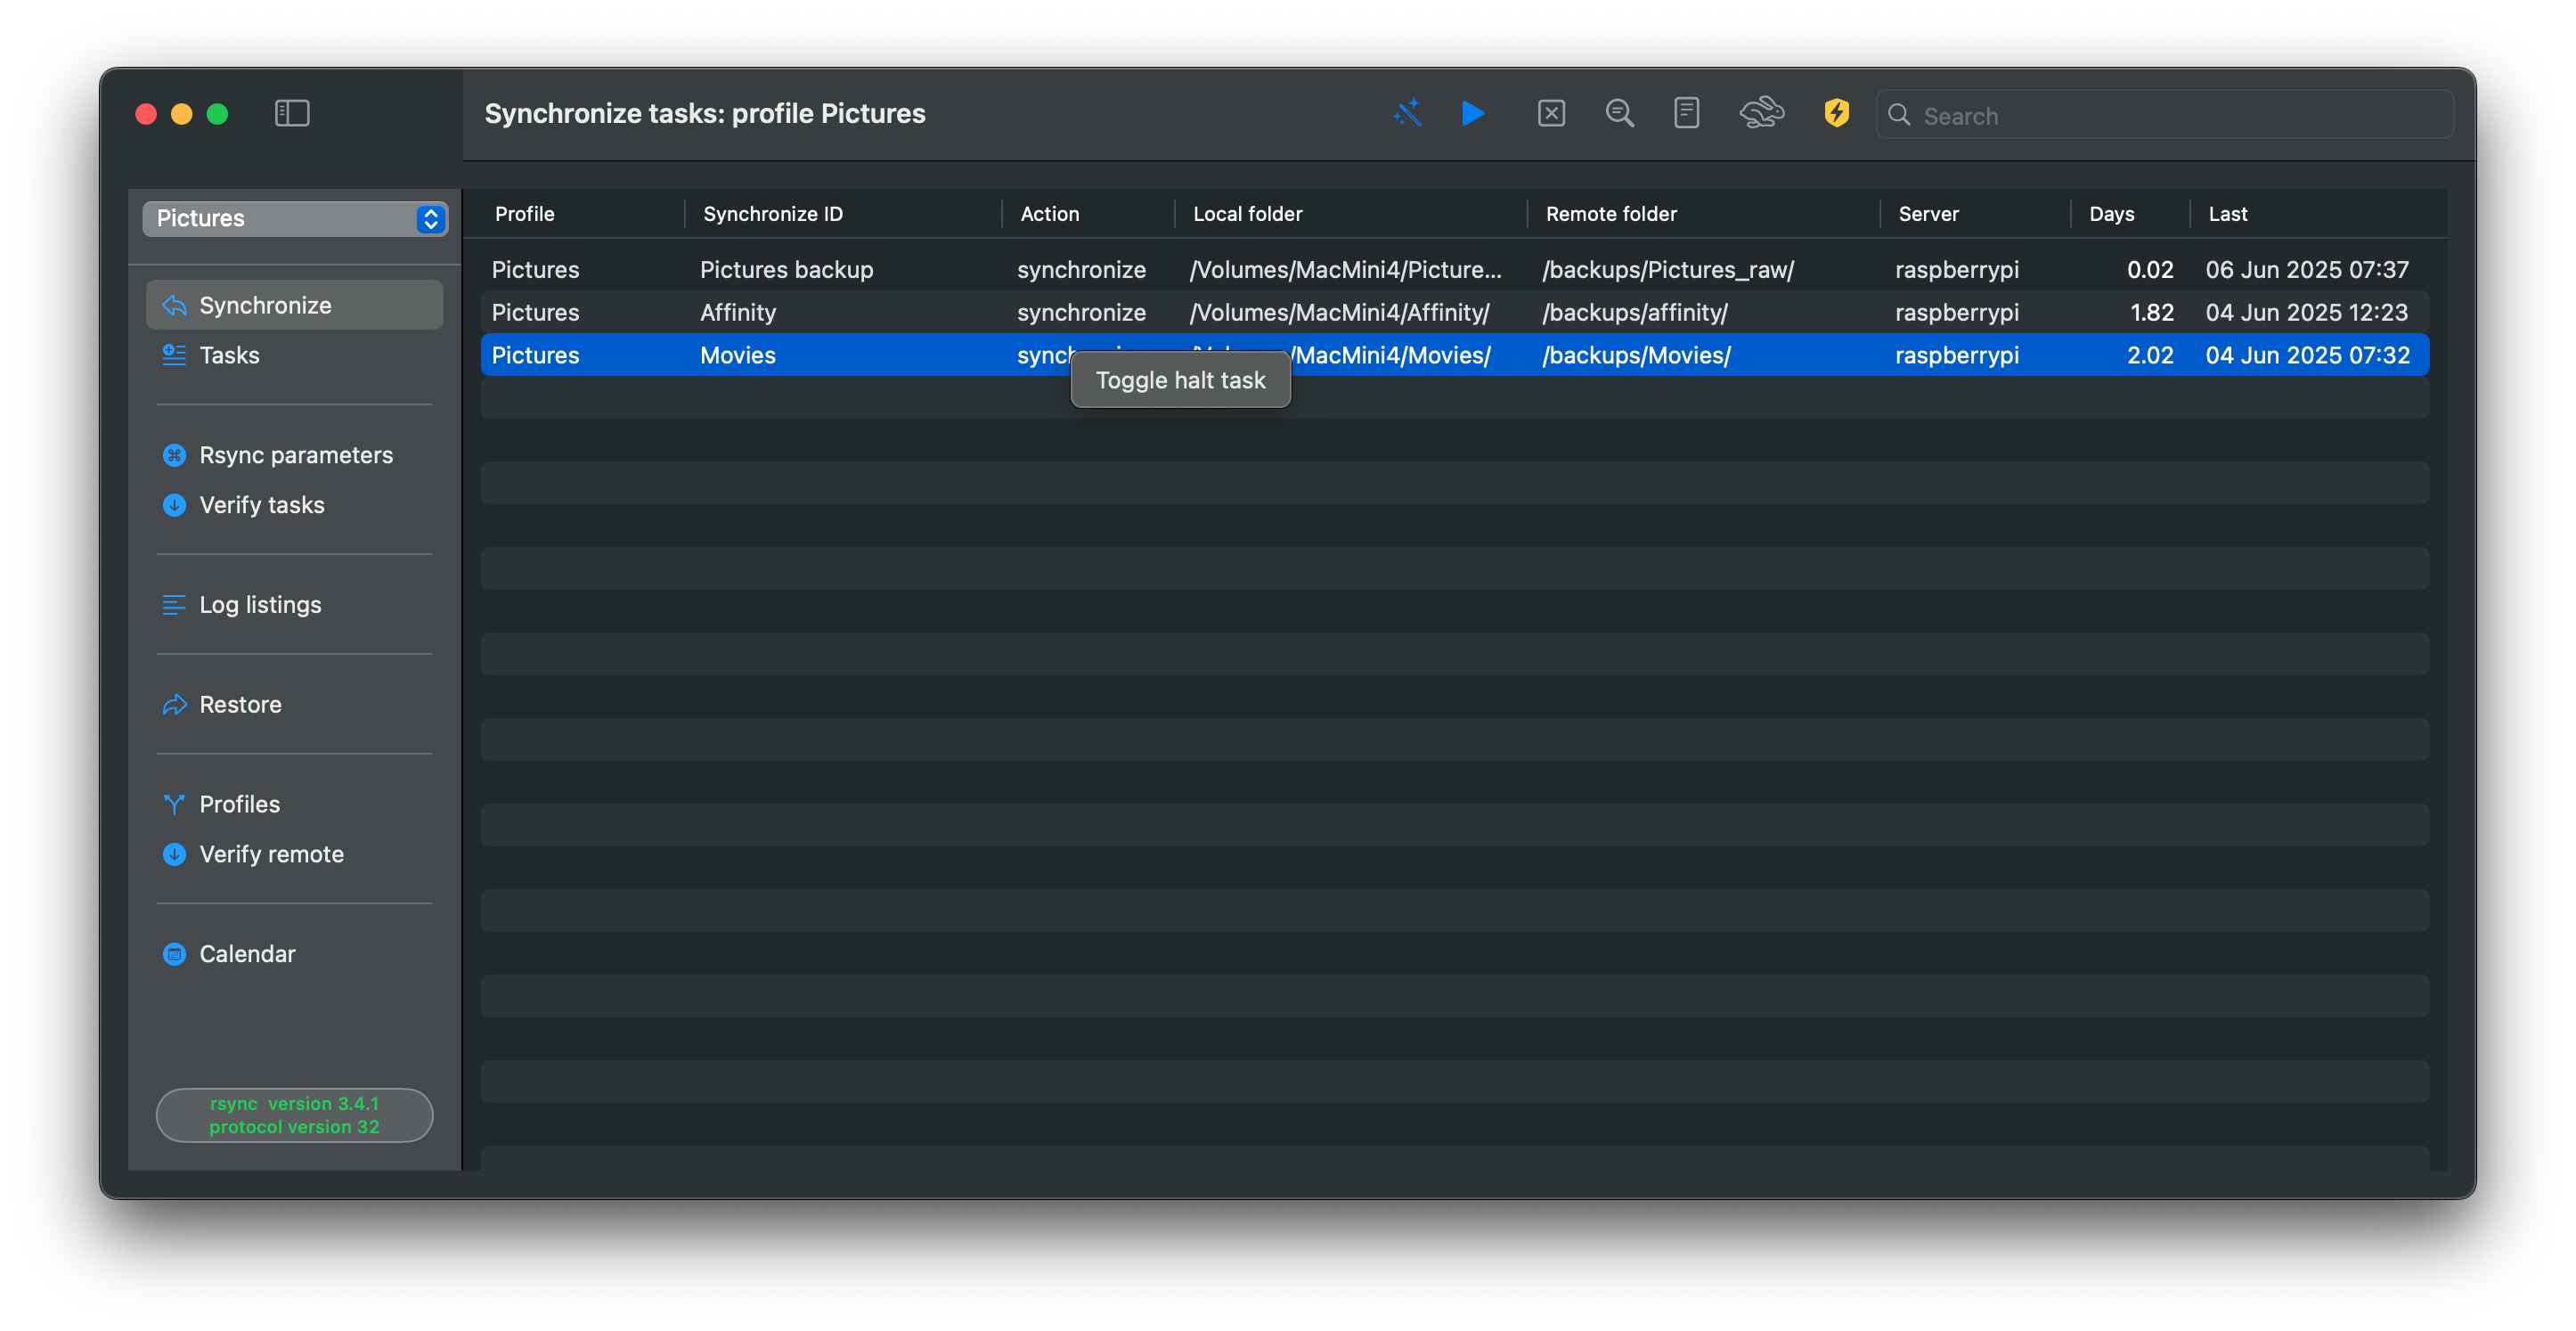
Temporary halt tasks
A task can be temporarily halted. Within the primary Synchronize view, select the task and right-click. Halting a task will retain the type of task that was halted when the task is resumed. An halted task displays a red stop sign in the action column.
Two options to save updates to data
This option applies to the data synchronized by RsyncUI. By enabling either of these options, you can save changes to data, such as deletions or updates, prior to a synchronization task.
There are a two options to automatically save changes to data when it is changed or deleted. Rsync supports a backup flag. By, in RsyncUI, switching on RsyncUI adds the required parameters. You may change the backup directory to any location you want.
Using snapshots, the second option, require that the latest version 3.x of rsync is installed. Please refer to the Snapshots section how to enable and use snapshots.
Remote servers
RsyncUI compels data transfer via SSH if the destination is a remote server. The parameter -e ssh to rsync enables data transfer to be tunneled via SSH. It appears that recent versions of rsync or SSH do not require this parameter, but for safety, RsyncUI appends it if the destination is a remote server.
Through the SSH tunnel, the transfer is encrypted when transmitted over a network connection.
Refer to the Passwordless login section for further information on SSH and SSH-keys. This feature cannot be disabled.
2 - Limitations
There are a few limitations or constraints to be aware of when using RsyncUI. NONE of these limitations can result in data corruption or trouble. However, they may inadvertently halt an ongoing synchronization process.
Long running tasks and sleep
Upon each Mac sleep, RsyncUI synchronization tasks cease. An active rsync process does not prevent Mac sleep. If Mac sleeps during a synchronization task, rsync likely generates an error, halting the task. The sole method to resume synchronization is to restart it via RsyncUI. RsyncUI will resume and synchronize data not yet transferred. Rsync is adept and resumes from its previous state.
If the above occurs, RsyncUI will not generate any logs. RsyncUI logs only upon detecting a termination signal from rsync. If Mac enters sleep during data synchronization, there will be no termination signal and no logging by RsyncUI.
You may modify your Mac’s sleep settings to control when it sleeps.
The above will also be true of you are using the Calendar function.
The Calendar
A note about the Calendar and schedule of actions. There are limitations of how the scheduler works due to how the Timer library is developed. Refer to the blog Timer and Calendar for more detailed info about the Timer.
Its primary function is to automate selected synchronization of tasks as long as RsyncUI is alive and you are logged in. It may prove useful for users who require scheduled synchronization of data during work. RsyncUI may be minimized or not the active window and the timer will still work.
The scheduler is implemented by using the Timer library, quote Apple: “A timer that fires after a certain time interval has elapsed, sending a specified message to a target object.”
If you leave your Mac and it goes to sleep, the timer will not work.
The timer has a strong reference to the run loop on the main thread. That also means that if the application goes to sleep, so does the run loop. And the timer is only active as long as RsyncUI is active.
Aborting Tasks
Please be cognizant that this is an external task not under the control of RsyncUI. It executes the command-line tool rsync.
RsyncUI monitors the task for progress and termination.
The user has the authority to abort a task at any juncture. Please permit the abort to complete and execute any necessary cleanup operations before initiating a new task. This process may take a few seconds. If not, RsyncUI may become unresponsive.
3 - Getting started
For new users, kindly refer to the Important section. Additionally, please find information about the latest version of rsync to install, refer to the Latest version of rsync section .
The primary Sidebar menu is context-sensitive. The rationale behind a context-sensitive Sidebar menu is to conceal menu options that may be distracting to the user. See last on this page about the sidebar menu options.
New Tasks and Verification
RsyncUI supports synchronizing data to:
local attached disk
remote servers on the Internet or local LAN
requiere passwordless login by ssh-key
Local attached disk
RsyncUI can synchronize your data to a local attached disk. If you only want to synchronize data to a local attached disk, connect the disk, add the source and destination, and you are ready for your first task.
Remote server and passwordless login
If you want to synchronize data to a server, on the Internet, or your local LAN, there is some more setup to do. If you have enabled passwordless login by ssh-key, you only have to add source, destination, login id, and servername and you are ready to synchronize data. If you have not enabled passwordless login, there are some more actions required before your first task.
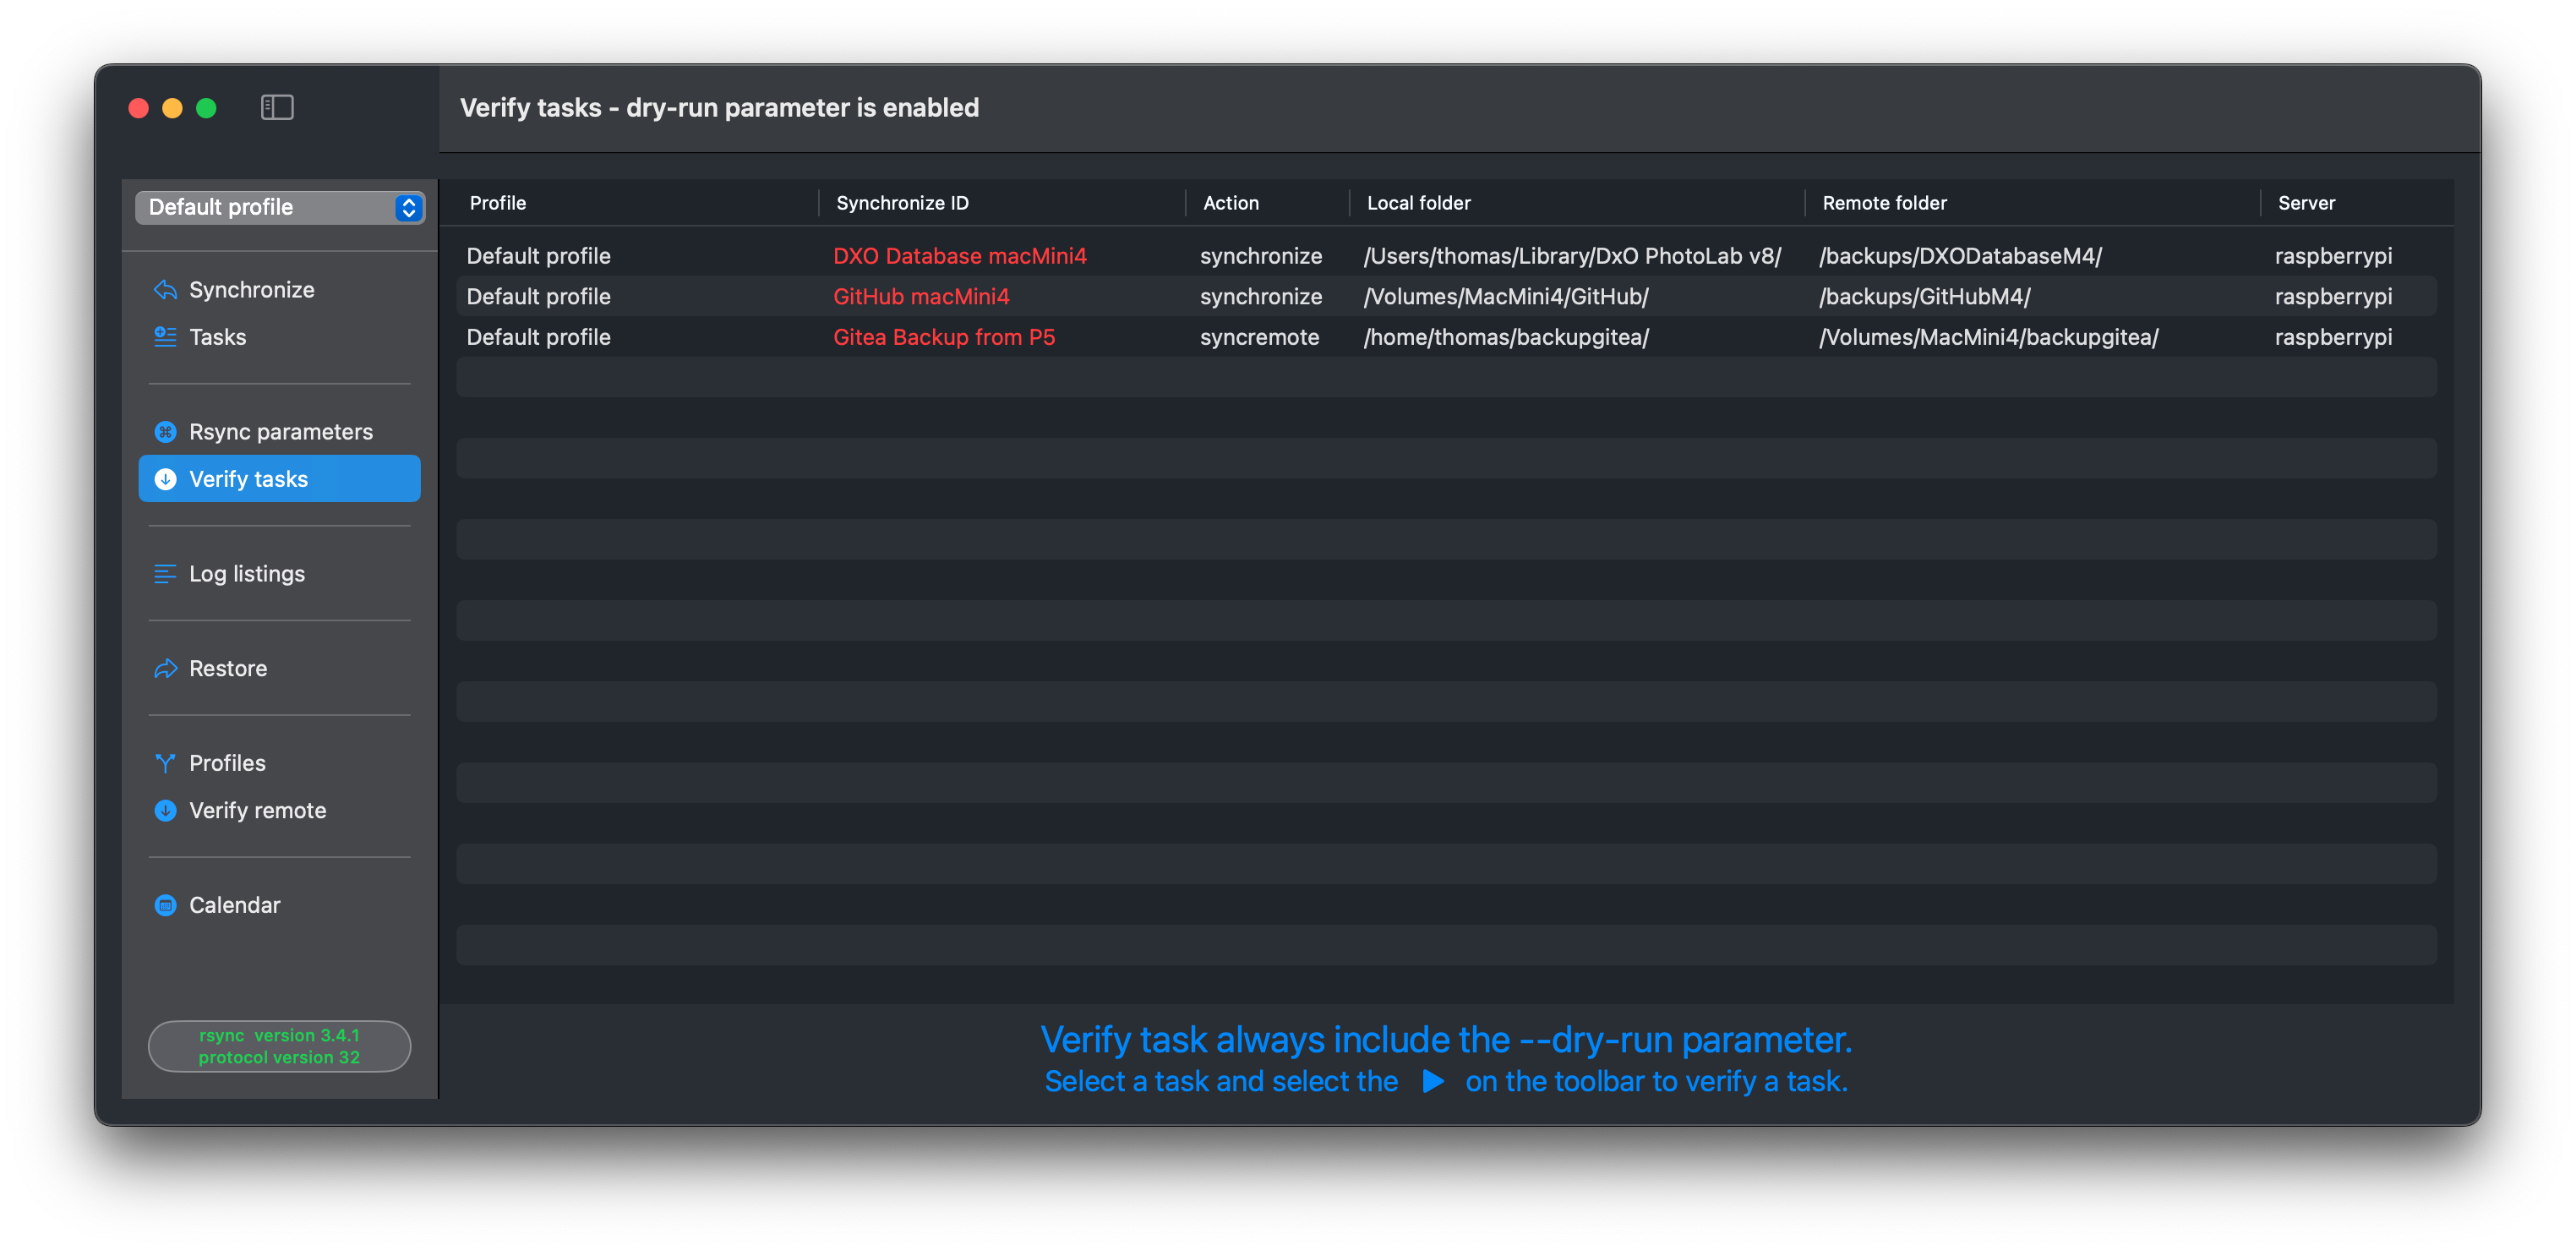
Verify tasks
Always verify a new task. After adding a new task, changed a task, added your own or changed parameters to rsync , select the “Verify tasks” from the primary Sidebar menu.
Select the task and press the play button on the toolbar. Executing the play button includes the –dry-run parameter for rsync, which is an estimation run.
Aborting tasks
Please note that this is an external task not controlled by RsyncUI, which executes the command-line tool rsync. RsyncUI monitors the task for progress and termination.
The user can abort a task at any time. However, it is essential to allow the task to complete and perform any necessary cleanup operations before starting a new task. This process may take a few seconds, and if not, the applications may become unresponsive.
The Sidebar Menu options
There are three Sidebar menu options that are contingent upon the properties of a task. It is sufficient as long as one of the tasks satisfies one of the prerequisites.
Snapshot: this option is exclusively available for snapshot tasks
Restore: this option is only available for synchronize- and snapshot tasks where the destination is located on a remote server
Verify remote: this option is only available for synchronize tasks where the destination is located on a remote server
The Sidebar menu may be hidden, either click on the Hide Sidebar icon top left or toggle ON Hide the Sidebar on startup within the RsyncUI settings.
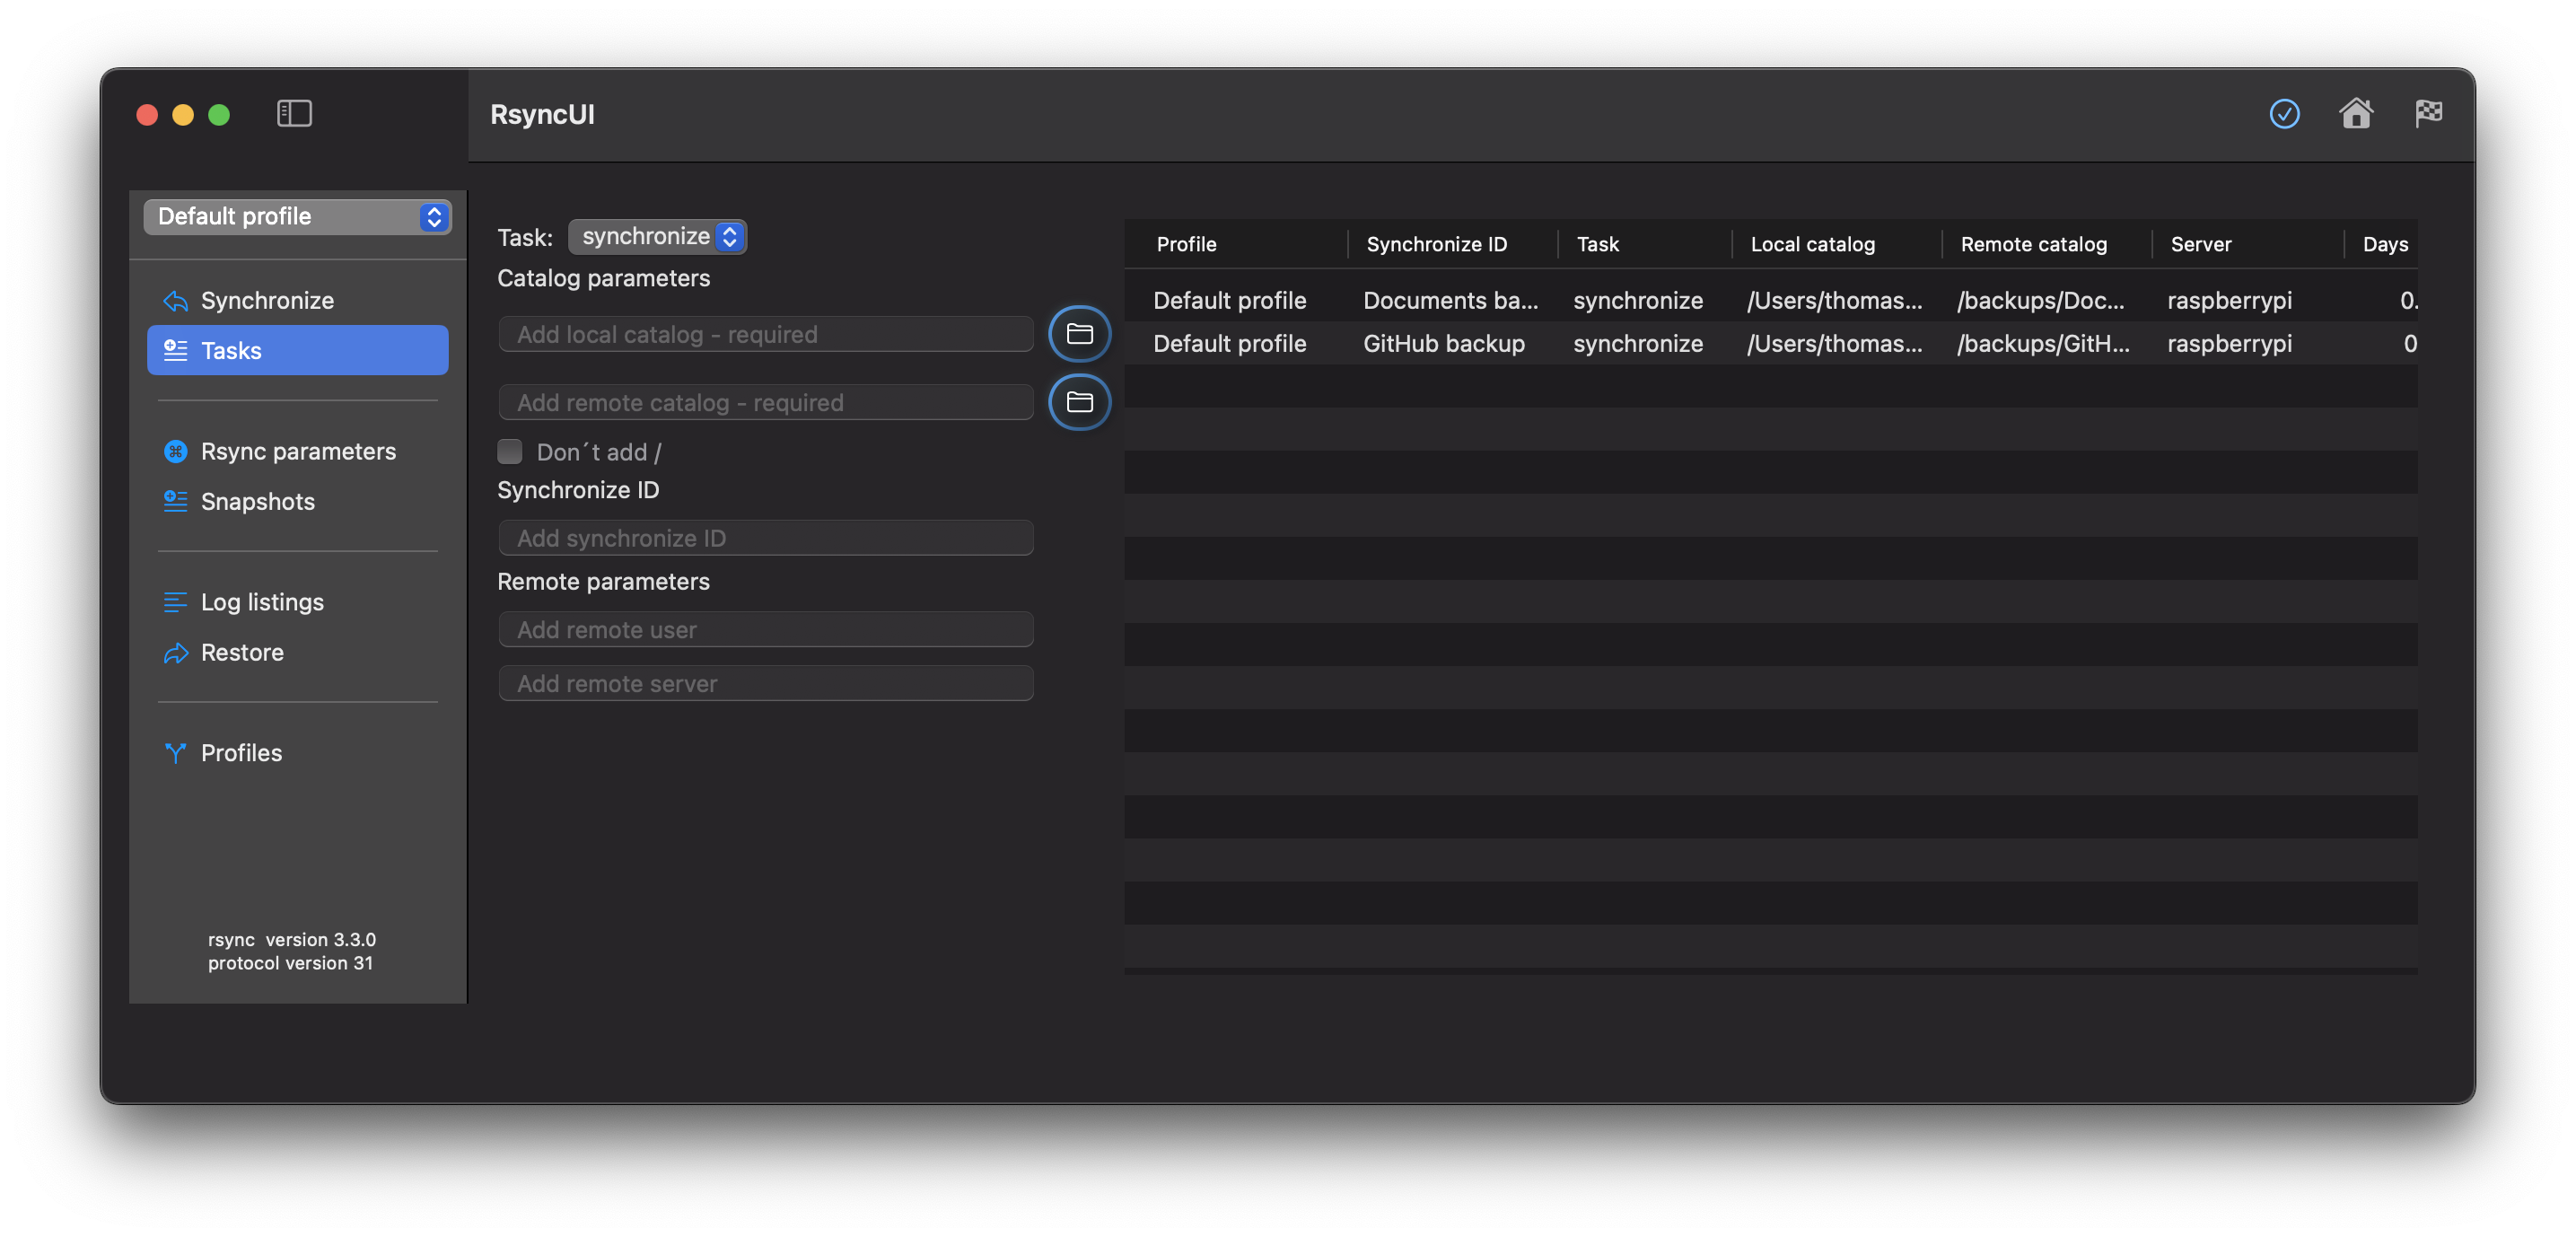
4 - New tasks
A task requires a minimum of a local directory, the source, and a remote directory, the destination.
Always verify the result of a new task before executing. Select the “Verify tasks” from the primary Sidebar menu.
Pressing the Enter key will advance to the next field. Pressing the Enter key will automatically add a new task after the last input. Tasks are saved to permanent storage after each entry.
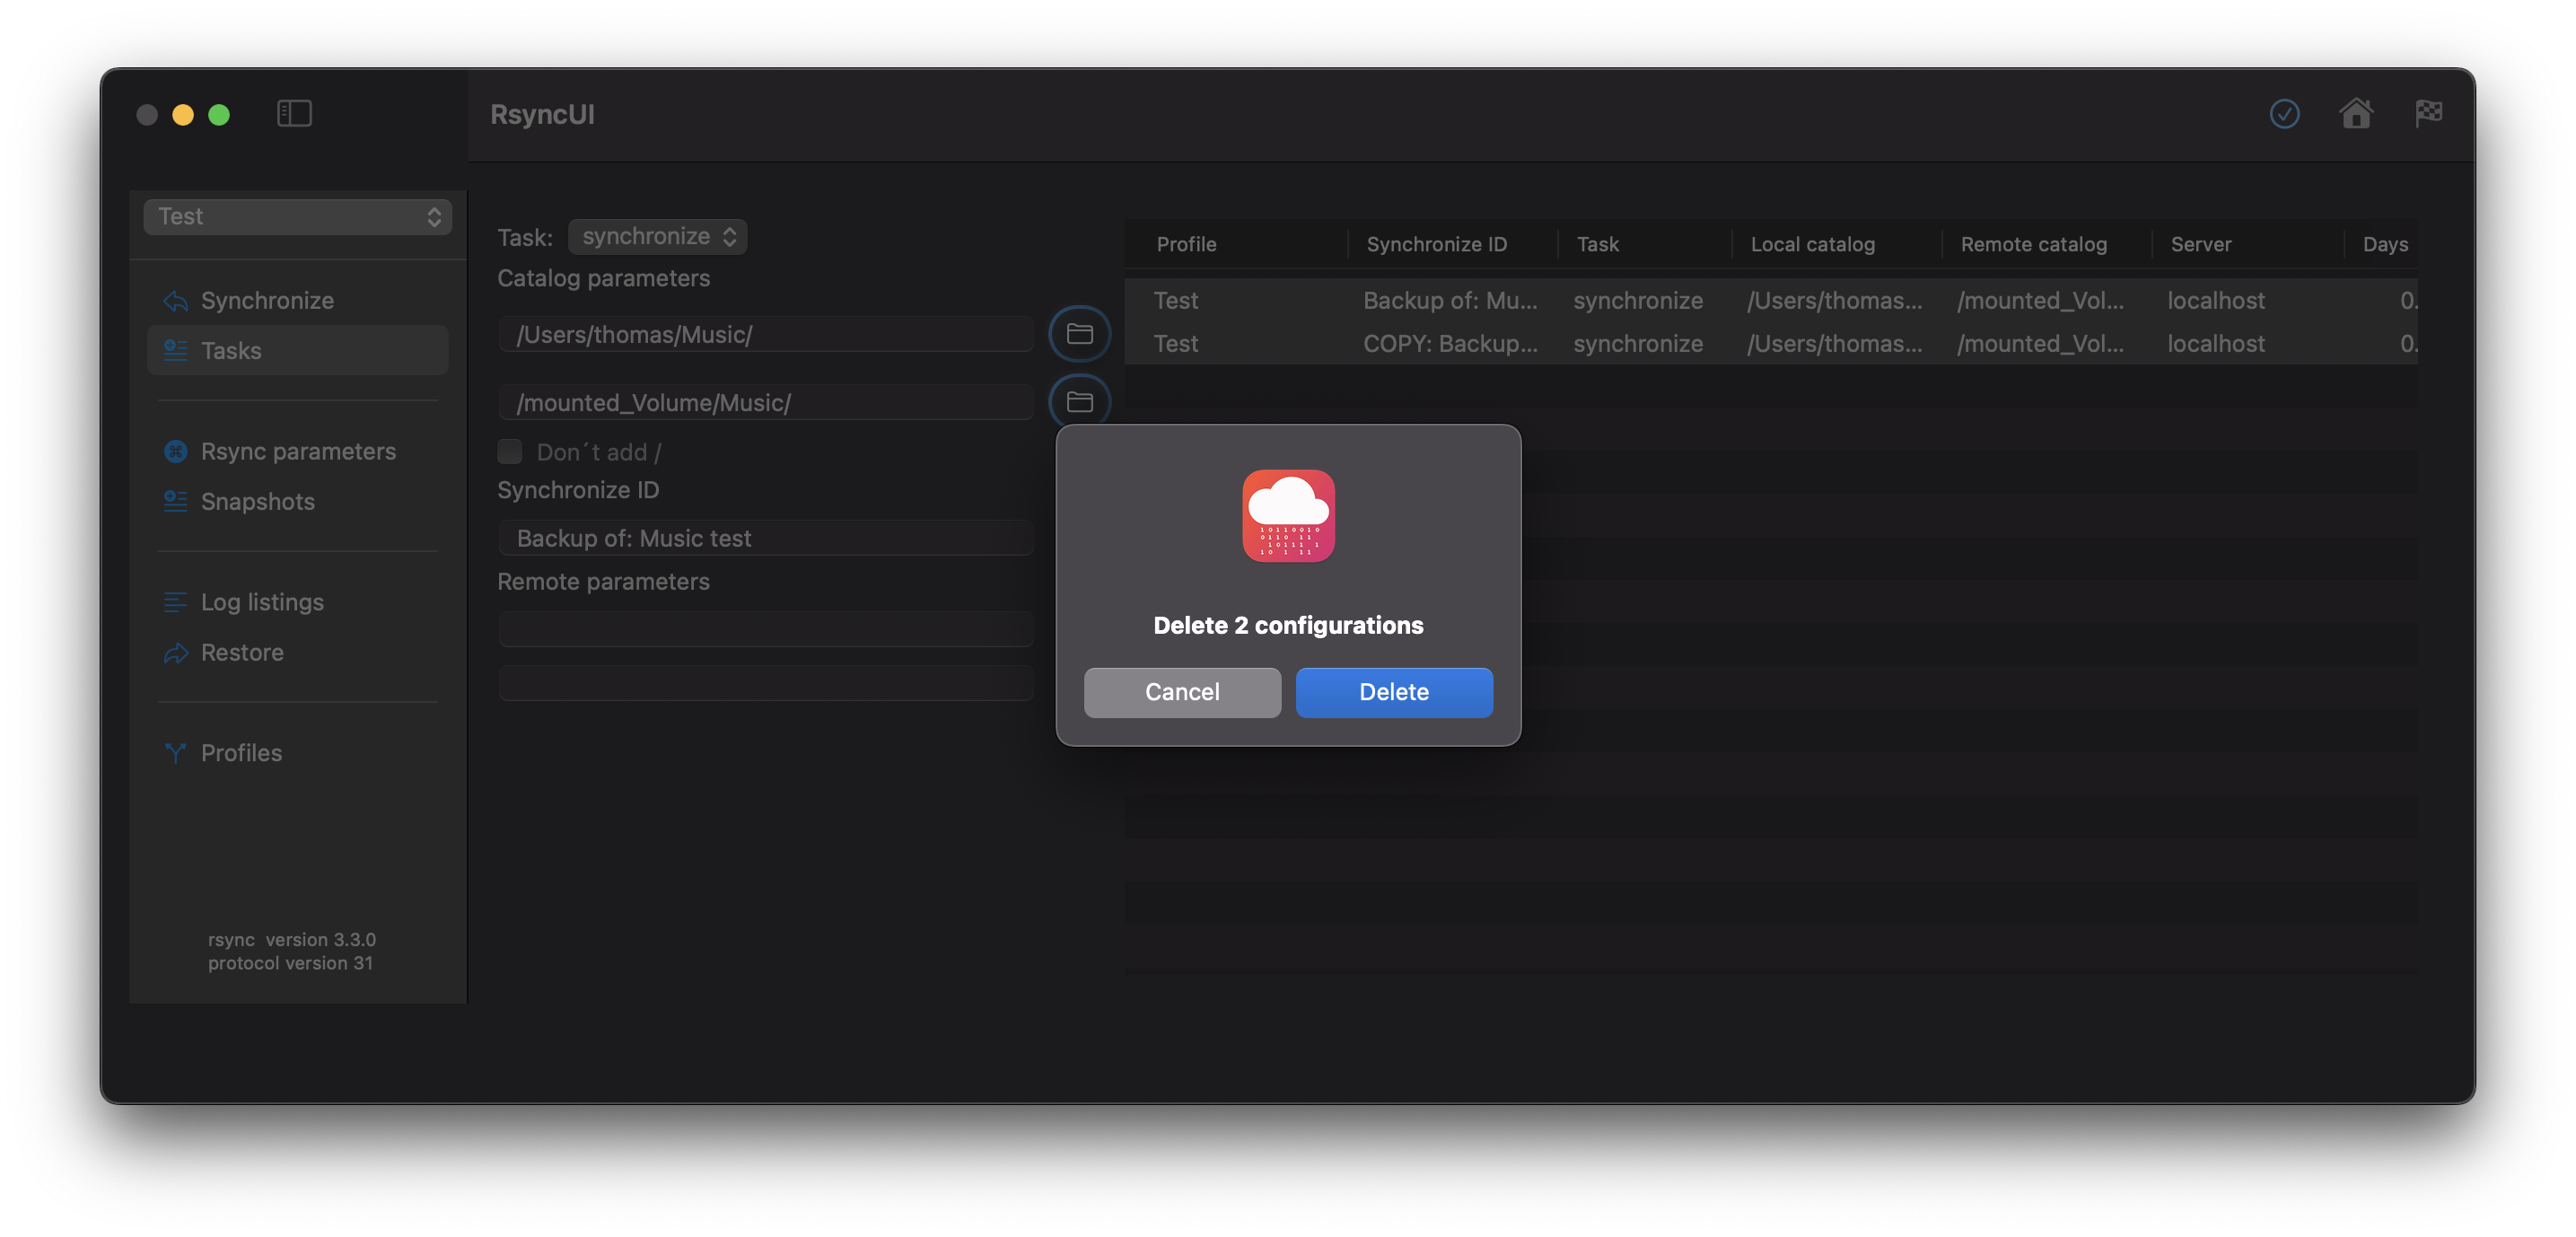
Delete Tasks
Select the tasks you wish to delete and delete them from the Edit menu or by pressing the backspace button.
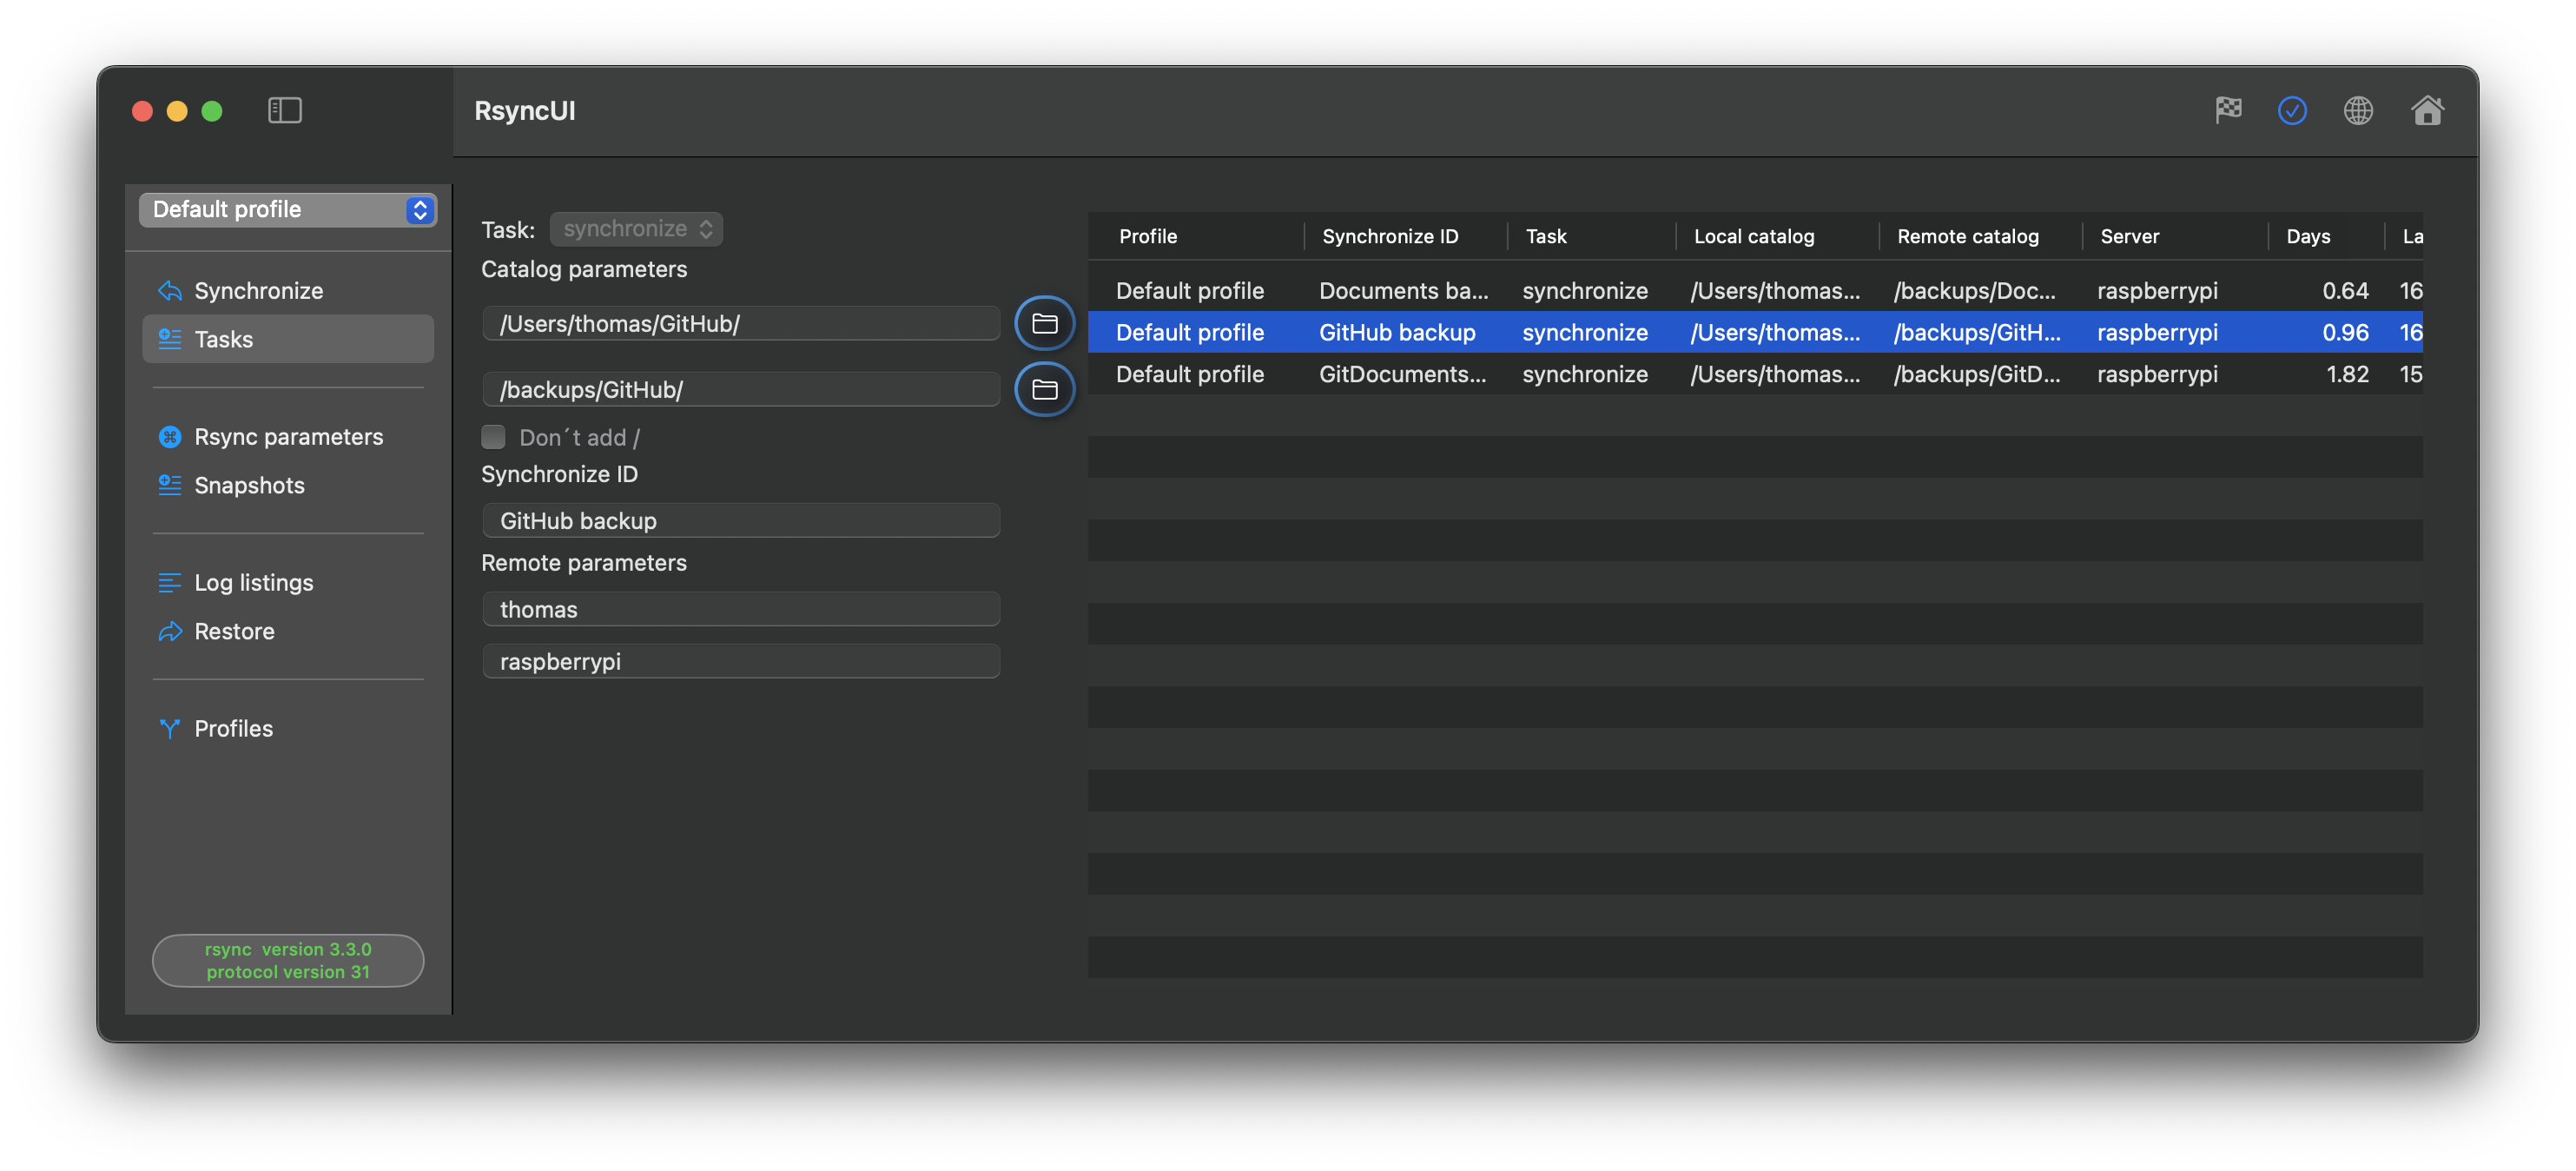
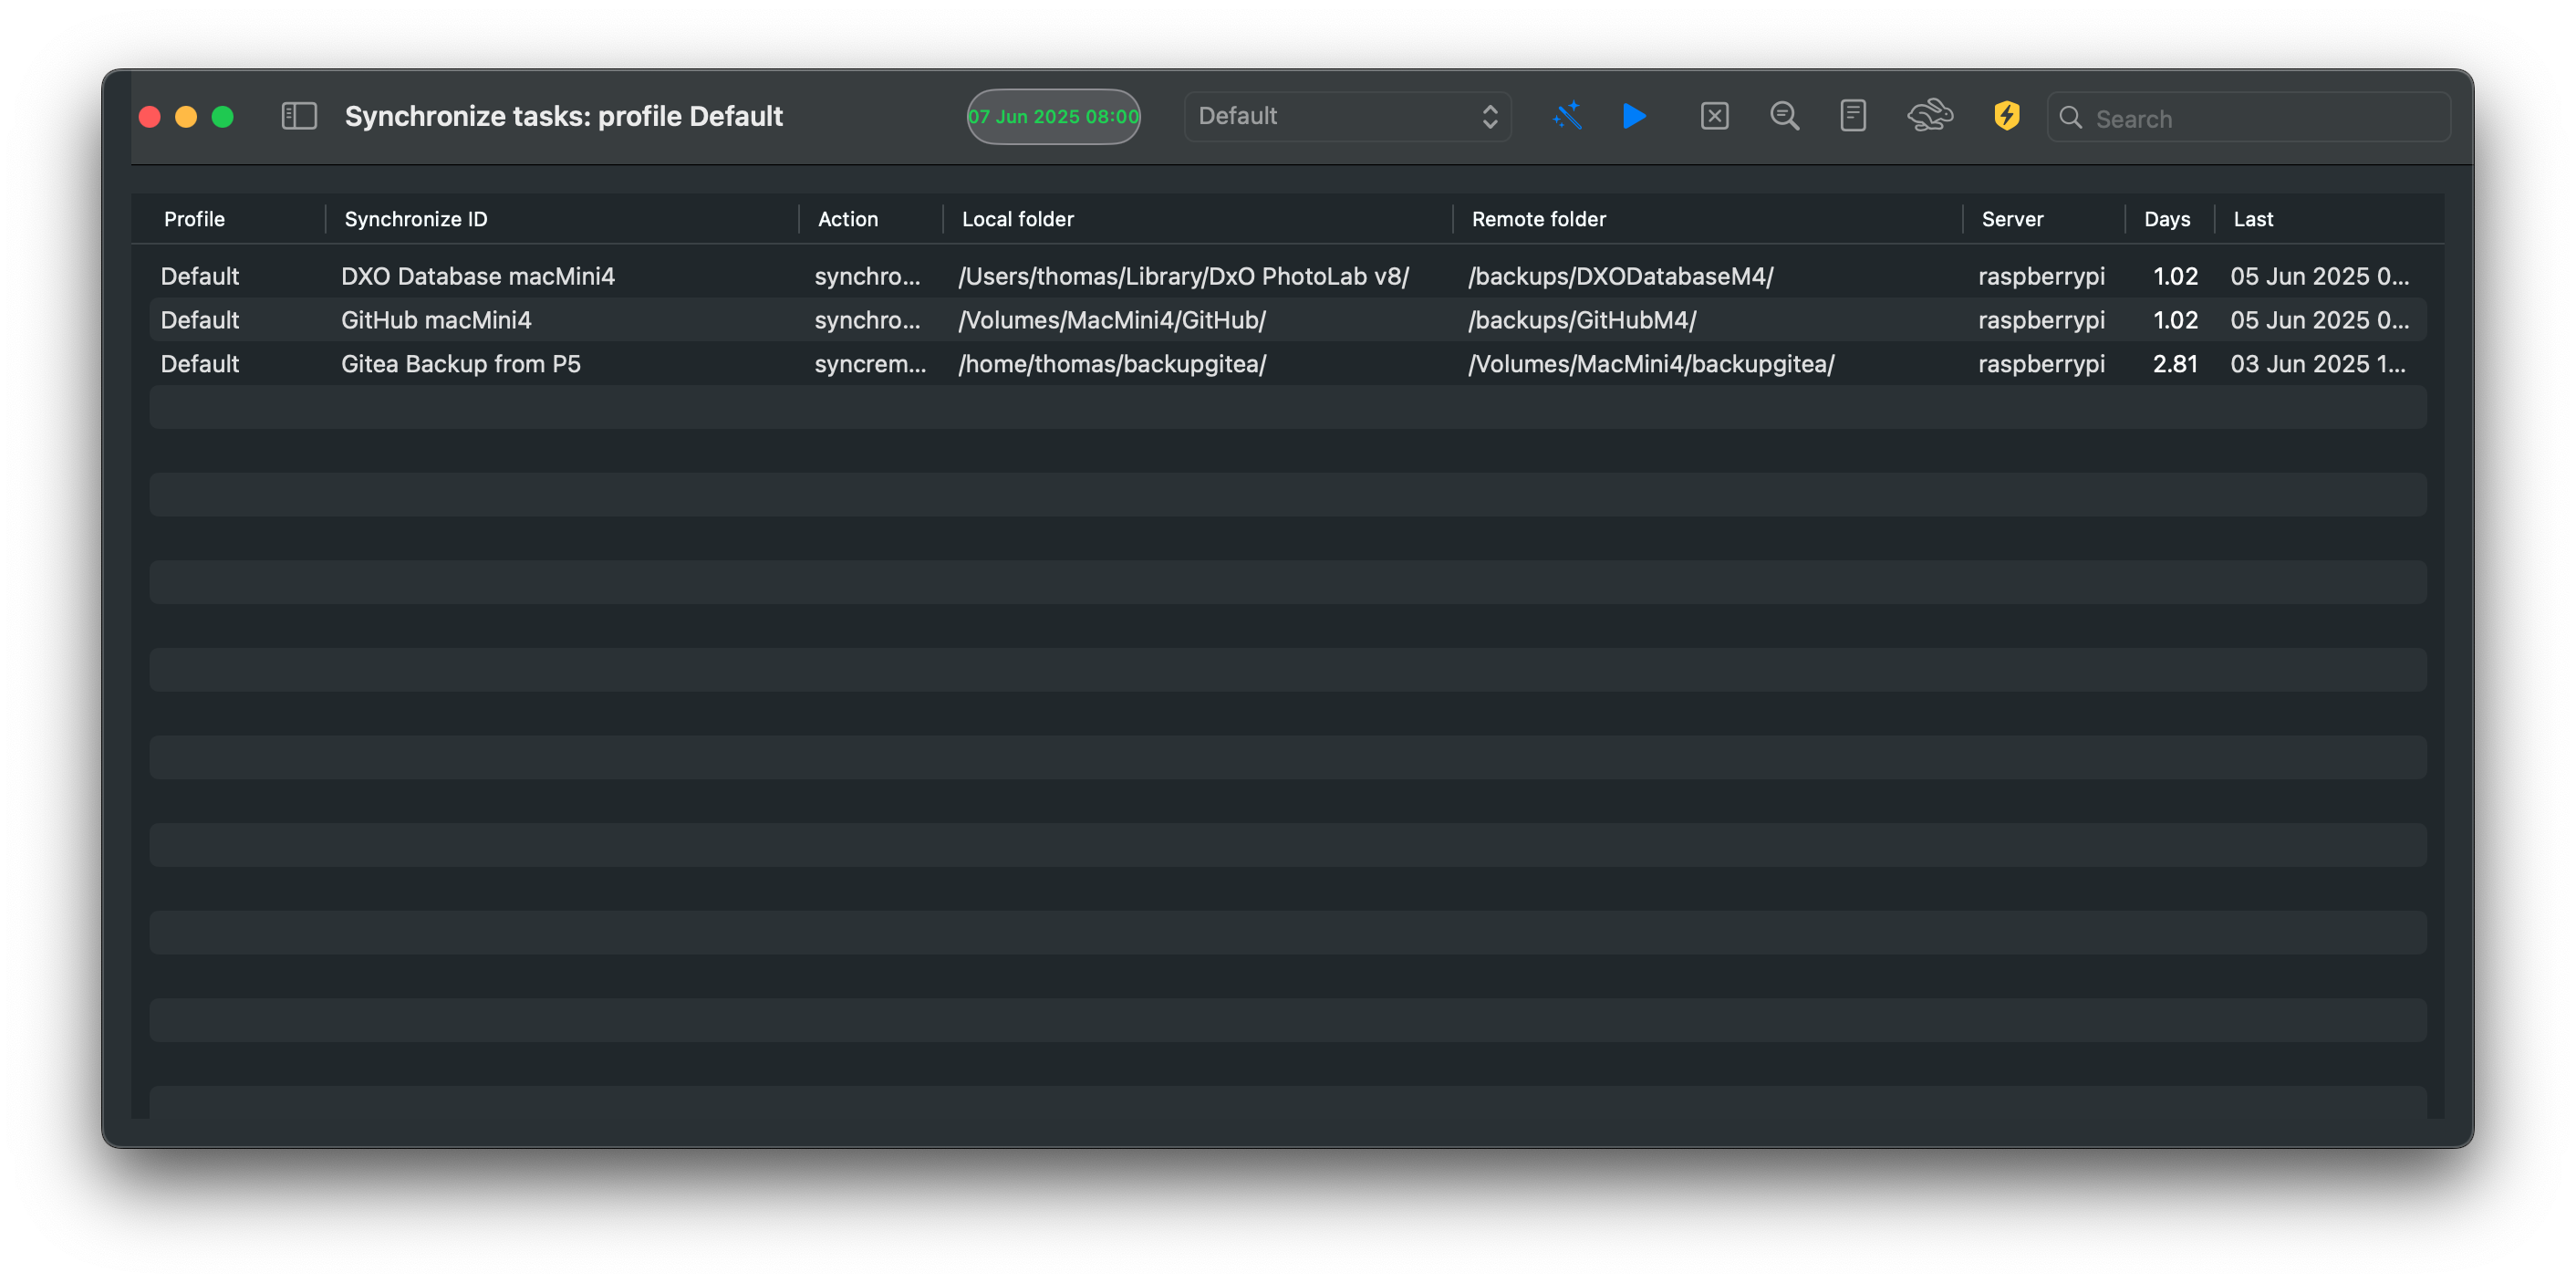
Data about Tasks
The following data pertains to tasks:
Action
synchronize: default action for synchronize data from a source to a destination
snapshot: saves changes and deletions prior to a synchronize operation
syncremote: synchronize data from a remote source to a local folder
when adding a syncremote action, add the local folder first and the remote folder as second, RsyncUI will do the flip
Folder Parameters
Local folder: required field, the source
Remote folder: required field, the destination
Trailing /
Dont´t add /: by default a trailing / is added to both source and destination
Synchronize ID
Synchronize ID: Informal tag for the task.
Remote Parameters
Remote username: Username for login to the remote server.
Remote server: Either server name or IP address for the remote server.
Copy and Paste Tasks
Shortcuts for copy and paste are ⌘C and ⌘V, or from the Edit menu. The copy and paste operation creates a copy of the selected tasks and marks them with the “copy” status. The copied tasks retain all parameters.
4.1 - Update tasks
To update a task, select the task. Press the update button to write updates to storage.
Global Changes
Global Changes, choose the Global icon on toolbar, applies to either all or selected tasks. Global changes, either partial or complete string modifications, can be applied to all tasks simultaneously. While updating tasks individually may be feasible, this method is more effective for modifying all tasks in one go.
Directories
Selecting the “Home” icon displays all directories from your “$Home” directory. If a local disk is attached, the mounted volumes are also presented. Select the home directory and the mounted volume. Return to the main Task view, and RsyncUI will suggest some values.
5 - Synchronize data
The Synchronize view enables the execution of either all or selected tasks in a single operation, either by shortcut actions or by functions on the toolbar.
Or, for a single task, a double click on one task initiates a –dry-run, an estimate run, and the subsequent double click executes the actual run for that task.
Shortcut actions within the Synchronize view:
estimate: ⌘E estimates all or selected tasks
synchronize: ⌘R synchronizes all or selected tasks without estimation
no progress bar during synchronization, progress bar requiere estimation first
abort: ⌘K aborts and halts any ongoing task
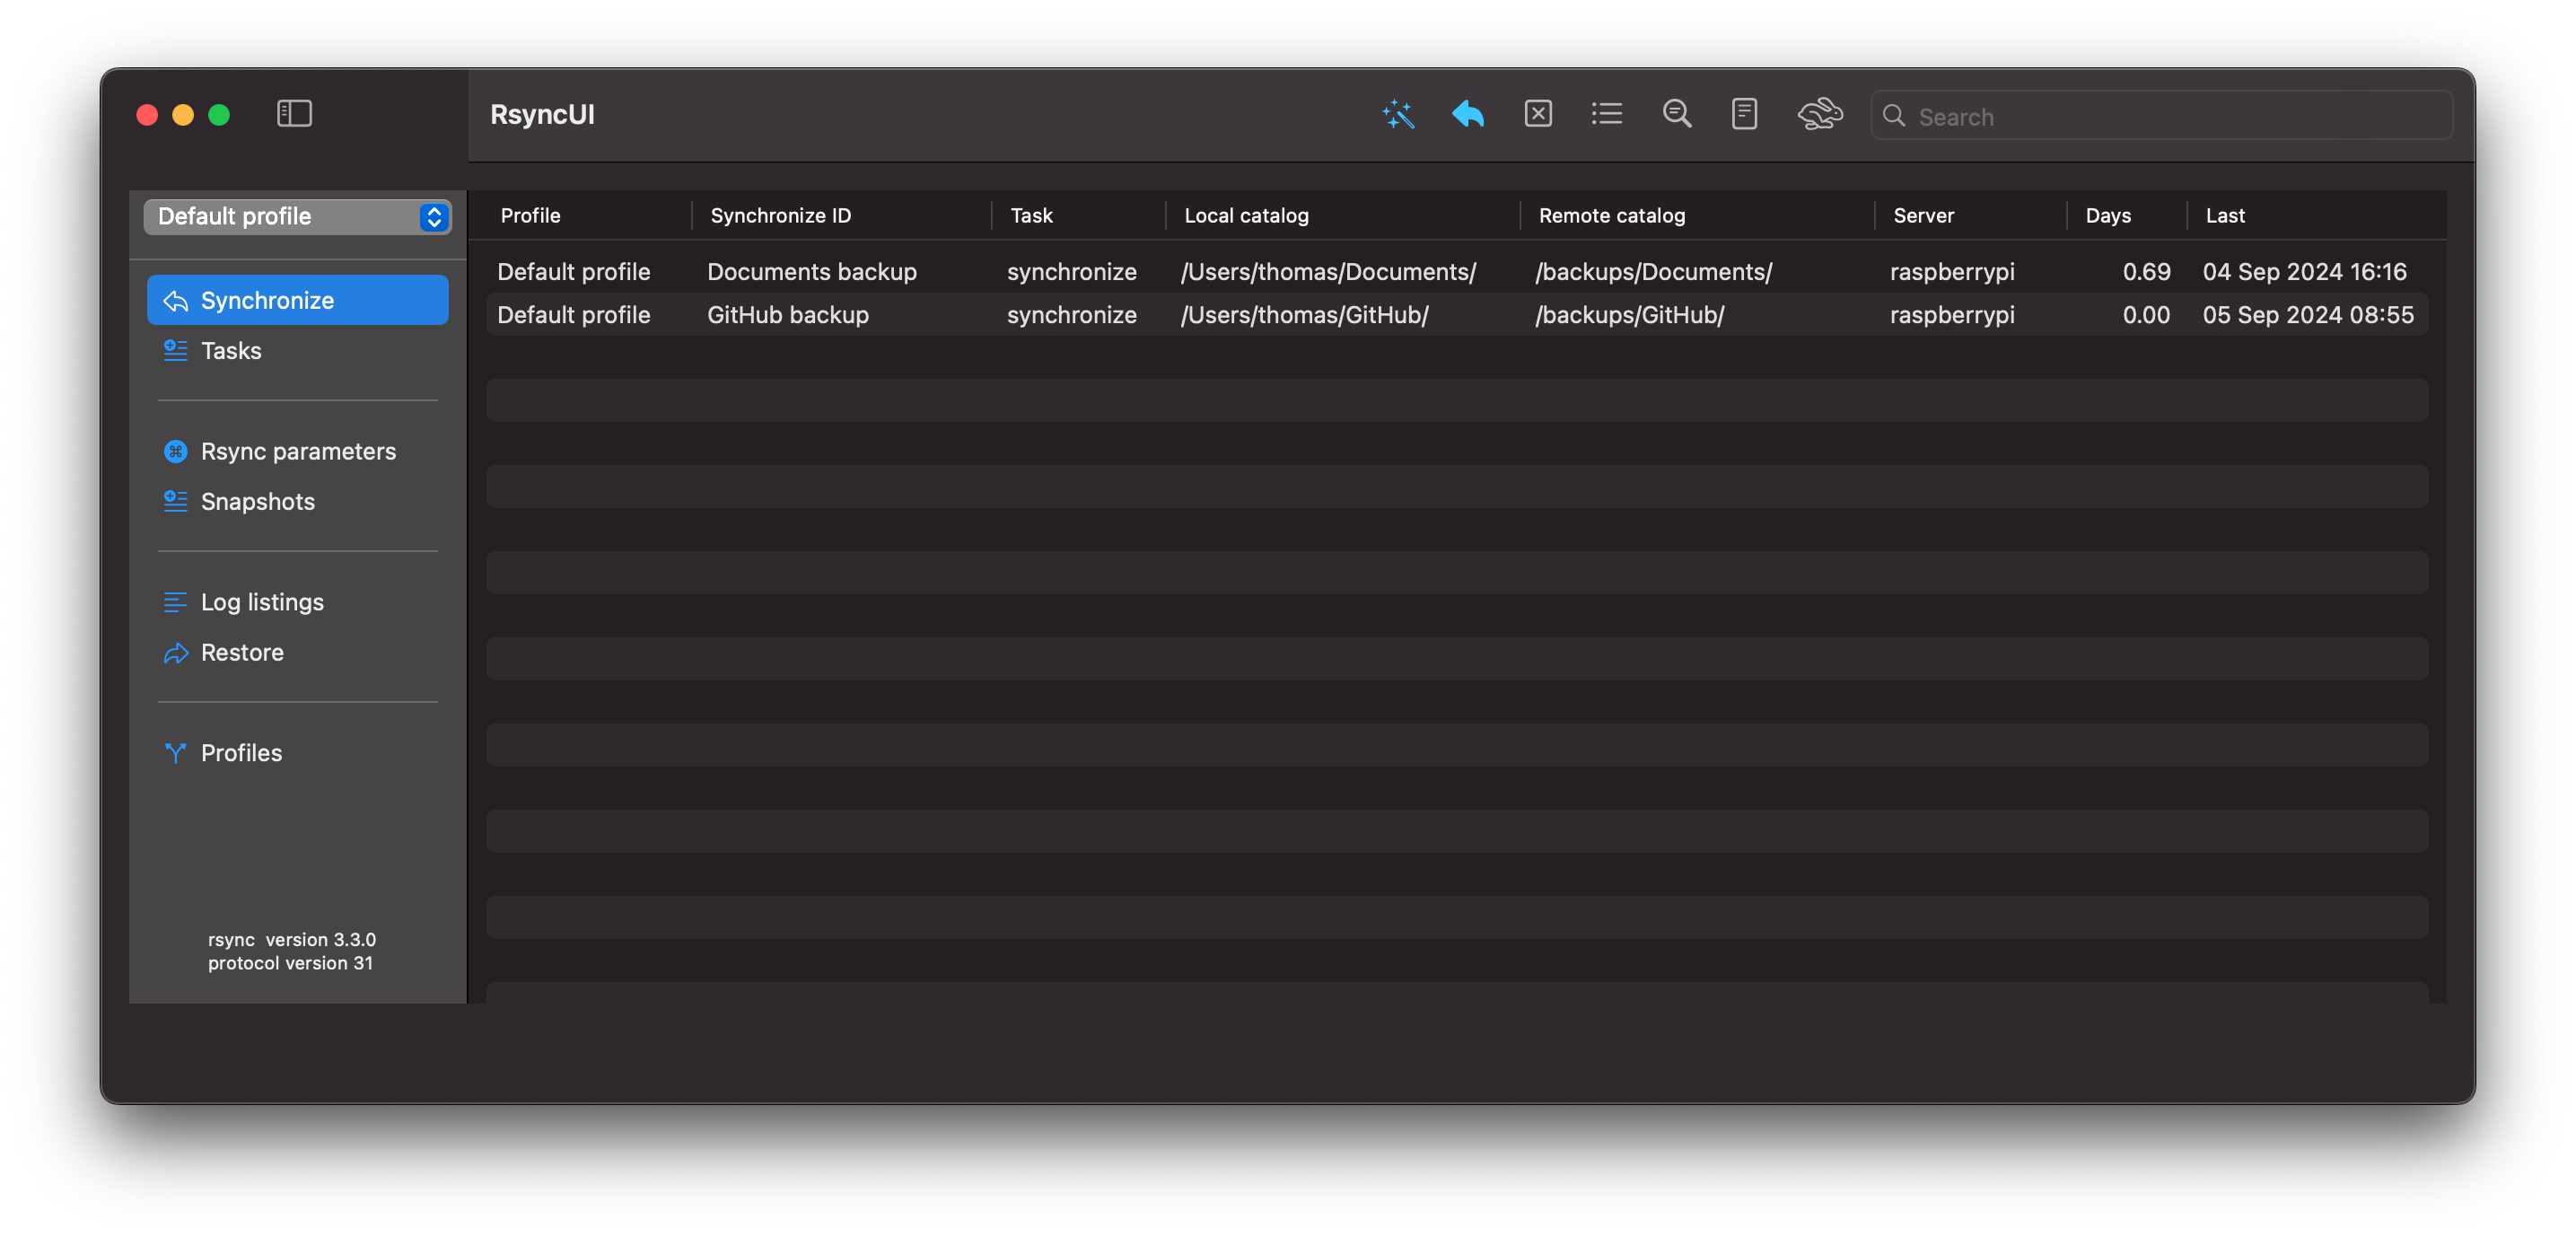
Upon launching RsyncUI, it automatically opens the Synchronize view. Selecting the wand and stars (shortcut ⌘E) from the toolbar initiates estimation of all tasks.
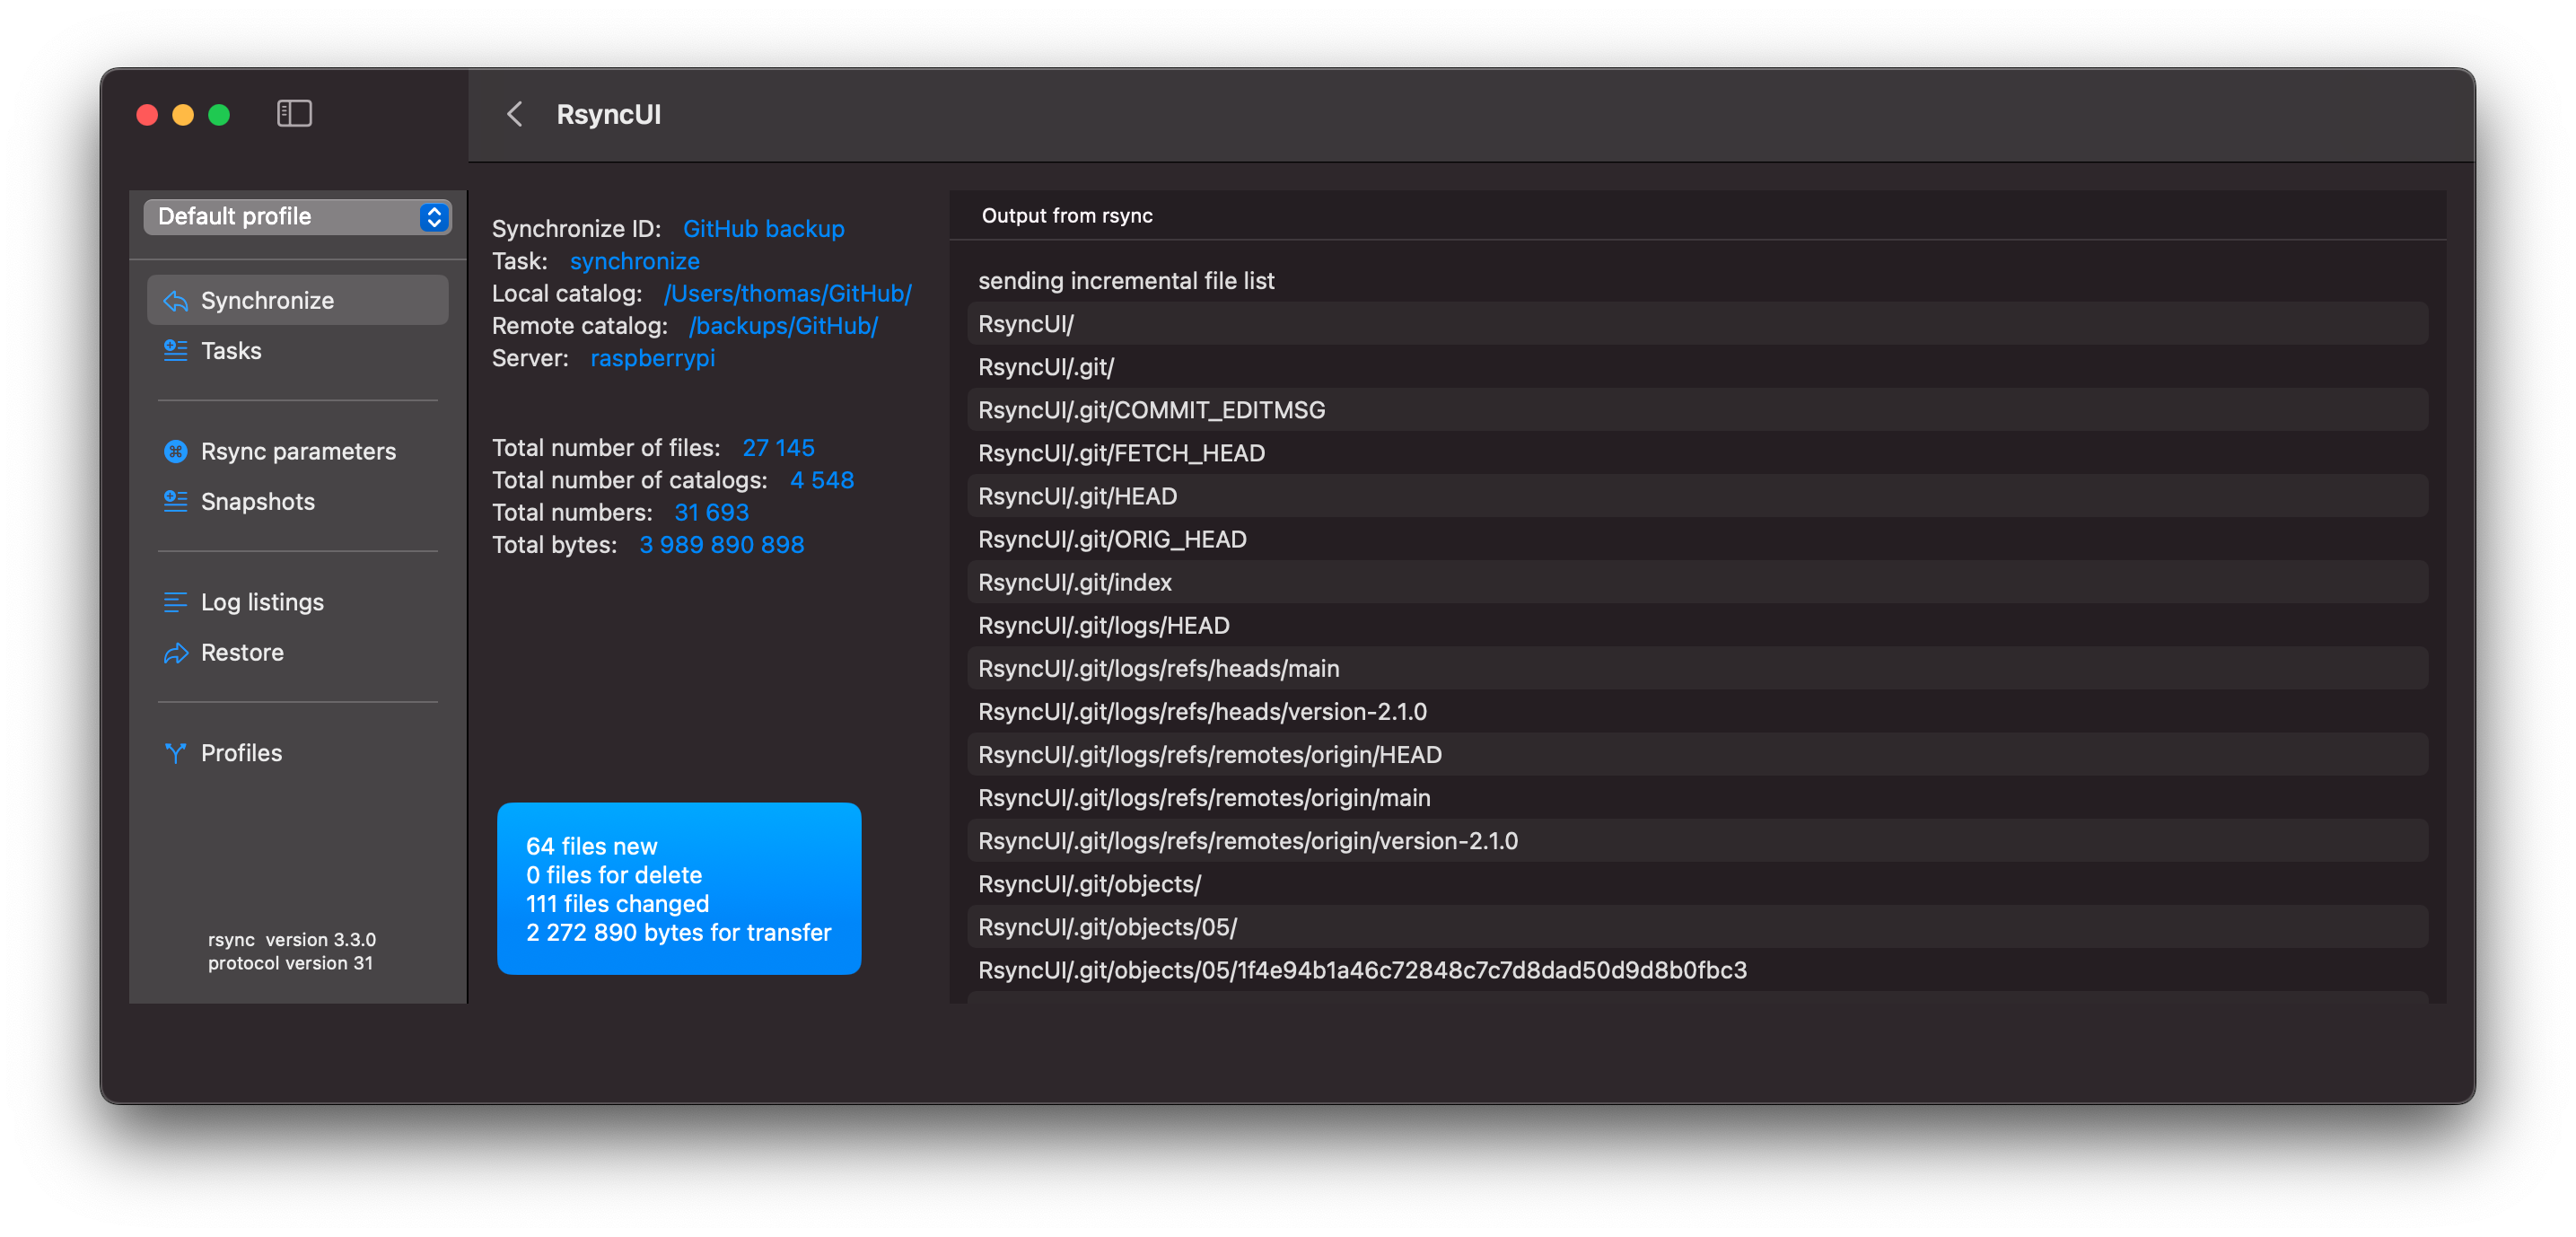
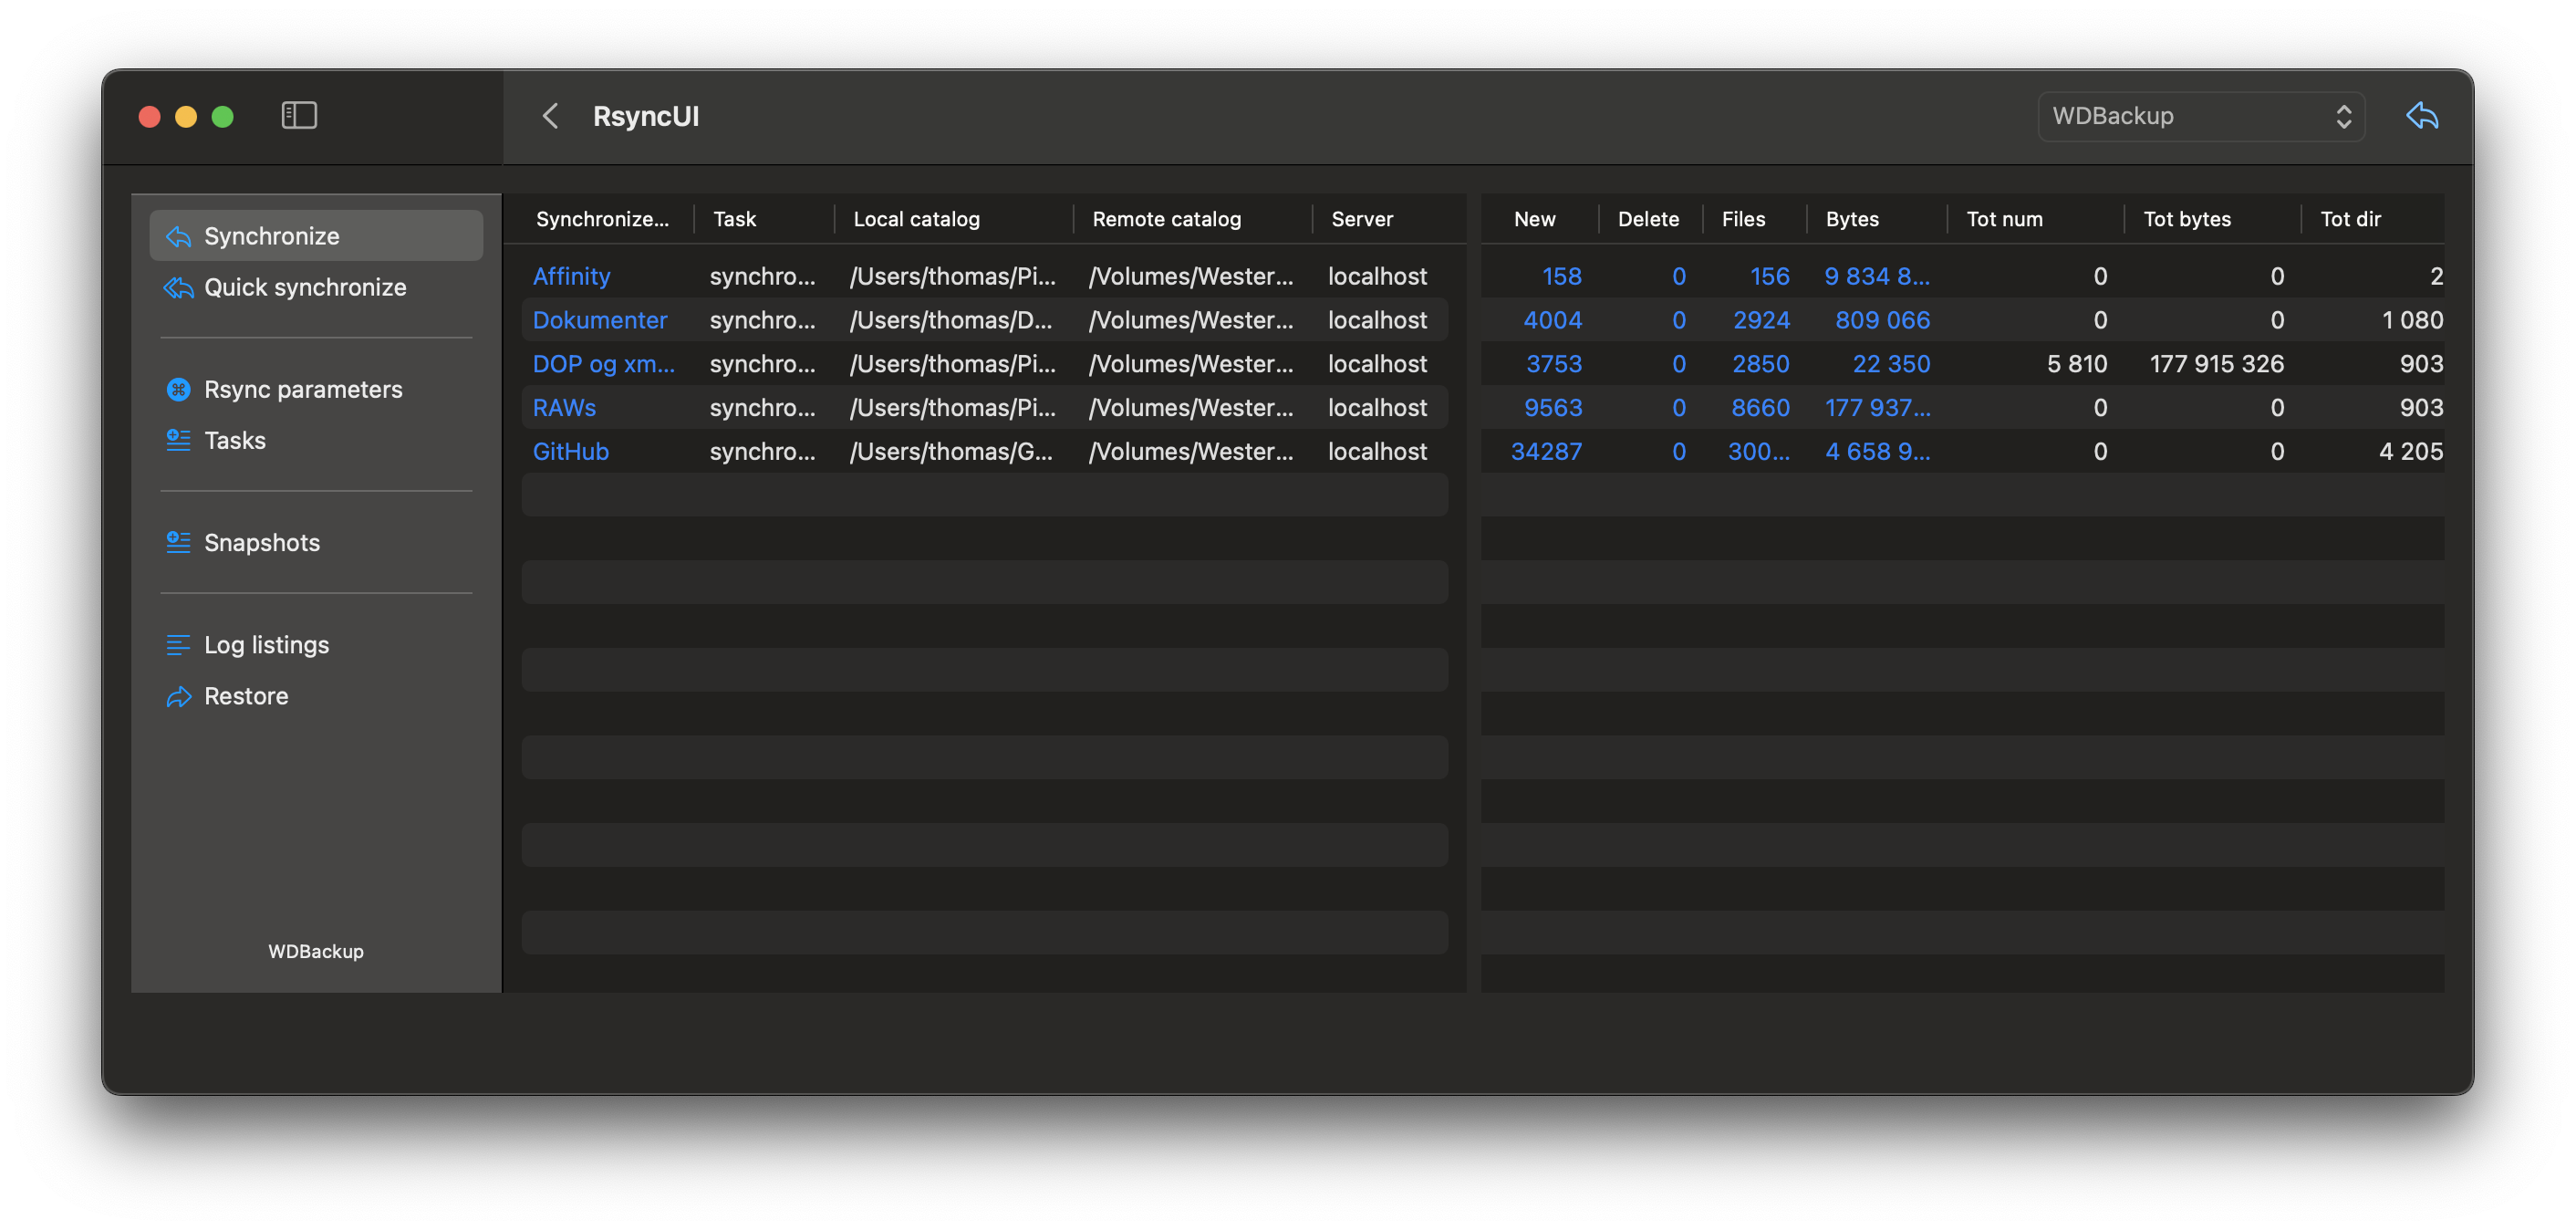
The outcome of an estimate is displayed, with blue numbers indicating data that requires synchronization. To execute the actual synchronize tasks, directly from the summarized estimated view, by pressing the left arrow (shortcut ⌘R) on the toolbar.
By selecting a row within the estimated view, you will be presented with the detailed information.
After execution, logs are updated.
6 - RsyncUI settings
There are several settings that can be adjusted. After changing a setting, you have to save the changes to keep it next time you use RsyncUI. Users can access their settings by default using the shortcut ⌘,.
Rsync and Path: - Settings for rsync and path
Monitor and Log: - Settings for monitoring and logging
SSH: - Settings for SSH
Environment: - Setting environment variables for SSH. There are several variables that can be set, but RsyncUI only supports one environment variable.
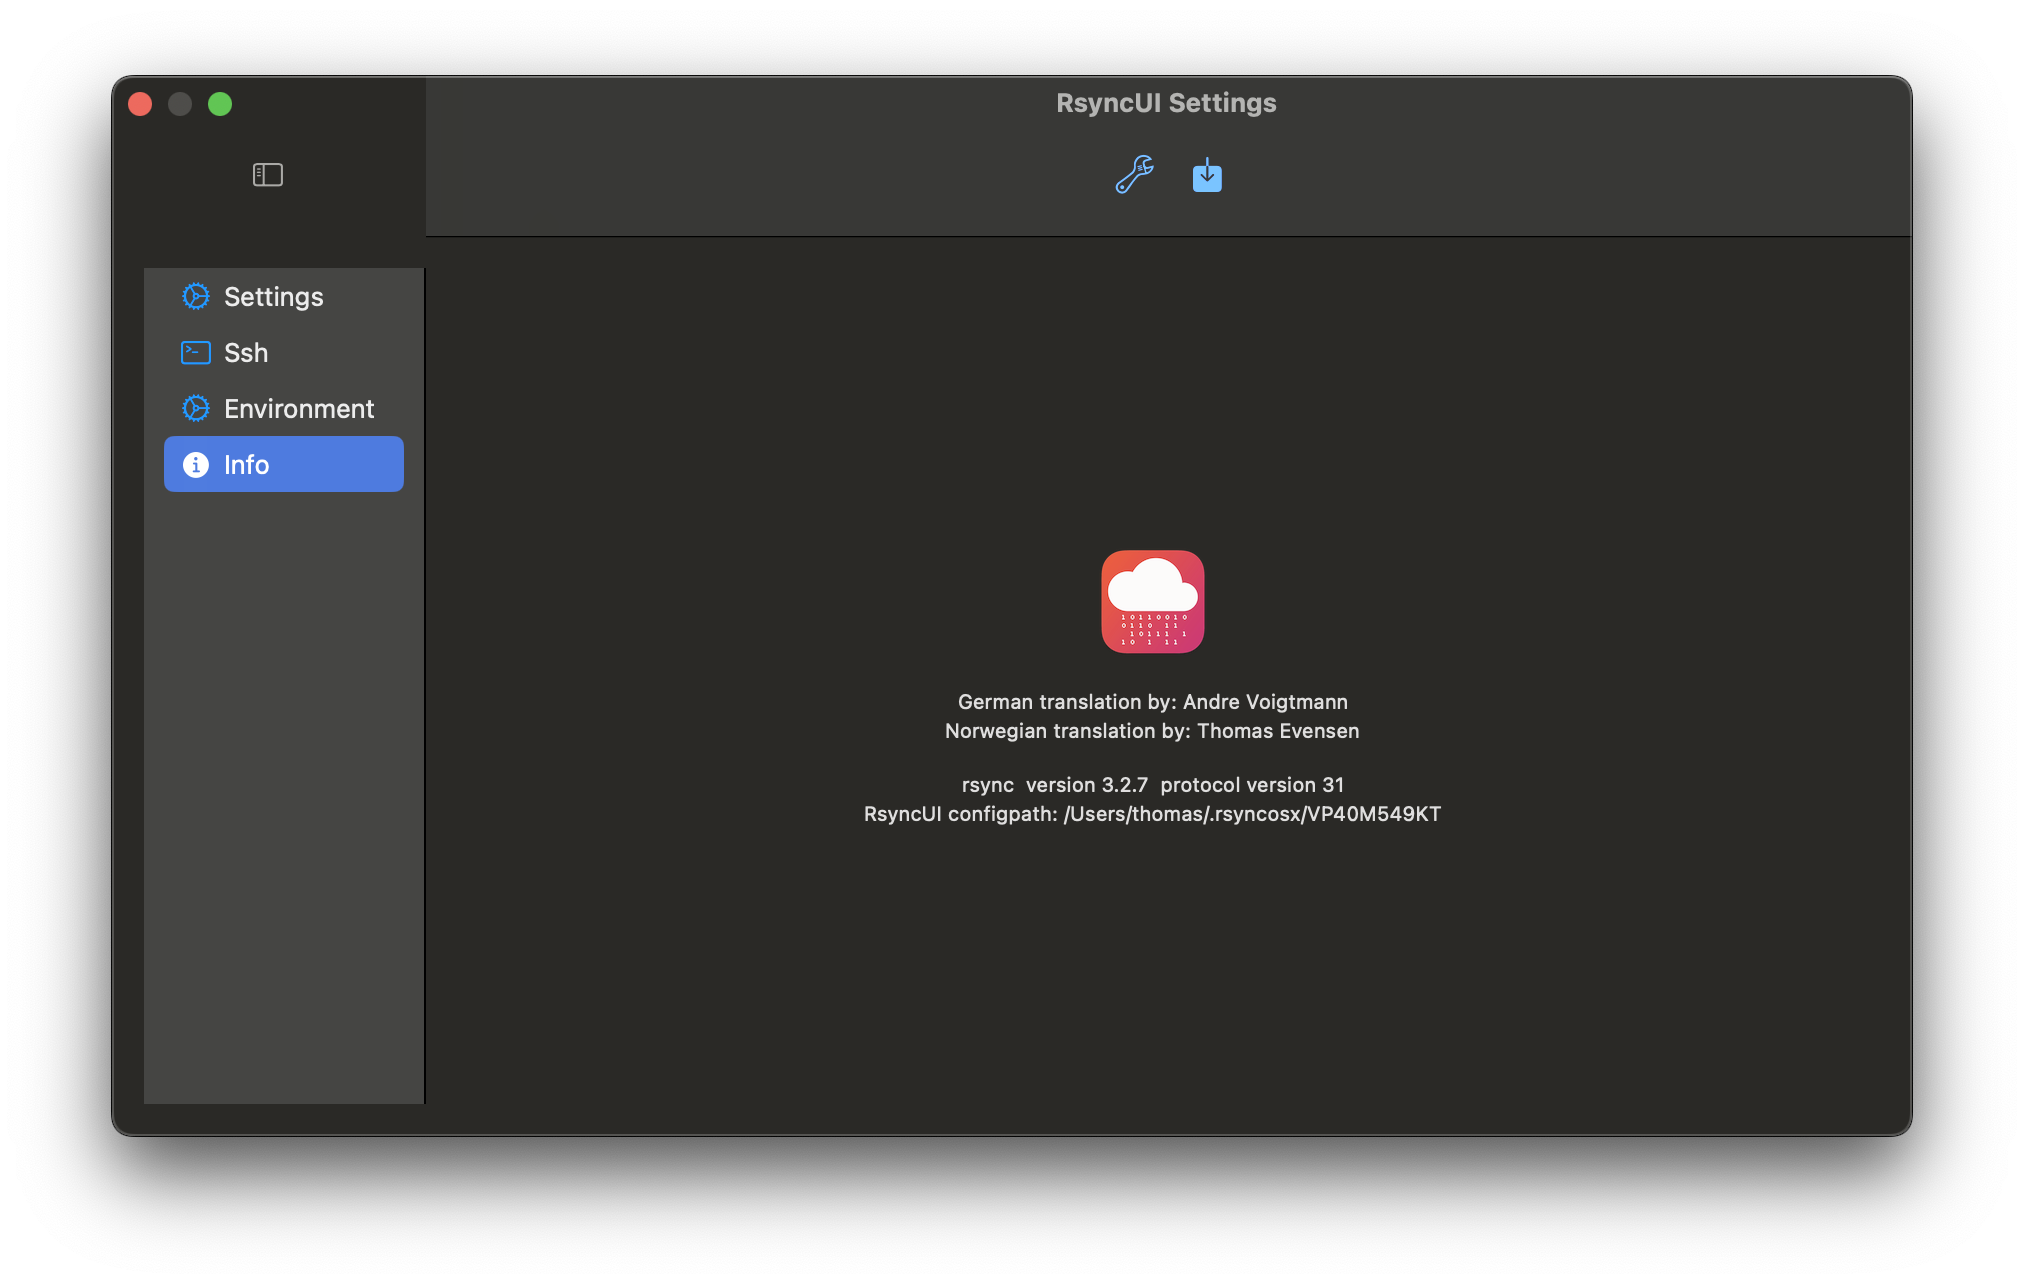
The “Info” section displays the version of rsync in use and the path for storing and retrieving configurations to the permanent storage location.
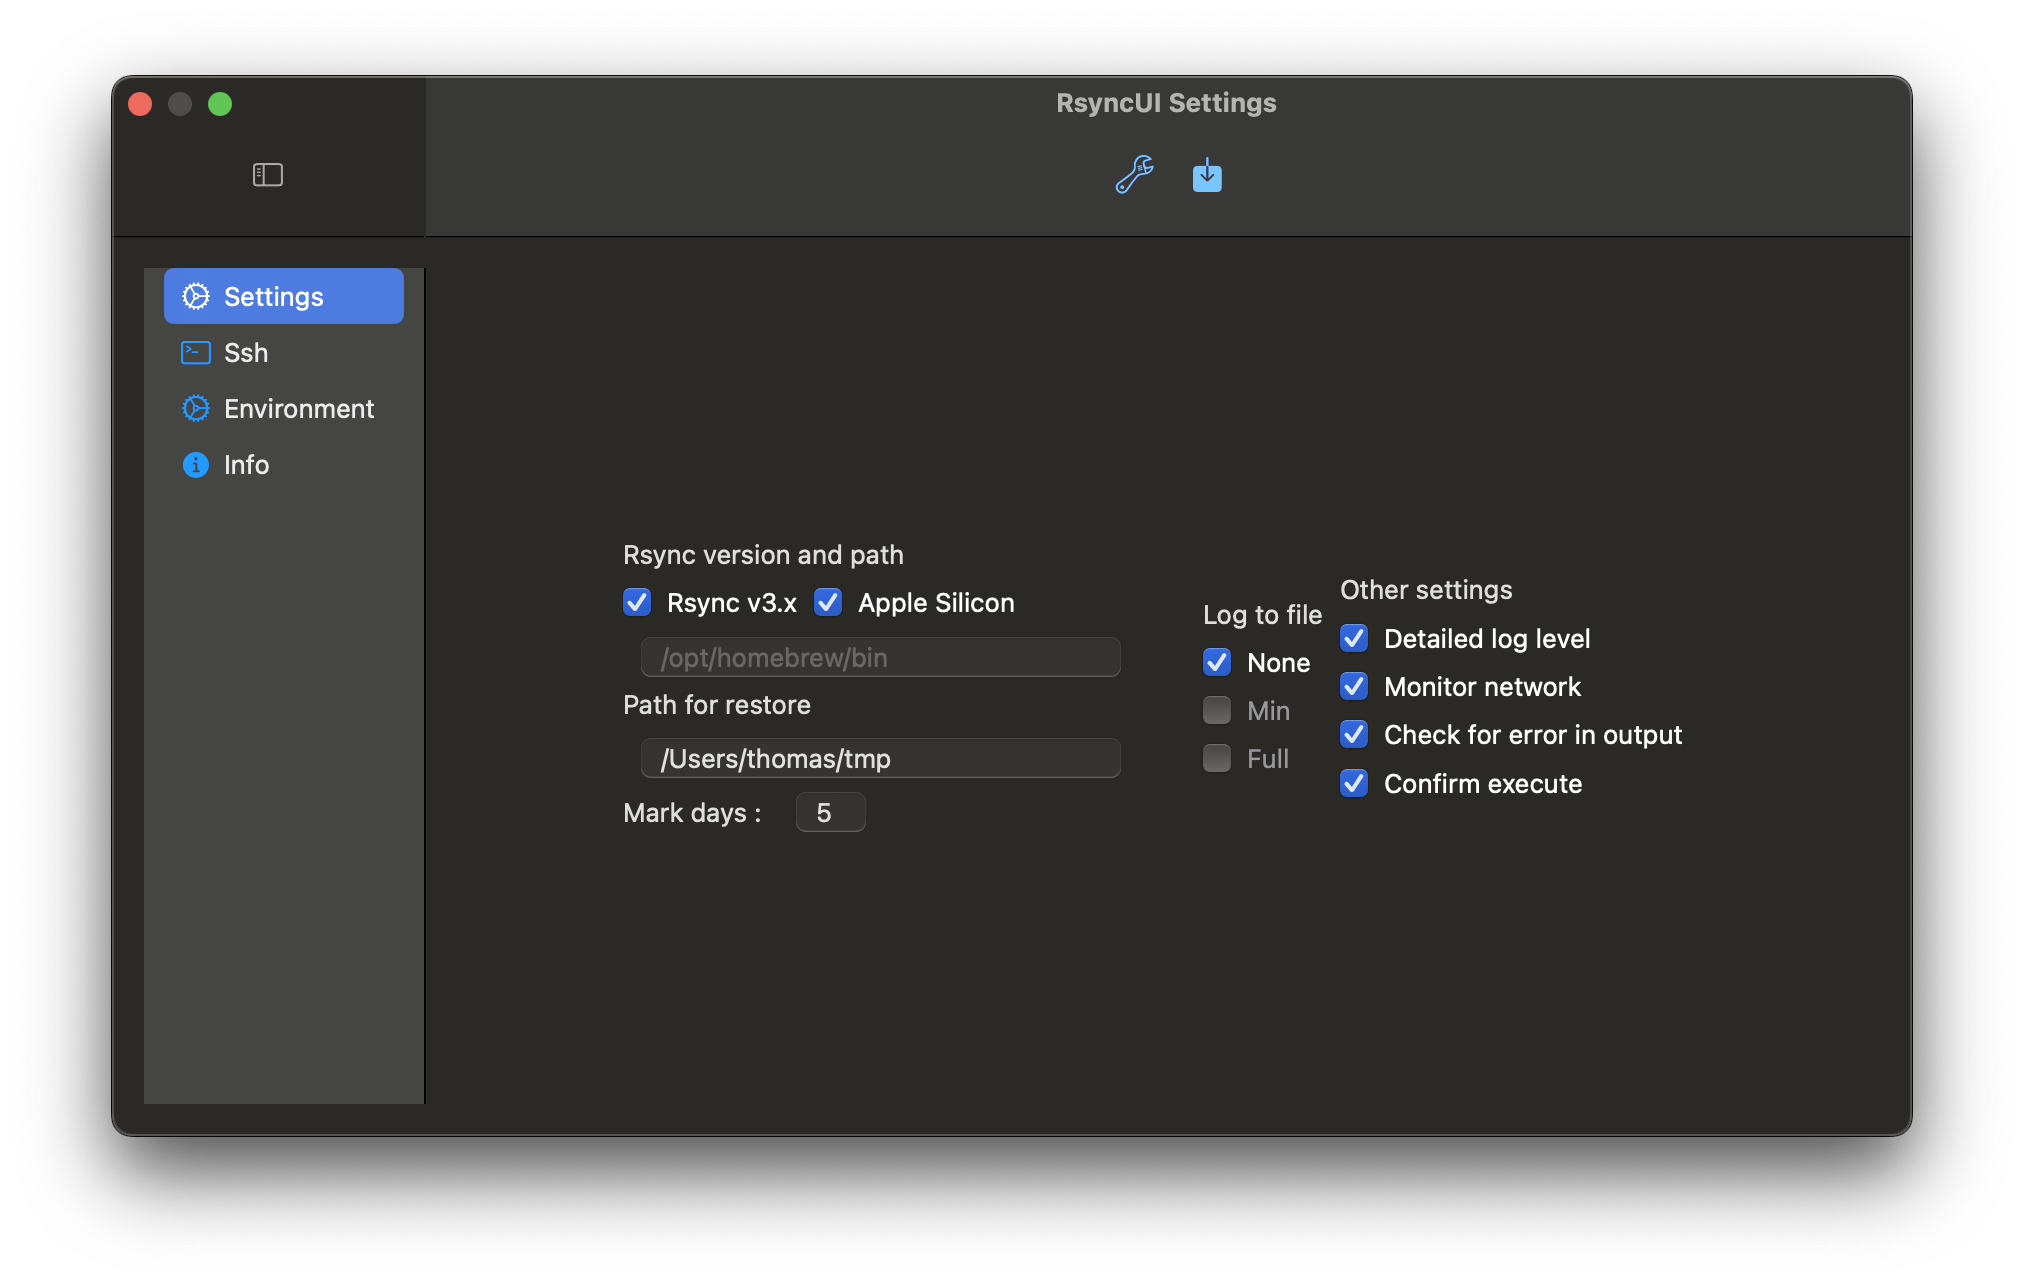
6.1 - Rsync and path
After changing a setting, you have to save the changes to keep it next time you use RsyncUI.
Version rsync
It is recommended to install the latest version of rsync using Homebrew. RsyncUI will determine the type of Mac you are using. The default path for Homebrew is:
Intel-based Mac: /usr/local/bin
Apple Silicon: /opt/homebrew/bin
Path rsync
If rsync is installed by Homebrew, the path is set to the default value or rsync if it is part of your macOS. The snapshot feature
requires version 3.2.x of rsync.
If the version of rsync is not installed by Homebrew, set the path to rsync.
If Rsync v3.x is enabled, set the optional path if not installed by Homebrew.
Any version of rsync will work, but only versions 2.6.9 and the latest release of version 3.2.x have been tested and verified.
Path for restore
Preset temporary path for restoring single files and directory
Preset temporary path for a full restore
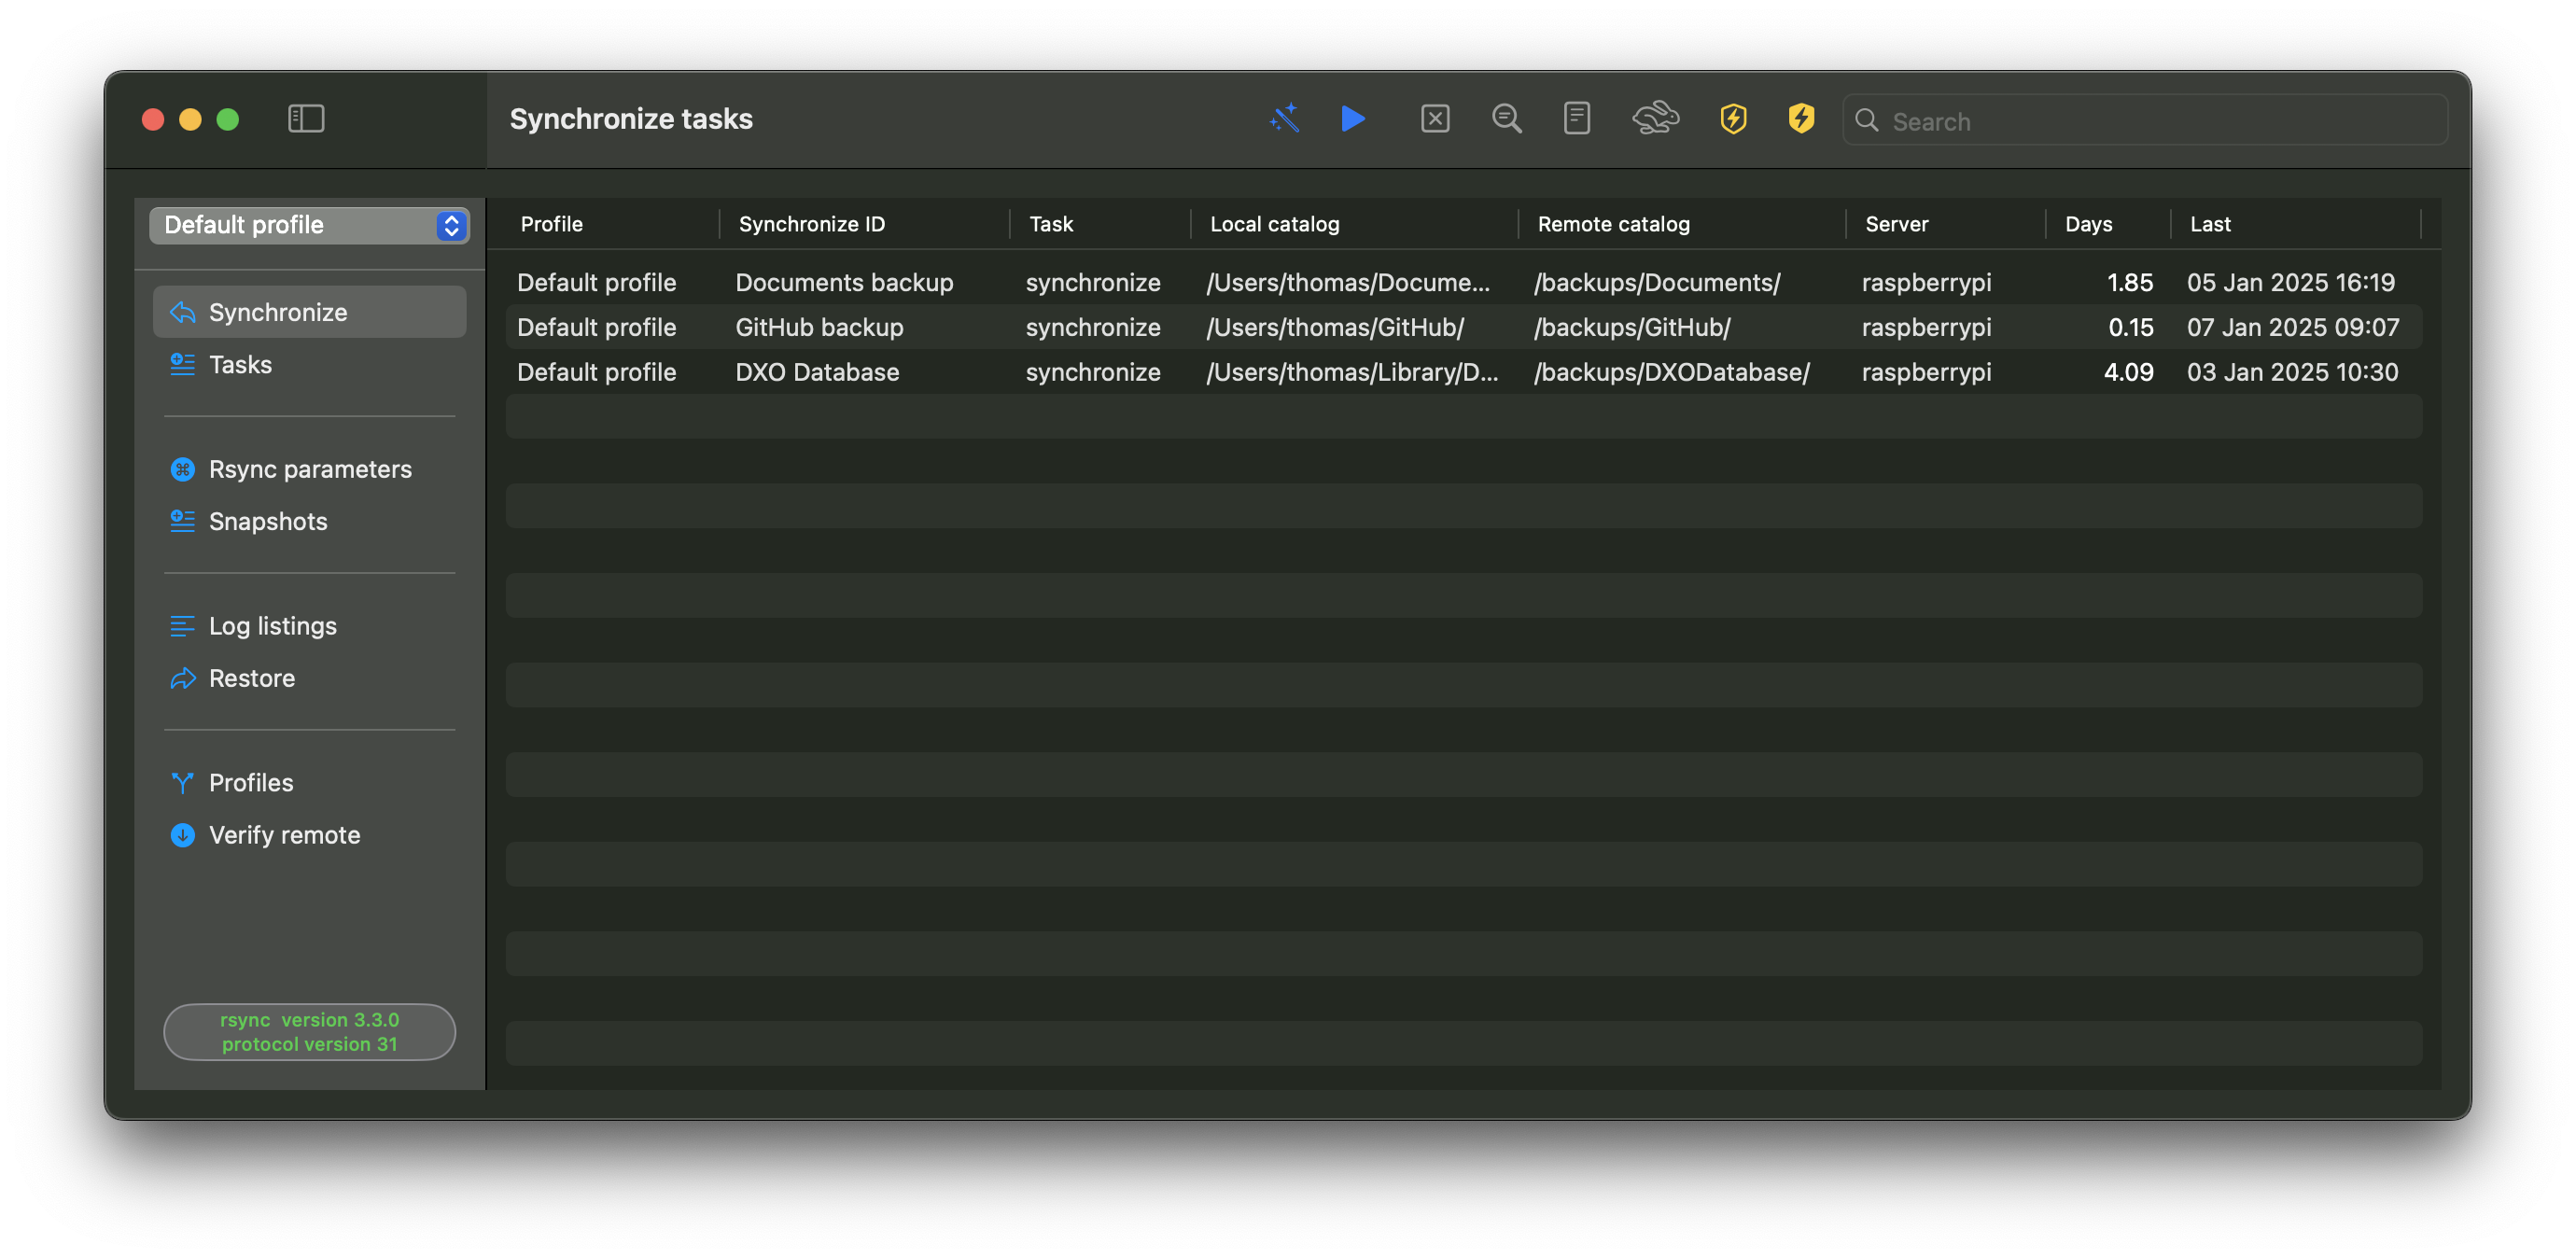
Mark days after
Tasks with an execution date older than the number of days are marked red.
Backup configurations
You can backup the current setup, configurations, and logs, including all profiles, at any time by clicking the wrench button.
The backup executes a copy to your Documents directory and appends a timestamp -month-day-year/hour/minute to the copy.
The backups are located in your Documents directory: $HOME/Documents/RsyncUIcopy-05-06-2024/08/21
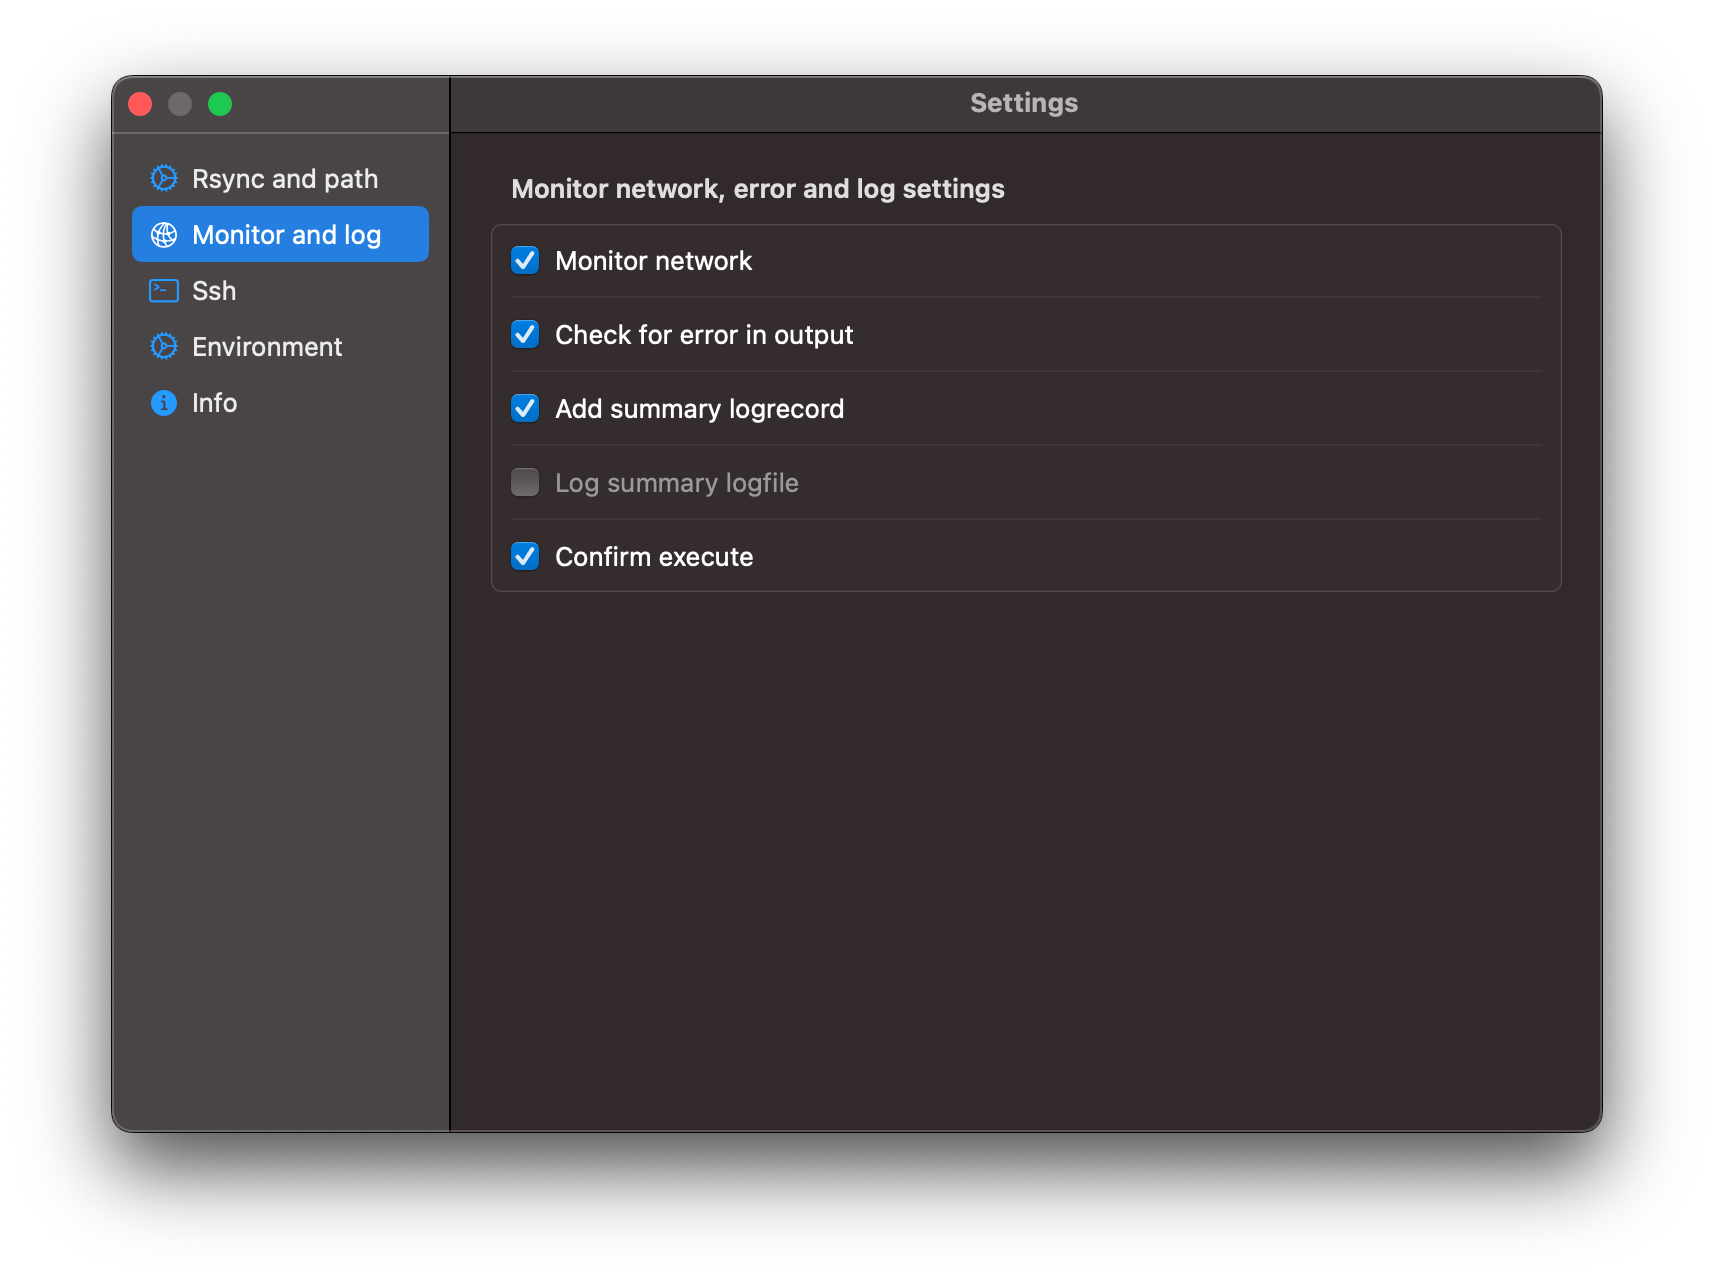
6.2 - Monitor and log
After changing a setting, you have to save the changes to keep it next time you use RsyncUI.
Monitor Network:
Monitor network connection during task execution.
If a network connection is dropped during execution, RsyncUI sends an interrupt signal to the task, halting it with an error.
Check for Errors in Output:
If the word “error” is discovered in the output from rsync, it is notified.
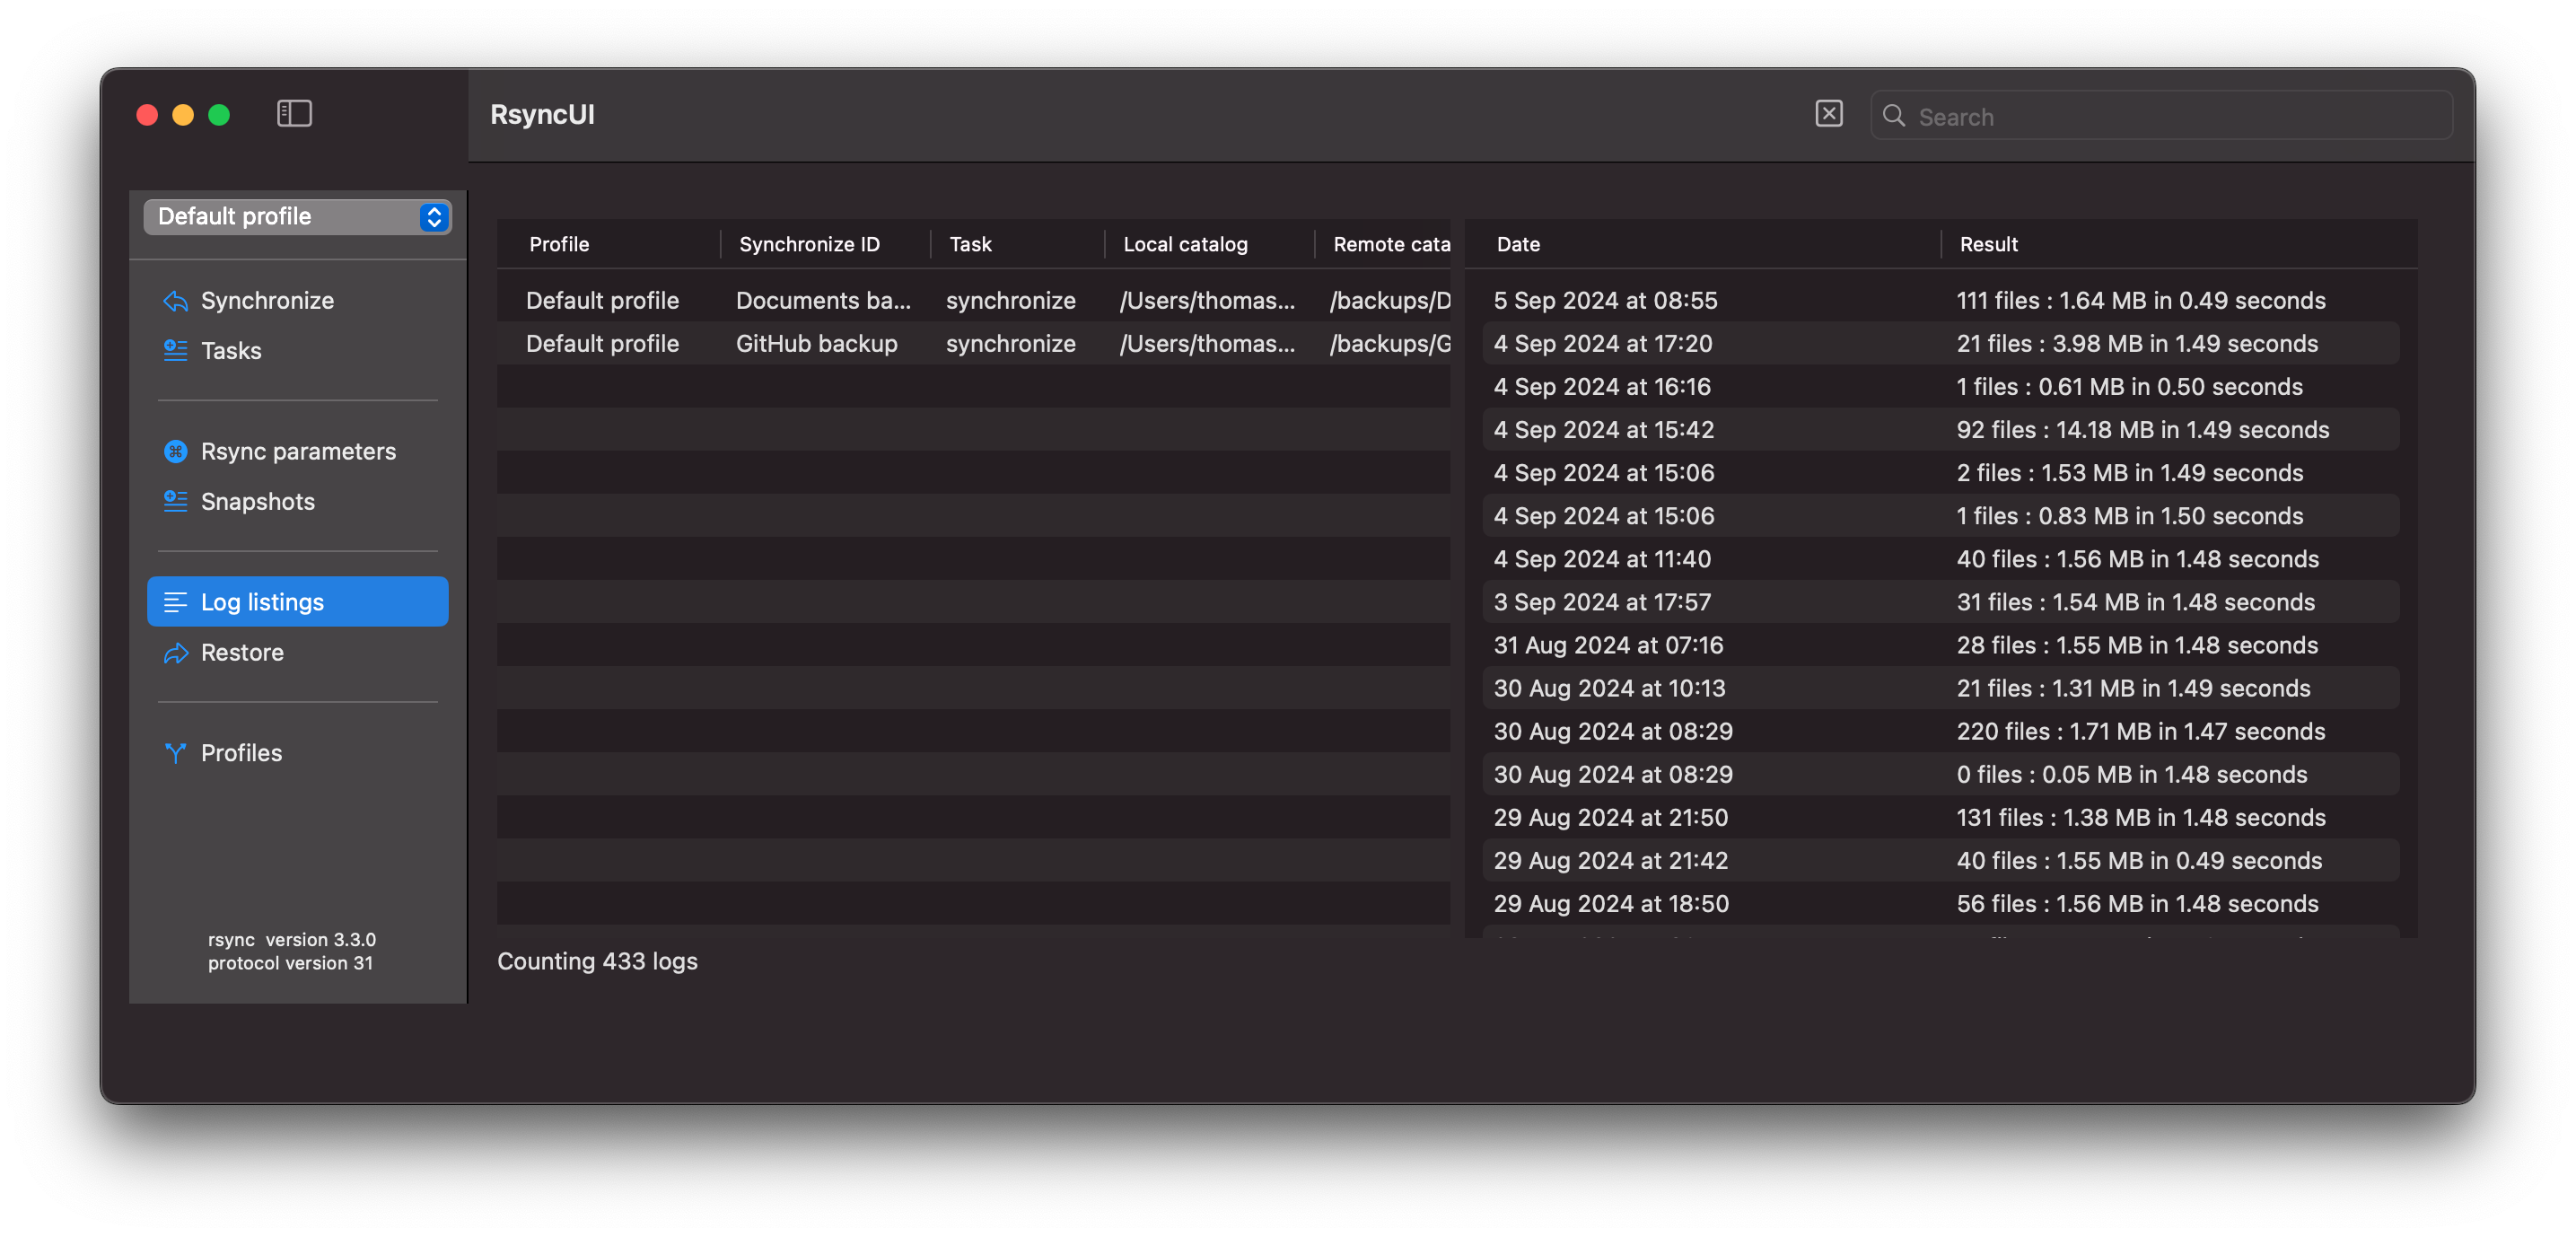
Add Summary Log Record:
By default, “on,” a summary of each synchronization is added to the log records. View “Log Listings” from the Sidebar.
No time delay Synchronize URL-actions
If “on”, the estimated tasks, by URL-action, will be Synchronized without any possibility to abort the action.
Hide the Sidebar on startup
the sidebar may be concealed, when on the sidebar will be hidden when RsyncUI start
Observe mounting of external drives
automatic selection of a profile when RsyncUI detects a new mount of a local attached disc
Always present the summarized estimate view
after an estimate, by selecting the Magic Wand on toolbar Synchronize task view, always present the summarized view
Hide Verify remote:
refer to section “Verify remote”, this is a kind of special function, default not enabled
Hide Schedule:
refer to section “Schedule”, hide the Schedule, default not enabled
Confirm Execution:
See below.
The log file is stored at $HOME/.rsyncosx/macserial/rsyncui.txt. The log file can be opened from the main view.
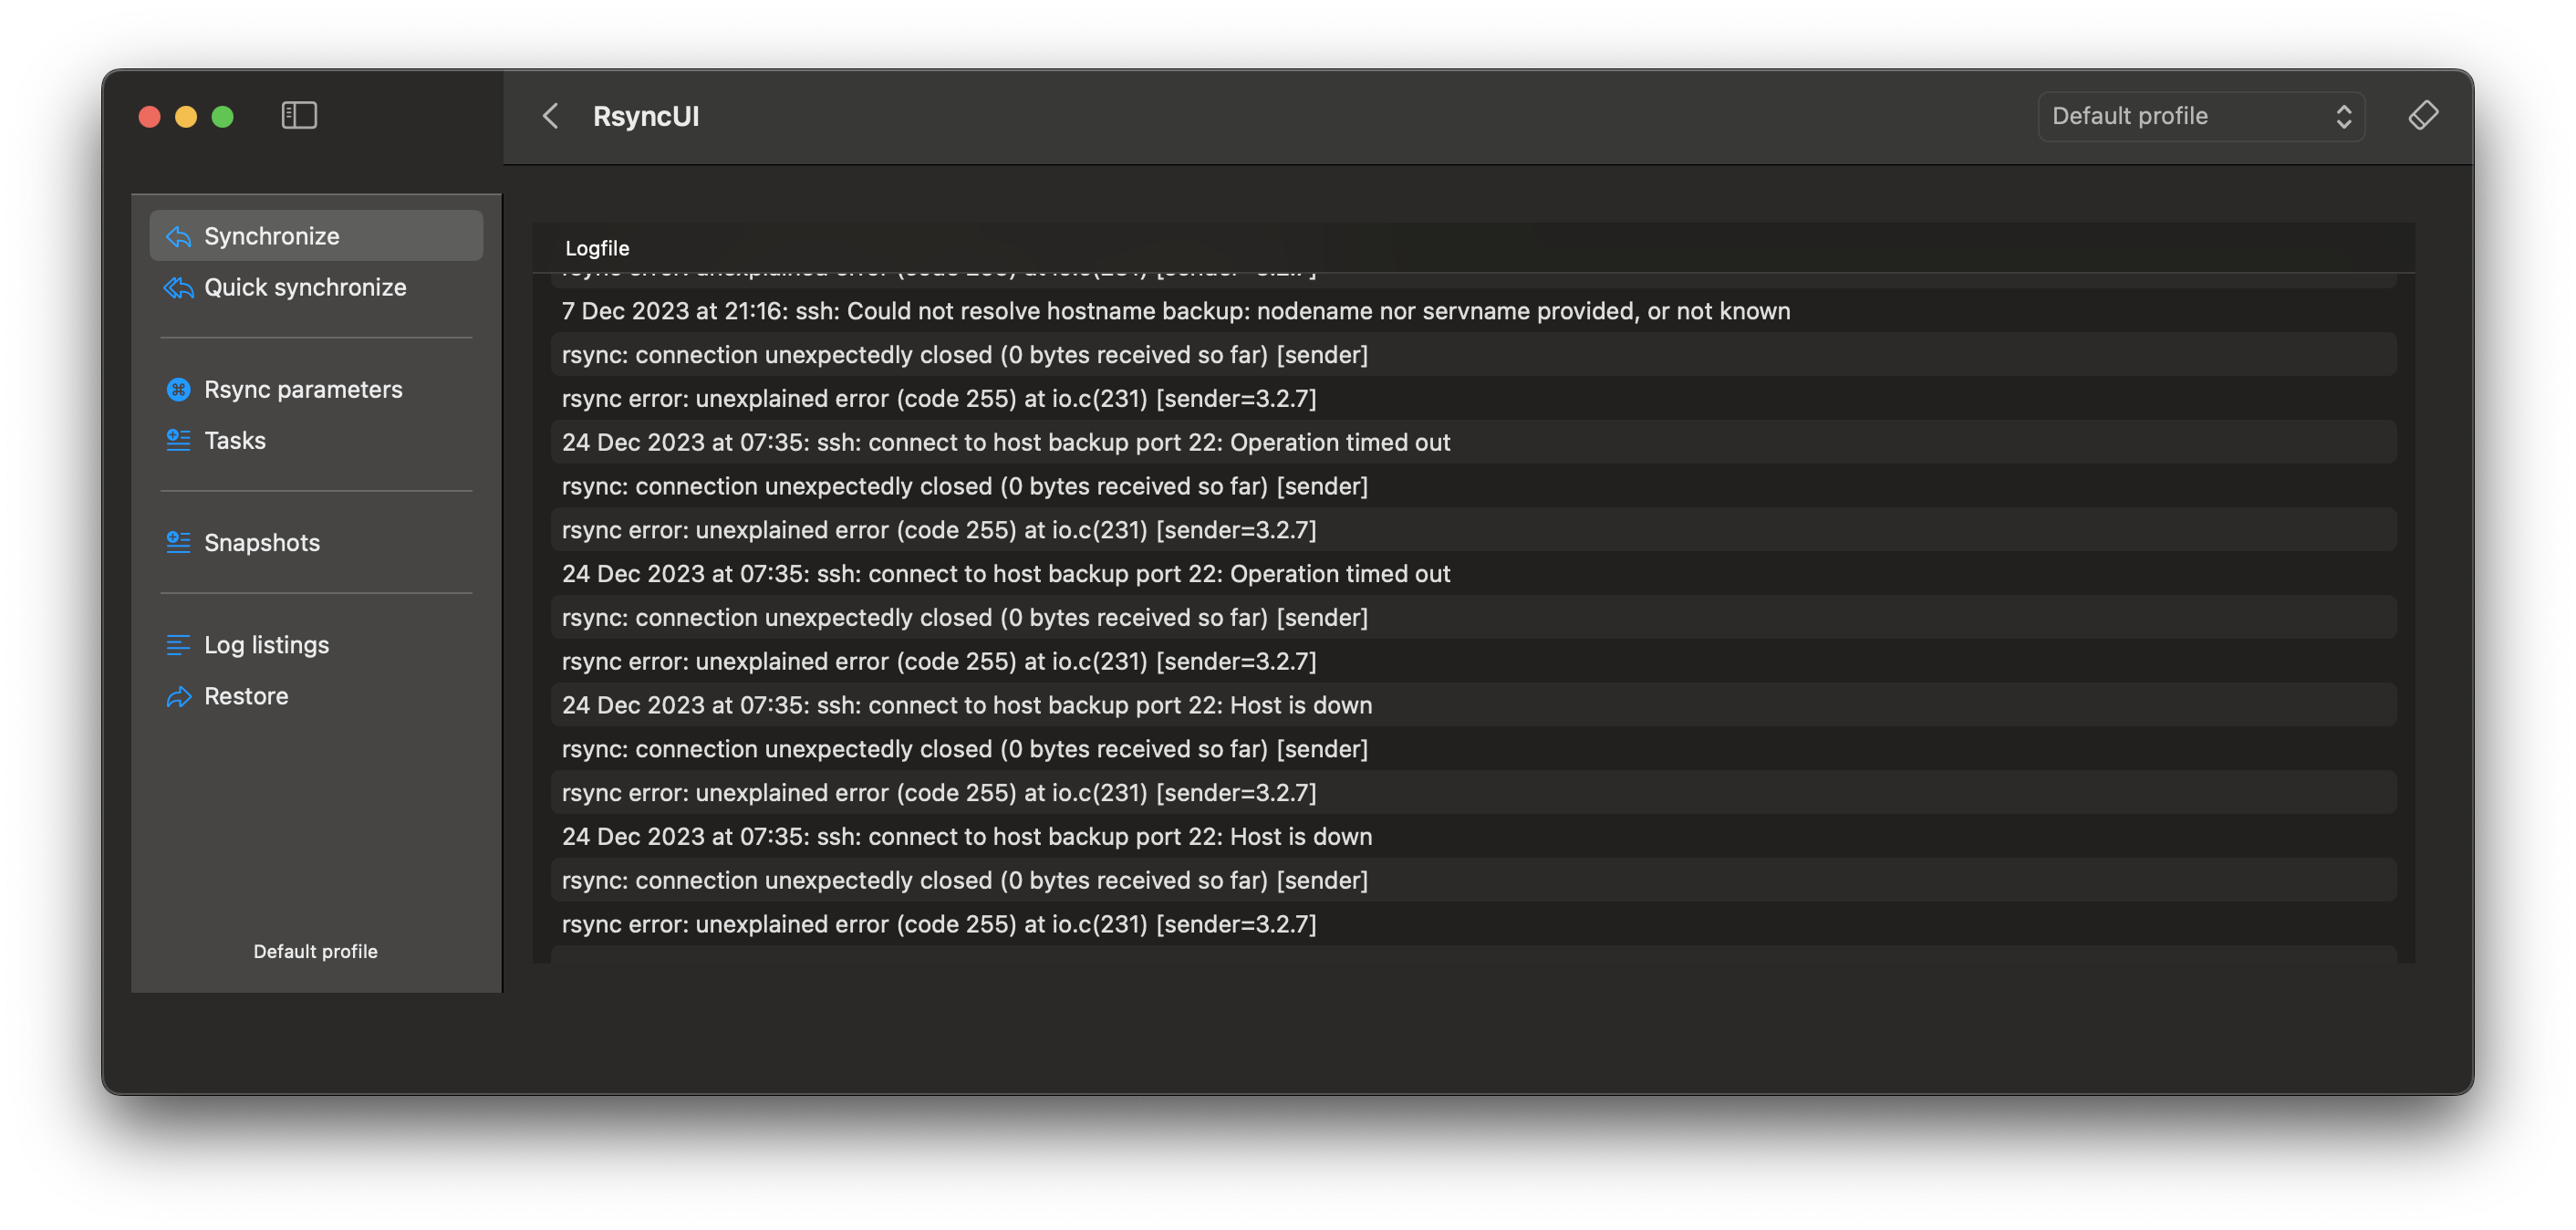
Error Output from rsync:
Sample of an error in output from rsync. If the switch “Check for error in output” is enabled, RsyncUI writes the output to the log file and alerts the user about any errors in rsync.
Confirm Execute
This option is only available if version 3.x of rsync is enabled.
The confirm dialog appears when the number of files to synchronize is comparable to a new task. Occasionally, a remote server or local disk becomes unavailable or is forgotten to be attached. If you initiate a synchronize task without being aware that the destination resource is not available, rsync may mistakenly believe this is a new full synchronize and prompts a dialog to confirm synchronize or abort.
If a remote server is unavailable, rsync will likely complain and generate an error. If the check for error in output option is enabled in the user settings, the rsync error messages written to the log and an Alert will be displayed.
If a local disk is not attached, rsync will attempt to synchronize the data to the /Volumes/ directory on your Mac. This directory is typically where macOS mounts local attached disks.
/dev/disk5s2 on /Volumes/Import bilder (apfs, local, nodev, nosuid, journaled, noowners)/dev/disk6s1 on /Volumes/Backups (apfs, local, nodev, nosuid, journaled, noowners)
Below the local attached volume is not connected, and the estimate may interpret this as a new synchronize task. If you have simply forgotten to attach the disk, you do not want RsyncUI to synchronize data to the /Volume directory.
6.3 - SSH settings
After changing a setting, you have to save the changes to keep it next time you use RsyncUI.
In this perspective, you can utilize RsyncUI to assist in creating an SSH key and setting up a global SSH keypath and identity file. SSH keys are required for passwordless logins to remote servers. You can either use the default values for SSH keys or set your own. For more information on passwordless logins, please refer to the documentation at Passwordless login section.
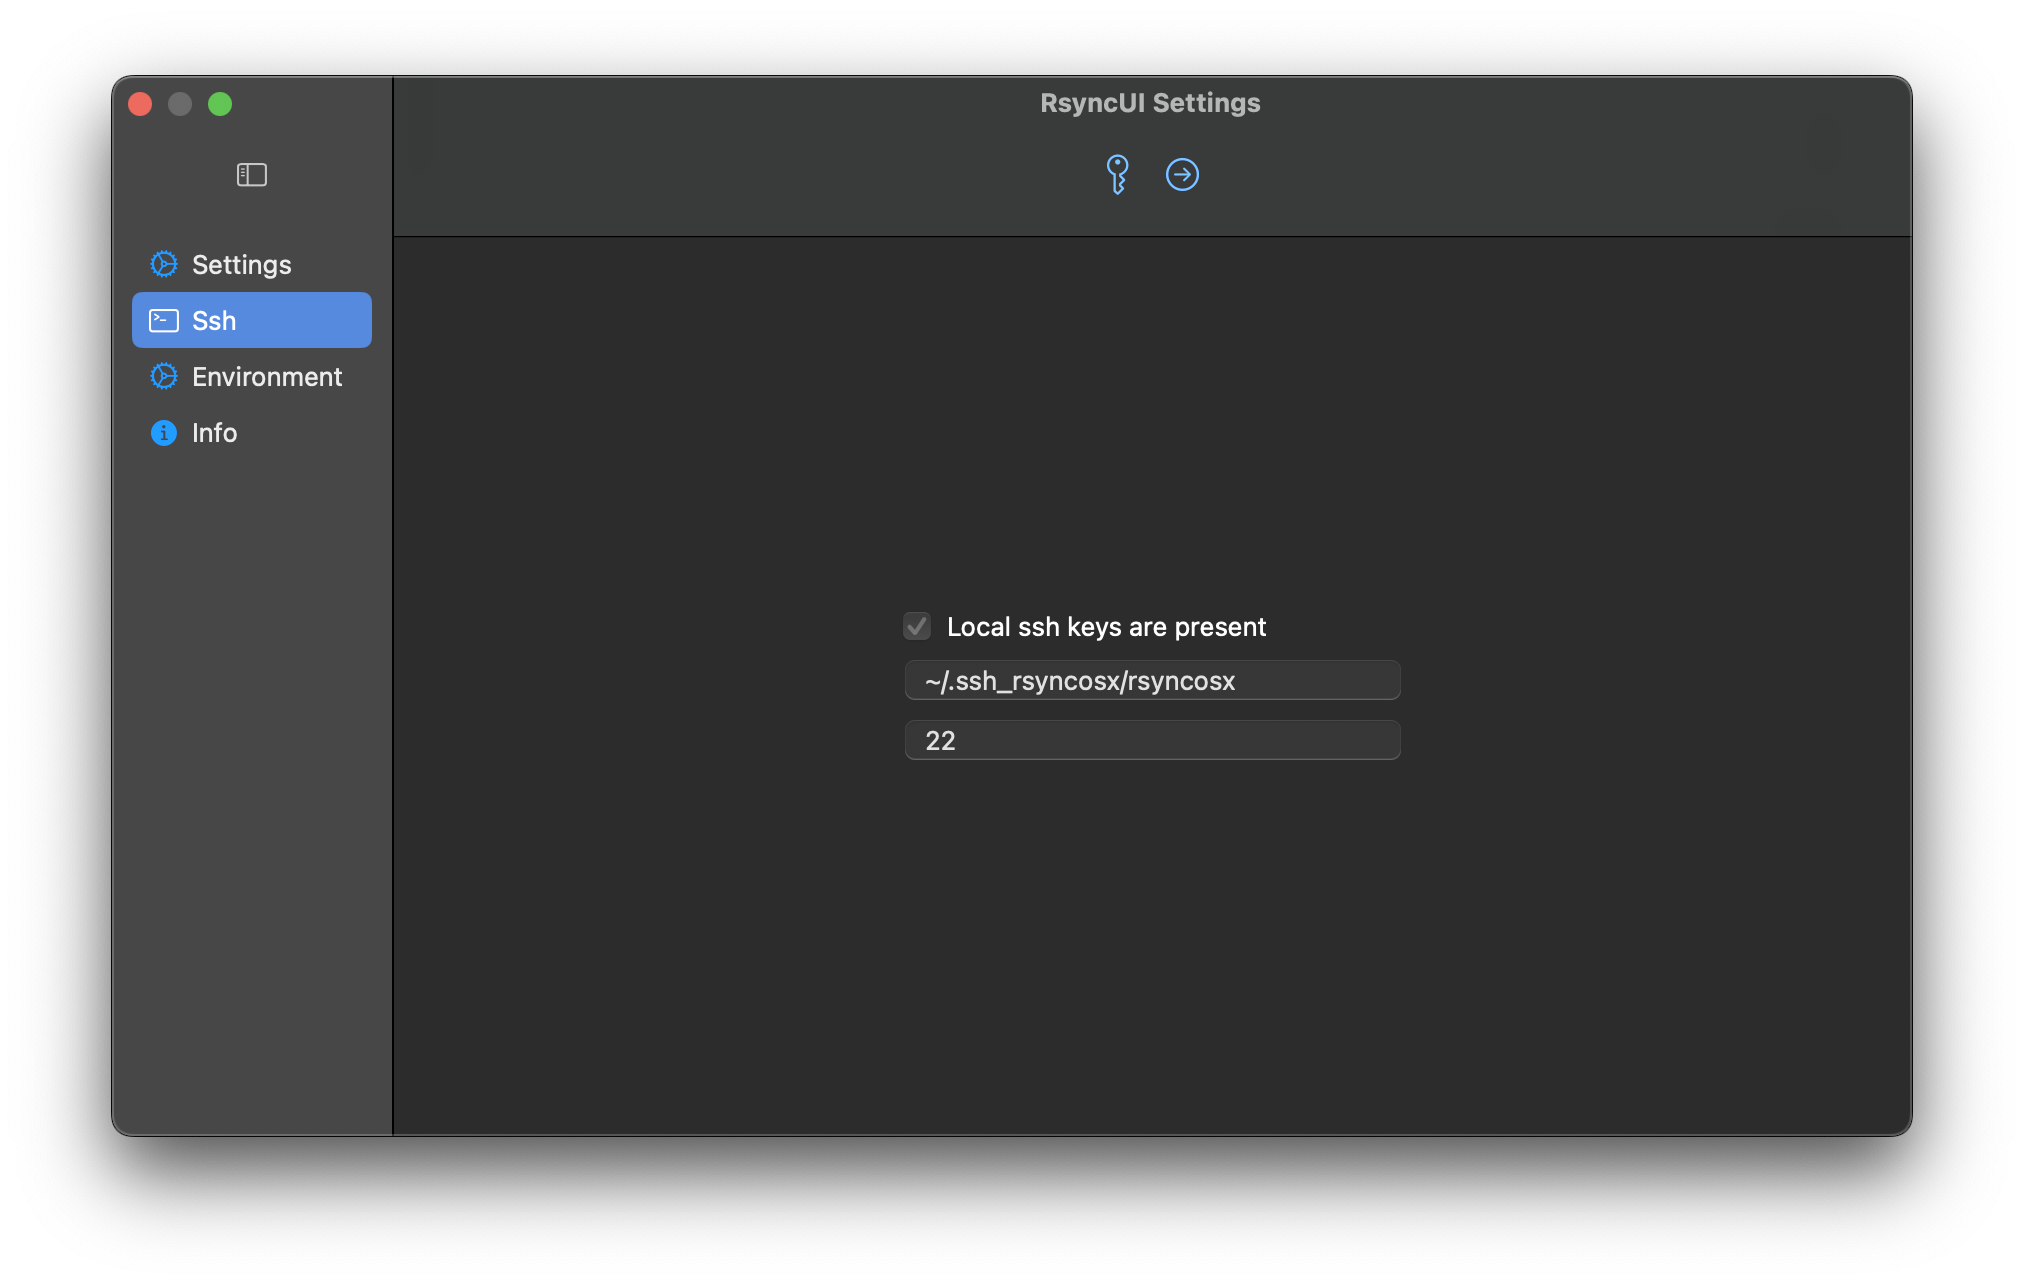
Local SSH Key Present
If the “on” option is selected in RsyncUI, it has detected a local SSH key.
The default values for RSA-based SSH keys are ~/.ssh/id_rsa and port number 22. These values are not mandatory if you choose to
use the default settings. If you do not specify your own SSH keypath and identityfile, RsyncUI will automatically use the default values.
If a local SSH key is present, you can either leave the settings as they are or manually set your own SSH keypath and identityfile.
In this case, RsyncUI will mark the selected settings as the default.
Set SSH Keypath and Identityfile
The user can specify a selected SSH keypath and identityfile that will apply to all configurations.
SSH Keypath and Identityfile: If the user selects a different keypath or identityfile from the default, it will be used for all configurations.
Port Number: The user can specify the port number through which SSH communicates. The default port number is 22.
If global SSH parameters are set, they will apply to all configurations. It is possible to specify different SSH parameters for each task.
7 - Some advanced features
There are a few more or less advanced features in RsyncUI. If you are new to RsyncUI, new to rsync, it is adviced to learn the basics before utilizing the more advanced features.
Halting tasks
By right-clicking on a task, on column Synchronize ID or Task, it can be halted or released from halted status. A halted task will be marked and not available for estimate or execute. When releasing a task from halted status, it remember which kind of task it was before halted.
7.1 - URL commands
Deep links facilitate direct access to application features via URL links. By utilizing deep links, users can execute an estimate and synchronize actions in a single click. Deep links in RsyncUI enable the grouping of actions that typically require multiple user inputs.
There are three methods of using deep links:
enable RsyncUI widgets
use URL functions direct within RsyncUI
save an URL-link in e.g. Notepad
RsyncUI widgets
Two widgets are embedded in RsyncUI:
one for estimating and synchronizing
and the second for verifying remote repository
Both widgets retrieve a saved URL link from storage. Within the Tasks view, there is a view for URLs. Within this view, you can save the required URLs. The widgets display whether a validated URL is present. To enable the widgets on macOS, click on the date and time icon located in the upper right corner of your screen. Edit the widgets and select RsyncUI. Then, add the widgets.
After enabling the widgets, a single click on the widget will launch RsyncUI and execute the corresponding action. To modify the URLs, update and save the new URLs.
Execute URL´s from within RsyncUI
Deep links also enable automation of actions within RsyncUI. A single click on the toolbar icon executes the URL action. RsyncUI generates the necessary URL based on the loaded profile and the required action. The two yellow toolbar icons allow execution of URL commands from within RsyncUI, as demonstrated in section above.
URL´s and Notepad
URL´s must start with rsyncuiapp://. The two URL´s actions are:
Action
URL
Estimate all tasks, automatically synchronize data
Estimate all tasks and automatically synchronize data
load profile, estimate all tasks and automatically synchronize data
Verify task, as an example, with Synchronize ID=Pictures backup
load profile and verify task with synchronizeID=Pictures backup*, the space in synchronize ID on task is converted to _ when searching for task in RsyncUI
There is a count down in six seconds to abort the synchronize task after estimate. The count down may be bypassed by toggle switch in Settings view.
Note: If only the default profile is in use, parameter is profile=default
Note: If there is space in Synchronize ID, like “Pictures backup”, the URL-parameter is id=Pictures_backup. RsyncUI automatically replaces the _ with space when searching for the ID.
View URLs
You may copy the correct URLs and save the URLs in e.g Notepad for easy access to start a synchronize task.
Errors in URL link
If RsyncUI encounters an invalid URL link, it will generate errors. Only well-defined URLs (specifically those supported by RsyncUI) are processed and executed. All URLs are validated as valid, but only defined URLs for RsyncUI are actually executed.
7.2 - Verify remote
The Verify remote function is not enabled by default. To enable it, please navigate to Settings and toggle the corresponding option. Before utilizing this function, kindly refer to its documentation to ensure you make the appropriate decision.
The Verify remote function is a specialized tool designed when synchronizing two Mac computers to a single repository, excluding Git repositories. This functionality was developed by the developer due to a personal need. The developer utilizes two Macs for photo development and data synchronization to a remote folder. The remote repository is not a Git server, necessitating a tool to determine whether to push or pull data.
Typically, a synchronize action operates in a one-way direction of data. Local data is synchronized to a backup media, such as an attached disc or a remote server. Restoring data, for instance, involves retrieving data from a backup when local data has become corrupted or inaccessible.
If you are using multiple Macs, as I do, and all Macs synchronize data to the same remote storage, there may be challenges maintaining synchronization
and preventing data loss, particularly if the remote storage is not a Git server, such as GitHub and Gitea. If the remote destinations are stored on a Git server, regular git push and pull commands will suffice.
Git is a superior tool for version control. However, in certain situations, creating a Git repository may not be feasible, and this function may prove useful. As a reminder, the Verify function is designed for multiple Macs synchronizing data to a single remote server as a backup. It also assists in deciding whether to push or pull changes to keep the local repository updated.
The verification applies only to remote destinations on servers
The user is solely responsible for determining the appropriate action. RsyncUI provides only advisory guidance, based on a rudimentary evaluation of a push and pull data comparison. Additionally, the function requires version 3.x of rsync to be installed and enabled.
The Verify process necessitates that one of the Macs be synchronized with the remote. If both Macs have local unique updates, the outcome of the Verify is most likely inaccurate, potentially resulting in data loss.
The function is not intended to be automated. Users must verify their subsequent actions.
Synchronization of Multiple Macs to a Remote Server
I have over 3,000 bird photos (130 GB) from the past four years that are synchronized using RsyncUI to a local remote server at home.
New photos are added, old photos are deleted, and updates are made to sidecars of the photos. As long as I was using only one Mac,
all updates were made on that Mac. However, with two Macs, I now use both Macs to work on my photos.
When I synchronize my changes, I need to transfer those changes to my second Mac.
Arguments for rsync
The following arguments are used in both push and pull.
--itemize-changes - output change-summary for all updates
--dry-run - rsync execute an estimate run
--update - evaluates the timestamp
The result from the pull command is subtracted from the result of the push command. Conversely, the push command is subtracted
from the result of the pull command. After both subtractions, the resulting arrays are compared based on the number of rows.
The outcome is as follows:
If pull has more data than push, it is likely that the remote repository is more up-to-date than the local repository.
If push has more data than pull, it is likely that the local repository is more up-to-date than the remote repository.
If the number of rows is equal, it is likely that the local repository is more up-to-date than the remote repository.
If there are zero rows, most likely, local and remote repository are in sync.
I utilize this function on a regular basis. I frequently travel to my mountain cabin, capture photographs of the wildlife, and develop images on my MacBook Pro during my stays. At home, I primarily use my MacMini 4 with a large monitor. Subsequently, I employ this function to synchronize my Macs with the photographs. As usual, I recall which Mac is most current. Occasionally, both the pull and push view contain data after a dry run, making it challenging to determine the appropriate course of action. I do recall which Mac is most current and include the delete parameter to synchronize. However, without remembering which Mac is most updated, it may be difficult to determine the correct action.
Therefore, my advice is to ensure that you are aware of which Mac is updated. Furthermore, avoid making changes on both Macs and synchronizing changes to the repository, as this may result in data loss.
Itemized output - push or pull
The parameter -i or --itemize-changes produces details about each file. The format of the output is:
YXcstpoguax
|||||||||||`-------------------------- the TYPE OF UPDATE:
|||||||||| <: file is being transferred to the remote host (pushed).
|||||||||| >: file is being transferred to the local host (pulled).
|||||||||| c: local change/creation for the item, such as:
|||||||||| - the creation of a directory
|||||||||| - the changing of a symlink,
|||||||||| - etc.
|||||||||| h: the item is a hard link to another item (requires --hard-links).
||||||||||"+" - the file is newly created
|||||||||| .: the item is not being updated (though it might have attributes that are being modified).
|||||||||| *: means that the rest of the itemized-output area contains a message (e.g. "deleting").
||||||||||`----------------------------- the FILE TYPE:
||||||||| f for a file,
||||||||| d for a directory,
||||||||| L for a symlink,
||||||||| D for a device,
||||||||| S for a special file (e.g. named sockets and fifos).
|||||||||`--------- c: different checksum (for regular files)|||||||| CHANGED VALUE (for symlink, device, and special file)`-------- s: Size is different
`------- t: Modification time is different
`------ p: Permission are different
`----- o: Owner is different
`---- g: Group is different
`--- u: The u slot is reserved for future use.
`-- a: The ACL information changed
7.3 - Passwordless login
To synchronize data to a remote server using RsyncUI, passwordless login via SSH-key authentication is required. It is not possible to provide a user login and password during data synchronization via RsyncUI. SSH-key authentication is generally considered more secure than password-based authentication.
If default values for RSA-based SSH-key authentication are used, no additional information about the SSH-key is required in RsyncUI. However, it is necessary to provide information if custom SSH-keypath, identityfile, or port number is used.
The SSH-keypath and identityfile are specified as follows:
-e "ssh -i ~/.keypath/identityfile -p NN"
where:
-i ~/.keypath/identityfile is the SSH-keypath and identityfile
-p NN is the port number used for communication (default port 22)
To use my own SSH-key and SSH-keypath data, the following is added to RsyncUI in the settings:
To configure SSH-keypath and Identityfile, refer to the user configuration located in the SSH settings. When enabling user-selected SSH-keypath and Identityfile, please ensure they adhere to the following format:
~/.mynewsshdirectorylog/mynewkey
like
~/.ssh_rsyncosx/rsyncosx
The prefix must be ~ followed by a /. RsyncUI will verify that the SSH-keypath begins with ~ and contains at least two / characters before saving the new SSH-keypath.
The rsync command to synchronize my Documents directory is set by RsyncUI to my Raspberry Pi server:
For more information on passwordless login, please refer to the Tools passwordless login section.
7.4 - Tools passwordless login
The following SSH tools are utilized: ssh-keygen and ssh-copy-id. RsyncUI primarily assists in establishing an RSA-based key.
User selected SSH-key pairs are validated to conform to the form ~/.ssh_keypath/identityfile for SSH keypath and identityfile and Integer value for the SSH-port number.
The SSH functions facilitate two methods:
private and public SSH-key pairs based on default SSH values for RSA keys (~/.ssh/id_rsa)
private and public SSH-key pairs based on user-selected values (~/.ssh_rsyncosx/rsyncosx)
If creating a new public SSH-key pair based on default SSH values for RSA keys, RsyncUI does not add any parameters to the rsync
command because these are default values. SSH parameters are added to the rsync command only when the second method is selected.
The following commands for creating a new, alternative private and public SSH-key pair are provided:
The following command copies the newly created public key to the server:
ssh-copy-id -i /Users/thomas/.ssh_rsyncosx/rsyncosx -p NN user@server
The user can also configure the new SSH keypath and identityfile in a terminal window and subsequently add them to the Userconfig. RsyncUI will automatically enable these settings when added to the Userconfig.
The user can also apply local SSH keypath and identityfile and SSH port, which govern global settings, to each task.
Ensure that the new SSH directory has the appropriate permissions. Open a terminal window and execute the following command:
chmod 700 ~/.ssh_rsyncosx
7.5 - Export and import
Tasks can be exported and imported between profiles and to new Macs. Select the “File” menu and then choose “Export and import.”
7.6 - Snapshots
Utilizing snapshots is an effective method for restoring previous versions of data and deleted files. Snapshots employ hardlinks (https://en.wikipedia.org/wiki/Hard_link) to save only modified and deleted files as separate files in a snapshot. Files that remain unchanged are hardlinks to the original file.
In every snapshot task, RsyncUI stores the next available snapshot number for use. The snapshot number is a sequential number incremented by one after each snapshot task execution. The rsync command automatically creates the next snapshot directory by number and stores the next snapshot number to use on the task. The snapshot number is displayed as part of the log timestamp.
If a file named “file.txt” is saved in the initial snapshot and remains unchanged or deleted, the file “file.txt” in the latest snapshot is a hardlink to the original file in the first snapshot.
If the “file.txt” is deleted from the initial snapshot, the filesystem handles the update and determines the appropriate location to save the original file as part of the delete operation.
In RsyncUI, even if all snapshots are marked for deletion, the first and last snapshots are not deleted.
Snapshots
A snapshot is a saved state or backup of data at a specific point in time. Each snapshot is synchronized with the local directory at the time of creation.
Remote server
The rsync parameter for next snapshot to synchronize to a remote.server is:
n is the number of next snapshot to be synchronized
n-1 is the latest synchronized snapshot
/Users/thomas/data/ is the source directory, only read by rsync
/Volume/backup/snapshots/ is the destination directory where snapshots are synchronized
Snapshot Creation
To create a snapshot task, select “snapshot” as the action in the Add tasks section. Do not copy and paste the command for execution within a terminal window. RsyncUI automatically saves the snapshot number “n” to the task. This number represents the next available snapshot number and is used to calculate the rsync parameter. The value of “n” is retrieved from the configuration.
Snapshot Administration
Snapshot administration is crucial to maintain an organized and efficient backup system. It involves deleting unnecessary or irrelevant snapshots to prevent clutter and simplify the management of the backup space. Regularly reviewing and deleting snapshots is essential to ensure that only the most relevant data is retained.
Deleting Snapshots
Deleting snapshots is a destructive operation that should be performed with caution. It is important to have a plan in place to determine which snapshots to keep and which to delete. RsyncUI provides a simple plan for deleting and keeping snapshots.
The Plan for Keep and Delete
Selecting the “Tag” button evaluates all snapshots based on the date within the log record. Based on the selected plan and date, snapshots are either tagged with “keep” or “delete.” Snapshots tagged with “delete” are also preselected for deletion. To delete the marked snapshots, select the “Delete” button.
Even if all snapshots are tagged for deletion, the first and last snapshots are not deleted. The first and last snapshots are removed from the delete list as part of the internal preparation for deletion.
The plan is based on three parts, where the parameter plan has an effect on previous months (and years):
the current week
keep all the snapshots within the current week
value of plan has no effect on the current week
the current month minus the current week
keep all snapshots for the selected Day of week, e.g all snapshots every Sunday this month
value of plan has no effect on the current month
previous months (and years)
keep the snapshot in the last week of month for selected Day of week, e.g the last Sunday in the month
if plan == Every, keep for the selected Day of week, e.g all snapshots every Sunday, every week in previous period
if plan == Last, keep for the selected Day of week, e.g all snapshots every last Sunday every month in previous period
Tagging and Deleting Snapshots
It is recommended to optimize the number of snapshots. Select a plan, tag the snapshots, and delete the snapshots marked for deletion.
8 - General information
There are some general information which might be nice to know.
8.1 - Latest version of rsync
The default /usr/bin/rsync on macOS Sonoma and macOS Sequoia differ in their versions. Both versions adhere to protocol 29 of version 2.6.9, but the licenses for these versions are distinct. Additionally, there may be variations in the code.
In macOS Sonoma, the default version is version 2.6.9, released in November 2006. In macOS Sequoia, the default version is a compatible rsync based on the BSD license. The command /usr/bin/rsync --version in macOS Sequoia displays openrsync: protocol version 29, rsync version 2.6.9 compatible.
It is recommended to install the latest release of rsync by Homebrew. Install the latest version by command:
brew install rsync
In RsyncUI, navigate to the settings menu and select Rsync and path. If rsync is installed via Homebrew, simply tick the boxes for Rsync ver3.x and ensure that RsyncUI correctly sets the path for rsync.
Note:
RsyncUI supports snapshots of files. However, due to a bug in version 2.6.9 of rsync, the snapshot feature in RsyncUI requires the installation of the latest version of rsync.
Copyright (c) 2020 - 2025 - Thomas Evensen

Permission is hereby granted, free of charge, to any person
obtaining a copy of this software and associated documentation
files (the "Software"), to deal in the Software without restriction,
including without limitation the rights to use, copy, modify, merge,
publish, distribute, sublicense, and/or sell copies of the Software,
and to permit persons to whom the Software is furnished to do so, subject
to the following conditions:

The above copyright notice and this permission notice shall be included
in all copies or substantial portions of the Software.

THE SOFTWARE IS PROVIDED "AS IS", WITHOUT WARRANTY OF ANY KIND, EXPRESS OR
IMPLIED, INCLUDING BUT NOT LIMITED TO THE WARRANTIES OF MERCHANTABILITY, FITNESS
FOR A PARTICULAR PURPOSE AND NONINFRINGEMENT. IN NO EVENT SHALL THE AUTHORS OR
COPYRIGHT HOLDERS BE LIABLE FOR ANY CLAIM, DAMAGES OR OTHER LIABILITY, WHETHER IN
AN ACTION OF CONTRACT, TORT OR OTHERWISE, ARISING FROM, OUT OF OR IN CONNECTION
WITH THE SOFTWARE OR THE USE OR OTHER DEALINGS IN THE SOFTWARE.
8.3 - RsyncUI files, JSON
RsyncUI read and store configurations, log records and user settings as JSON (https://en.wikipedia.org/wiki/JSON) files. The location of files is: $HOME/.rsyncosx/macserialnumber. RsyncUI get the computer mac serial number at startup. At startup RsyncUI reads the user settings and default configurations from JSON data. Log records are only loaded when viewing logs and when updating the logs after a synchronization task.
The logfile is a text file and normally view within RsyncUI.
$HOME/.rsyncosx/macserialnumber/rsyncui.txt
8.4 - Signing and notarization
RsyncUI is digitally signed with my Apple Developer Certificate and notarized (https://support.apple.com/en-us/HT202491) by Apple. This verification process ensures that the application is free from malicious code and will seamlessly integrate with Apple’s Gatekeeper technology. Upon opening either a new or updated application for the first time, Apple will issue a notification.
9 - Parameters to rsync
RsyncUI provides default parameters for data synchronization. However, the actual default parameters utilized in tasks are determined by whether the rsync operation is performed over a network connection or to a local attached disk.
Users have the ability to modify default parameters as necessary. Parameters to rsync are stored in tasks, including a local ssh parameter if set. The local ssh parameter overrides a global ssh parameter if set.
Always verify the result of changing parameters to rsync before executing. Select the “Verify tasks” from the primary Sidebar menu.
Task-specific Parameters to rsync
To add a parameter to rsync, enter it in the corresponding field. RsyncUI supports seven user-defined parameters. Users can add parameters using any of the fields. However, users are responsible for verifying the accuracy of the added parameters. If an incorrect parameter is added, rsync will generate an error message.
Parameters to rsync are typically constructed as follows. The following are examples only, rsync supports a ton of parameters.
parameter=value
--exclude-from=/Volumes/home/user/exclude-list.txt: Exclude list for rsync.
parameters only
--stats: Enables the display of statistics during the synchronization process.
--dry-run: Executes a simulated synchronization without modifying the files.
For a comprehensive list of parameters for rsync, please refer to the official rsync documentation.
Task Specific SSH parameter
If default ssh-key values are employed and no information regarding ssh-keys is provided in RsyncUI, the parameter -e ssh is appended to the rsync command to ensure data is tunneled and encrypted using ssh. This applies exclusively to remote servers and data restoration from remote servers.
Task-specific ssh parameters override global ssh parameters configured in the user settings.
ssh-port: specify if ssh utilizes a port other than the default port 22
ssh-keypath and identity file: typically, these are .ssh/id_rsa, set only if alternative ssh-keypath and identity file are to be utilized by ssh
The values are marked red until validated OK. Refer to section “Tools passwordless login” for info about validated values.
Backup Switch
The rsync command allows you to instruct it to save modified and deleted files in a separate backup directory prior to the synchronization process.
This feature can be enabled by setting the following parameters:
--backup: Enables the saving of modified files.
--backup-dir: Specifies the directory where modified or deleted files should be saved before synchronization.
The RsyncUI provides a default value for this parameter, but you can customize it as per your requirements.
The default backup directory for the <directory to synchronize> relative to the synchronized directory is ../backup_<directory to synchronize>.
10 - Schedule
The scheduler is implemented by using the Timer library, quote Apple: “A timer that fires after a certain time interval has elapsed, sending a specified message to a target object.” The timer has a strong reference to the run loop on the main thread. That also means that if the application goes to sleep, so does the run loop. And the timer is only active as long as RsyncUI is active.
Limitations
Its primary function is to automate selected synchronization of tasks as long as RsyncUI is alive. It may prove useful for users who require scheduled synchronization of data during work. RsyncUI may be minimized or not the active window and the timer will still work.
But if you leave your Mac and it goes to sleep, the timer will not work. There is more info in blog “Timer and Calendar”.
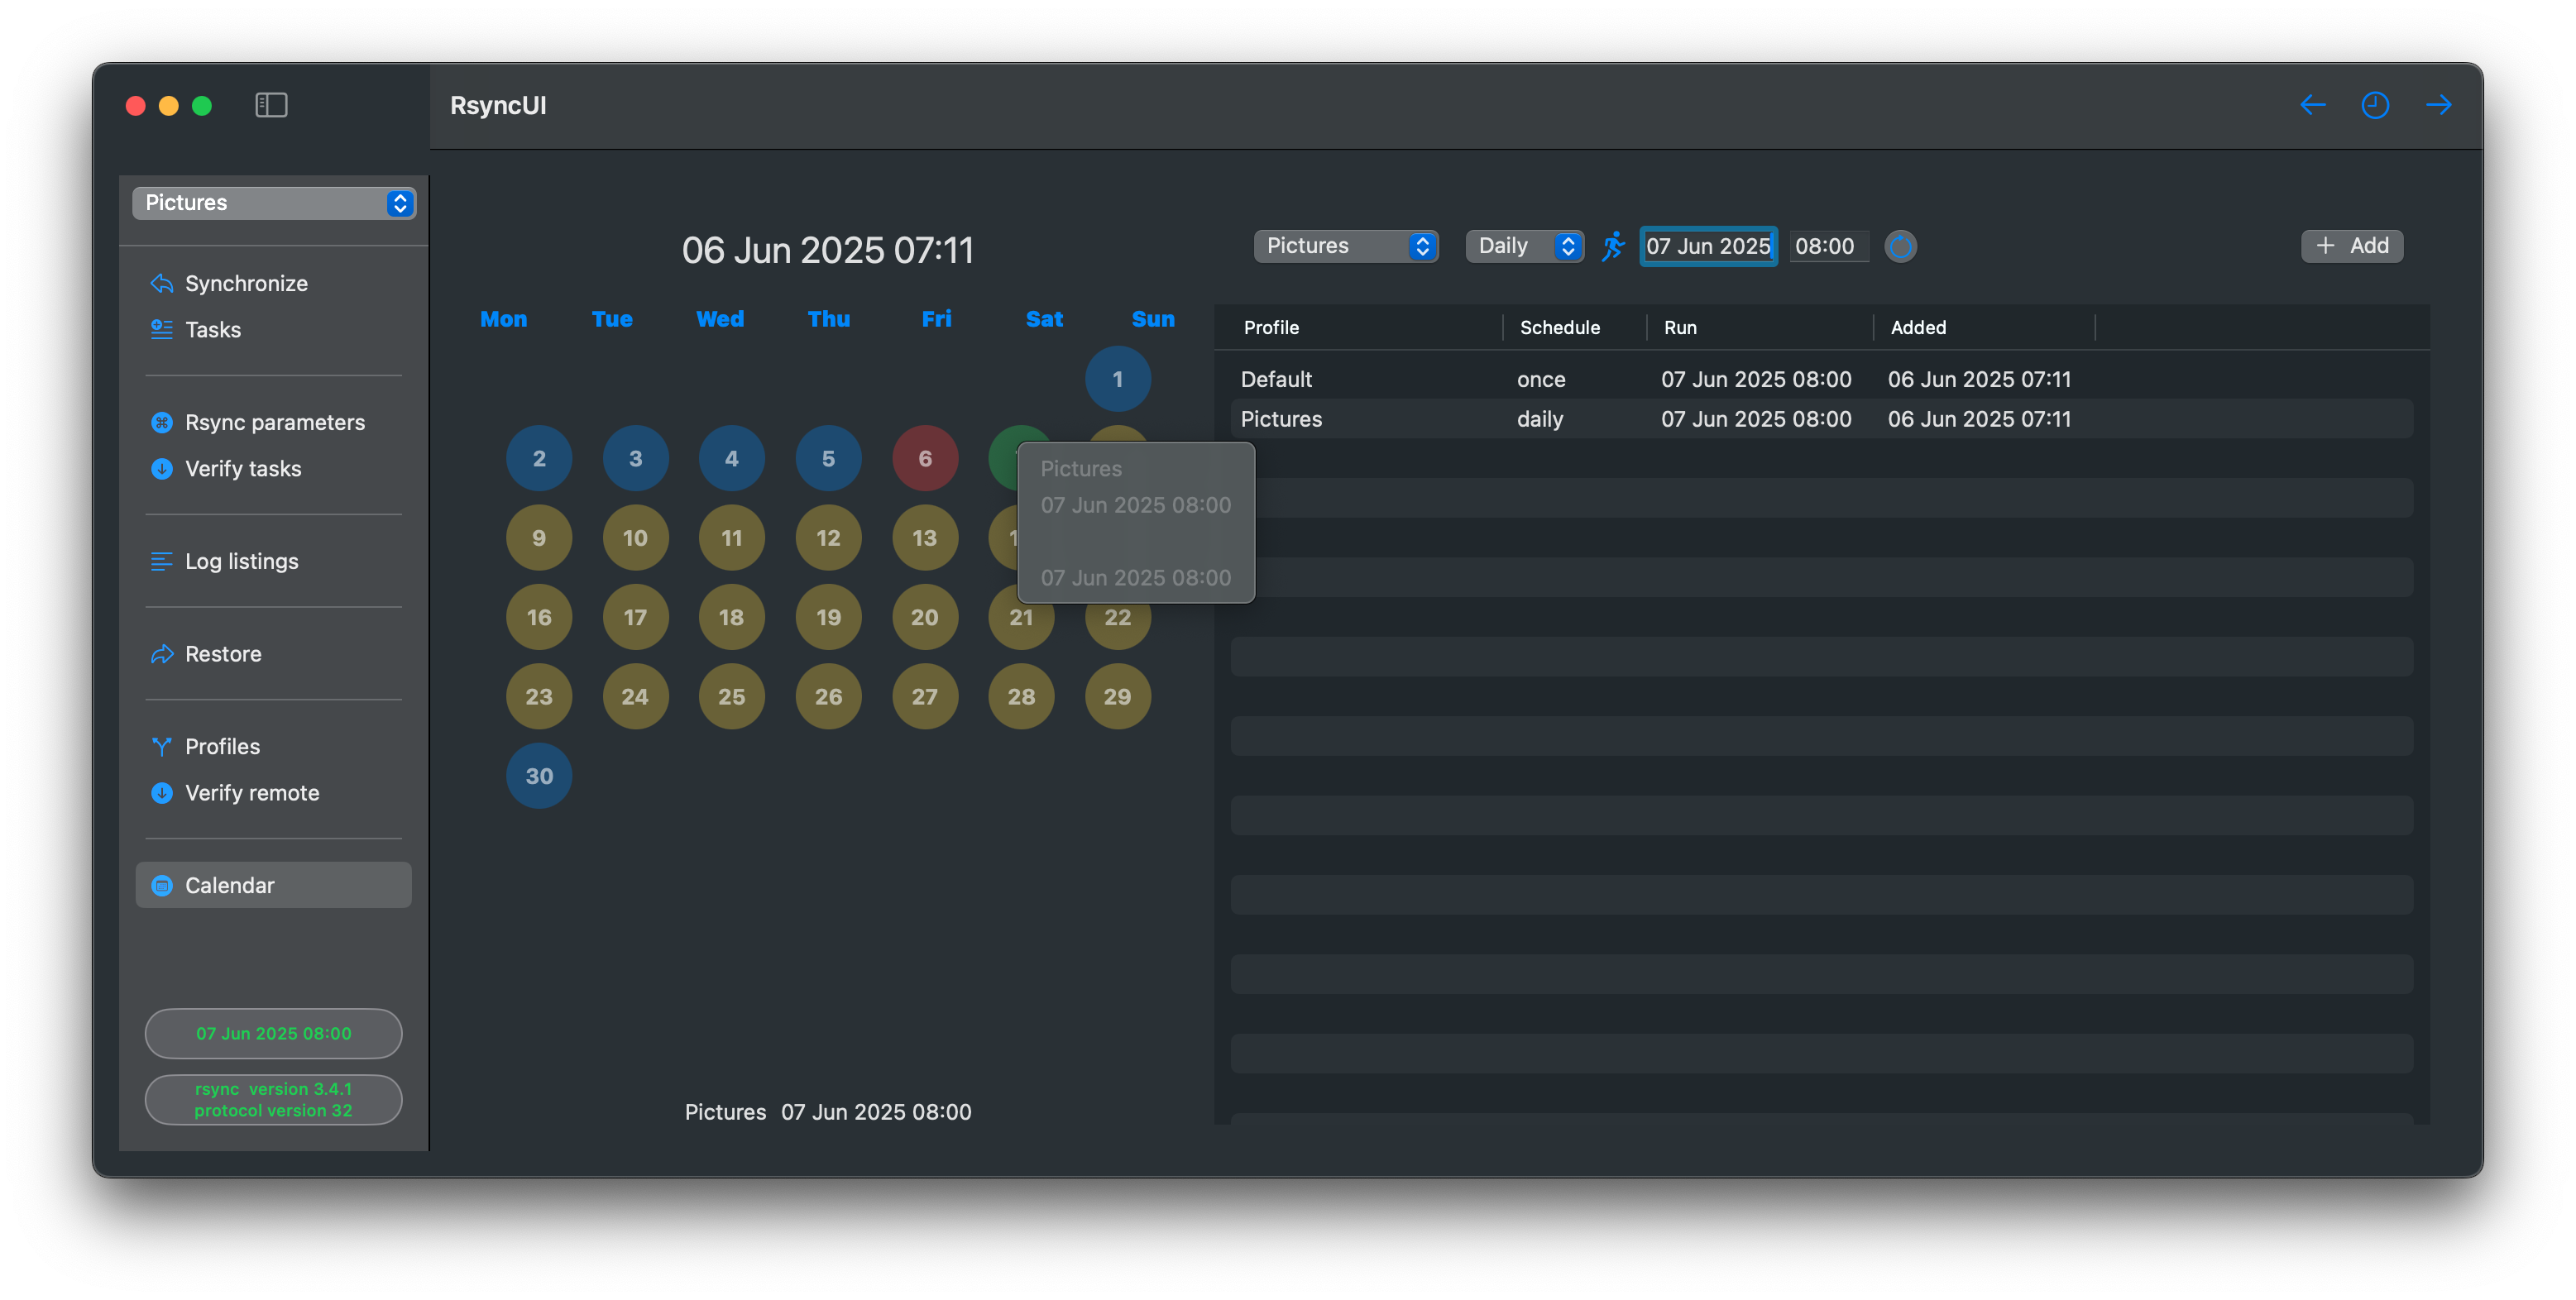
Add schedule
To add a schedule, click on the date, set time and schedule. That is it. When a schedule is active the user is notified by the sidebar or the toolbar when the sidebar is hidden. By right click on a date will present schedules by date.
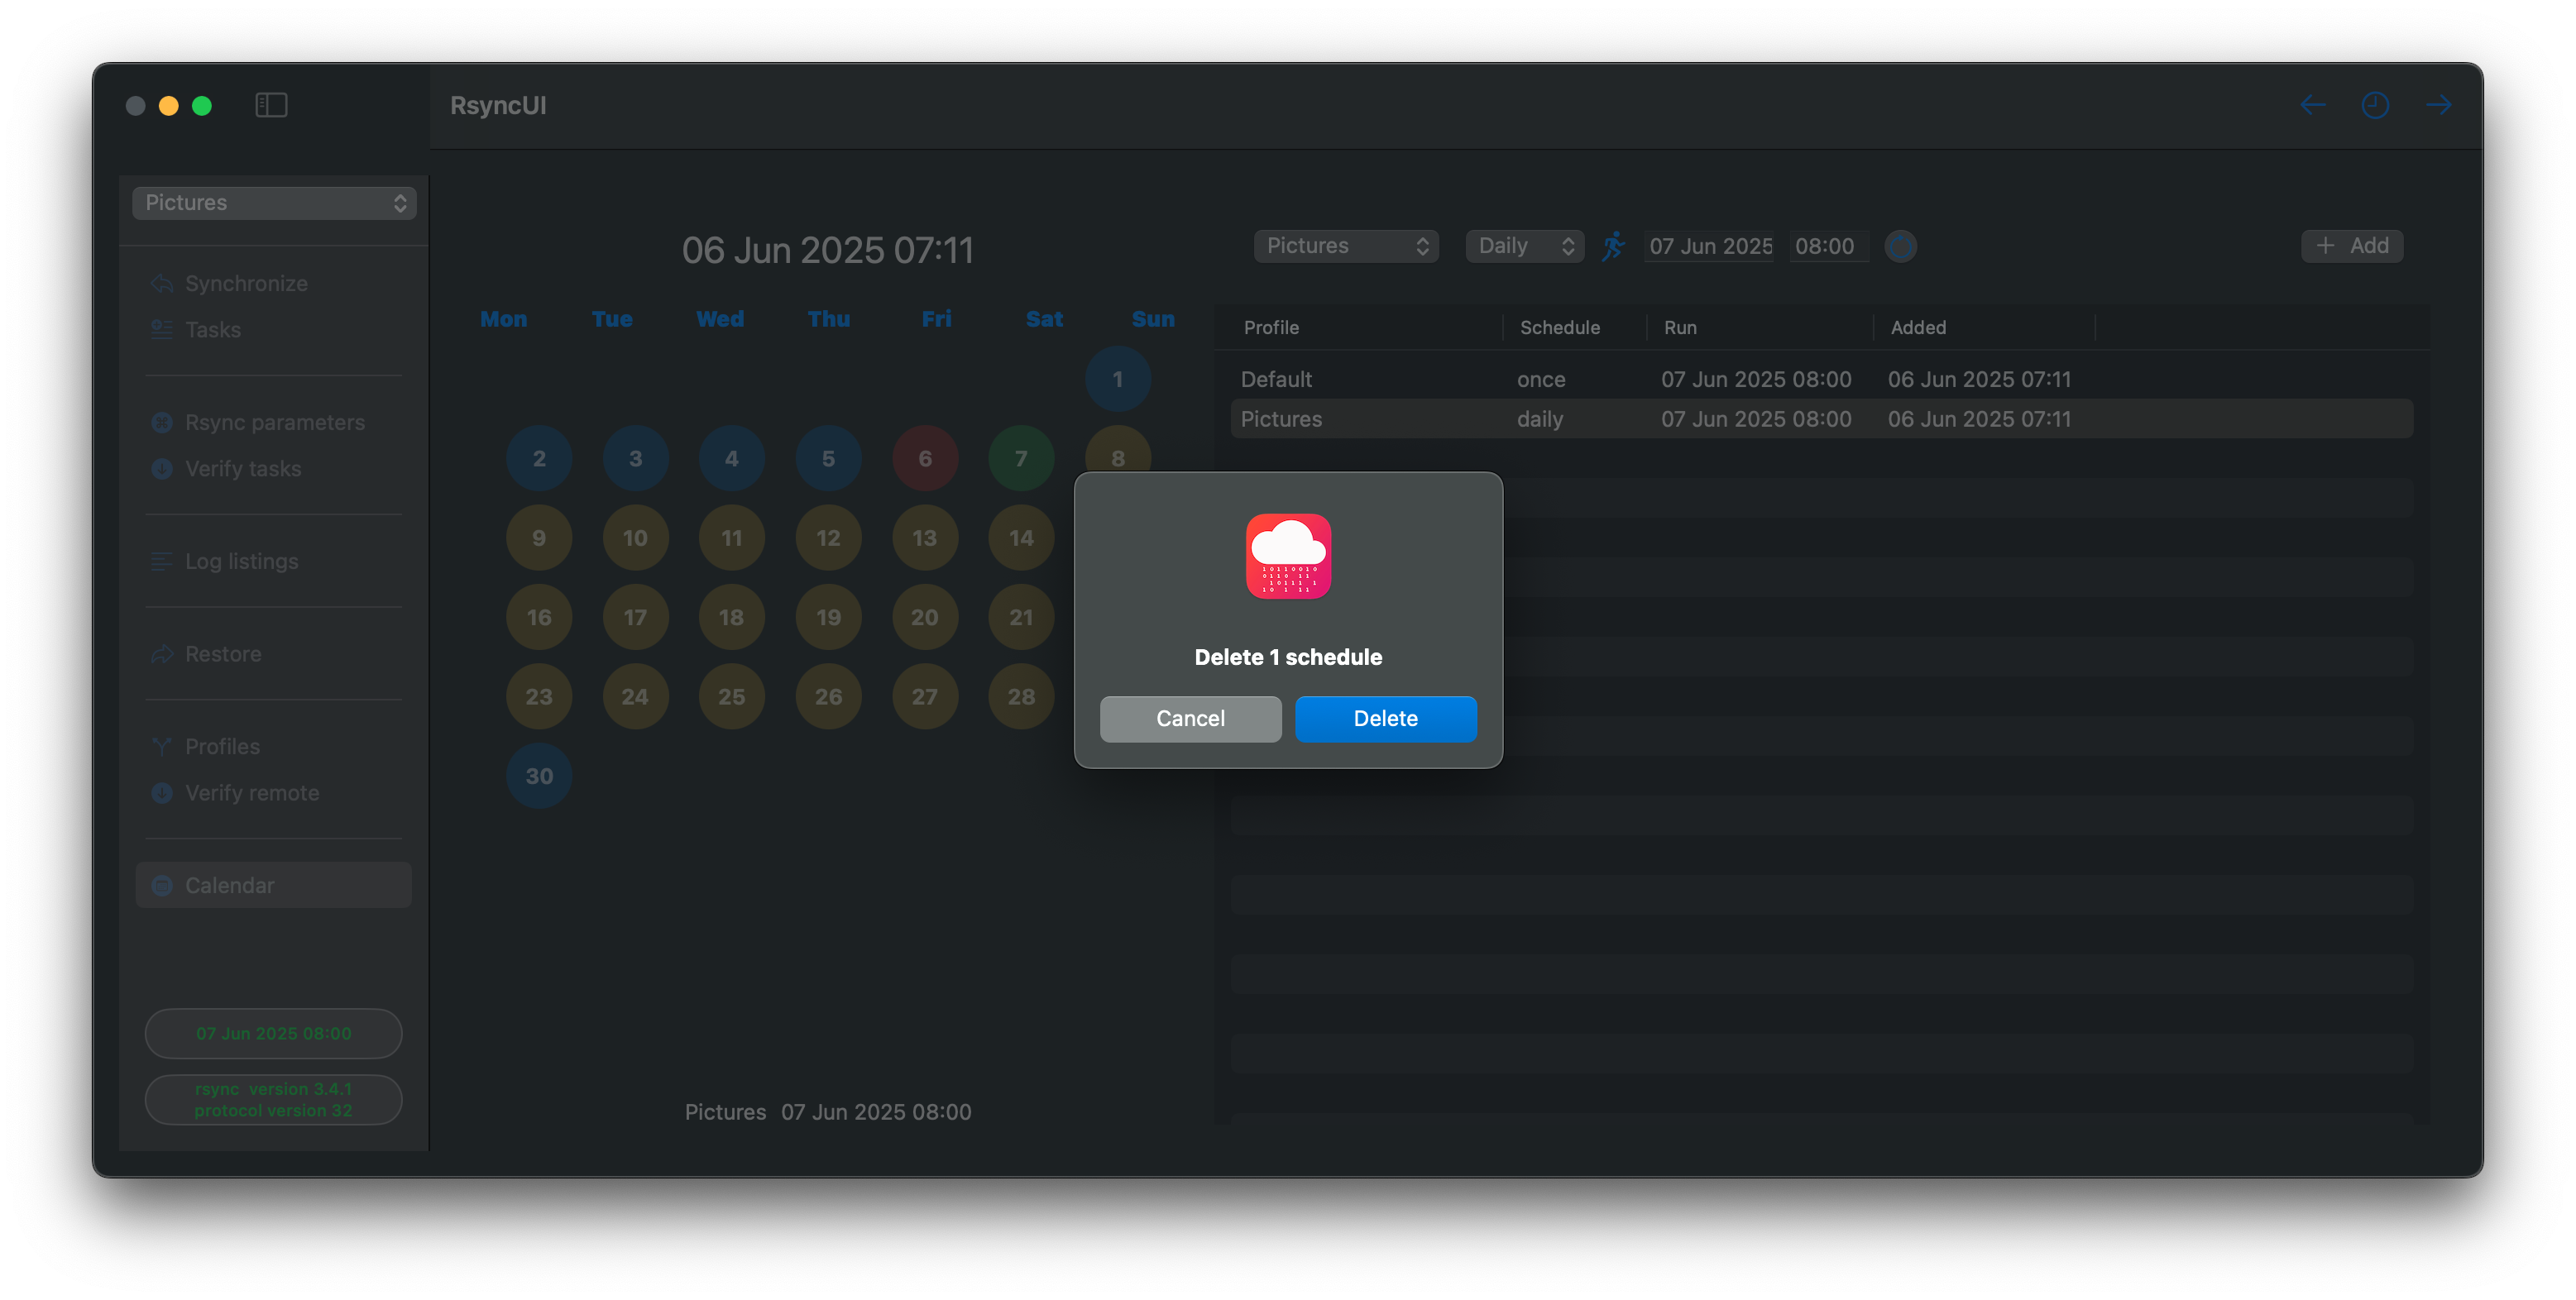
Delete schedule
Select the schedule and press the backspace.
11 - Profiles
Tasks can be organized in profiles. A profile is the name of the directory located at the storage location where RsyncUI stores its files. When you create a “newprofile,” RsyncUI creates a new directory at $HOME/.rsyncosx/macserialnumber/newprofile. Tasks and logfiles are stored within that directory for that profile.
The list on the right side of the view displays all tasks that have not been updated since the number of days specified in the settings under the “Mark days after” option.
12 - Quicktask
Note: Be aware of if using syncremote, the remote folder must be added first and the local folder as second. This is fixed in code which make RsyncUI to flip folders. To be released later as a maintenance release. This only apply to the quick task.
There also seems to be an issue with GUI for selecting local folders. Please use drag and drop for local folders. The GUI for selecting folders are removed. To be released later as a maintenance release. This only apply to the quick task.
Use QuickTask for quickly copy or transfer files to either local or remote storage. QuickTask will save the last executed quick task as default values. Default values can be cleared by the toolbar function.
There are two types of quick tasks:
synchronize: synchronize local files to remote, aka push data
syncremote: synchronize remote files to local, aka pull data
After entering data, the default task is a --dry-run task. It is recommended to inspect the result before executing the actual run.
Folder parameters
Local folder: a required field
Remote folder: a required field
a ~ is expanded as the home directory with the full path by the remote operating system
the remote directory may also be specified by full path, depending on where the backup directory is located on the remote server
Remote parameters
Remote username: the username for logging into the remote server
Remote server: either the server name or IP address for the remote server
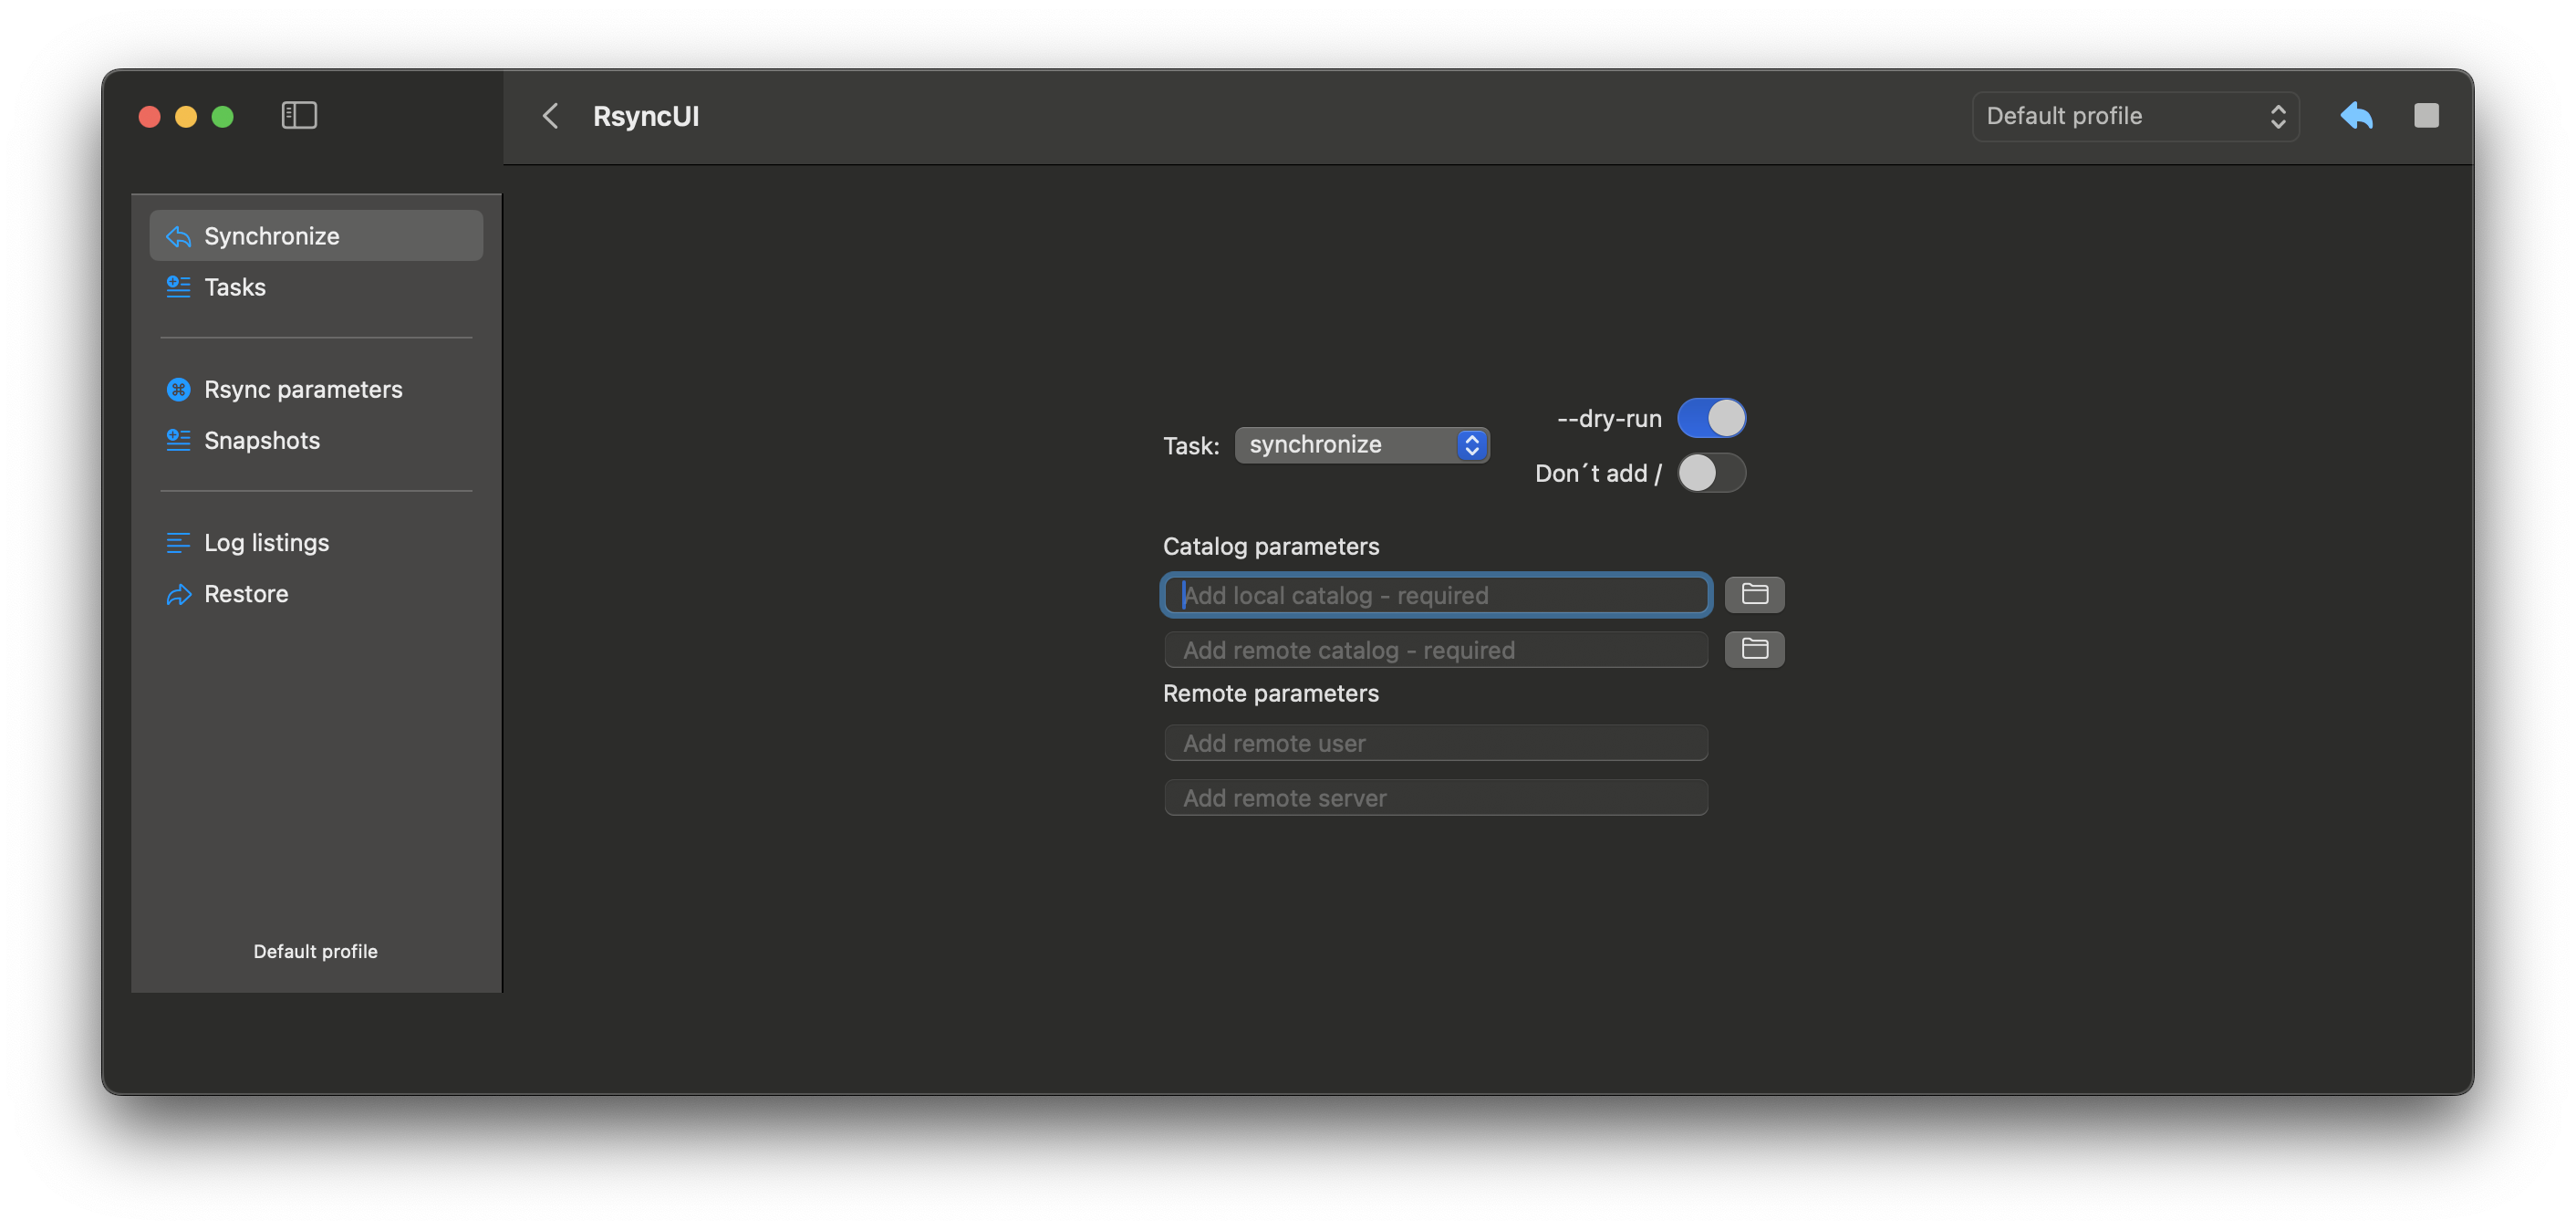
13 - Restore data
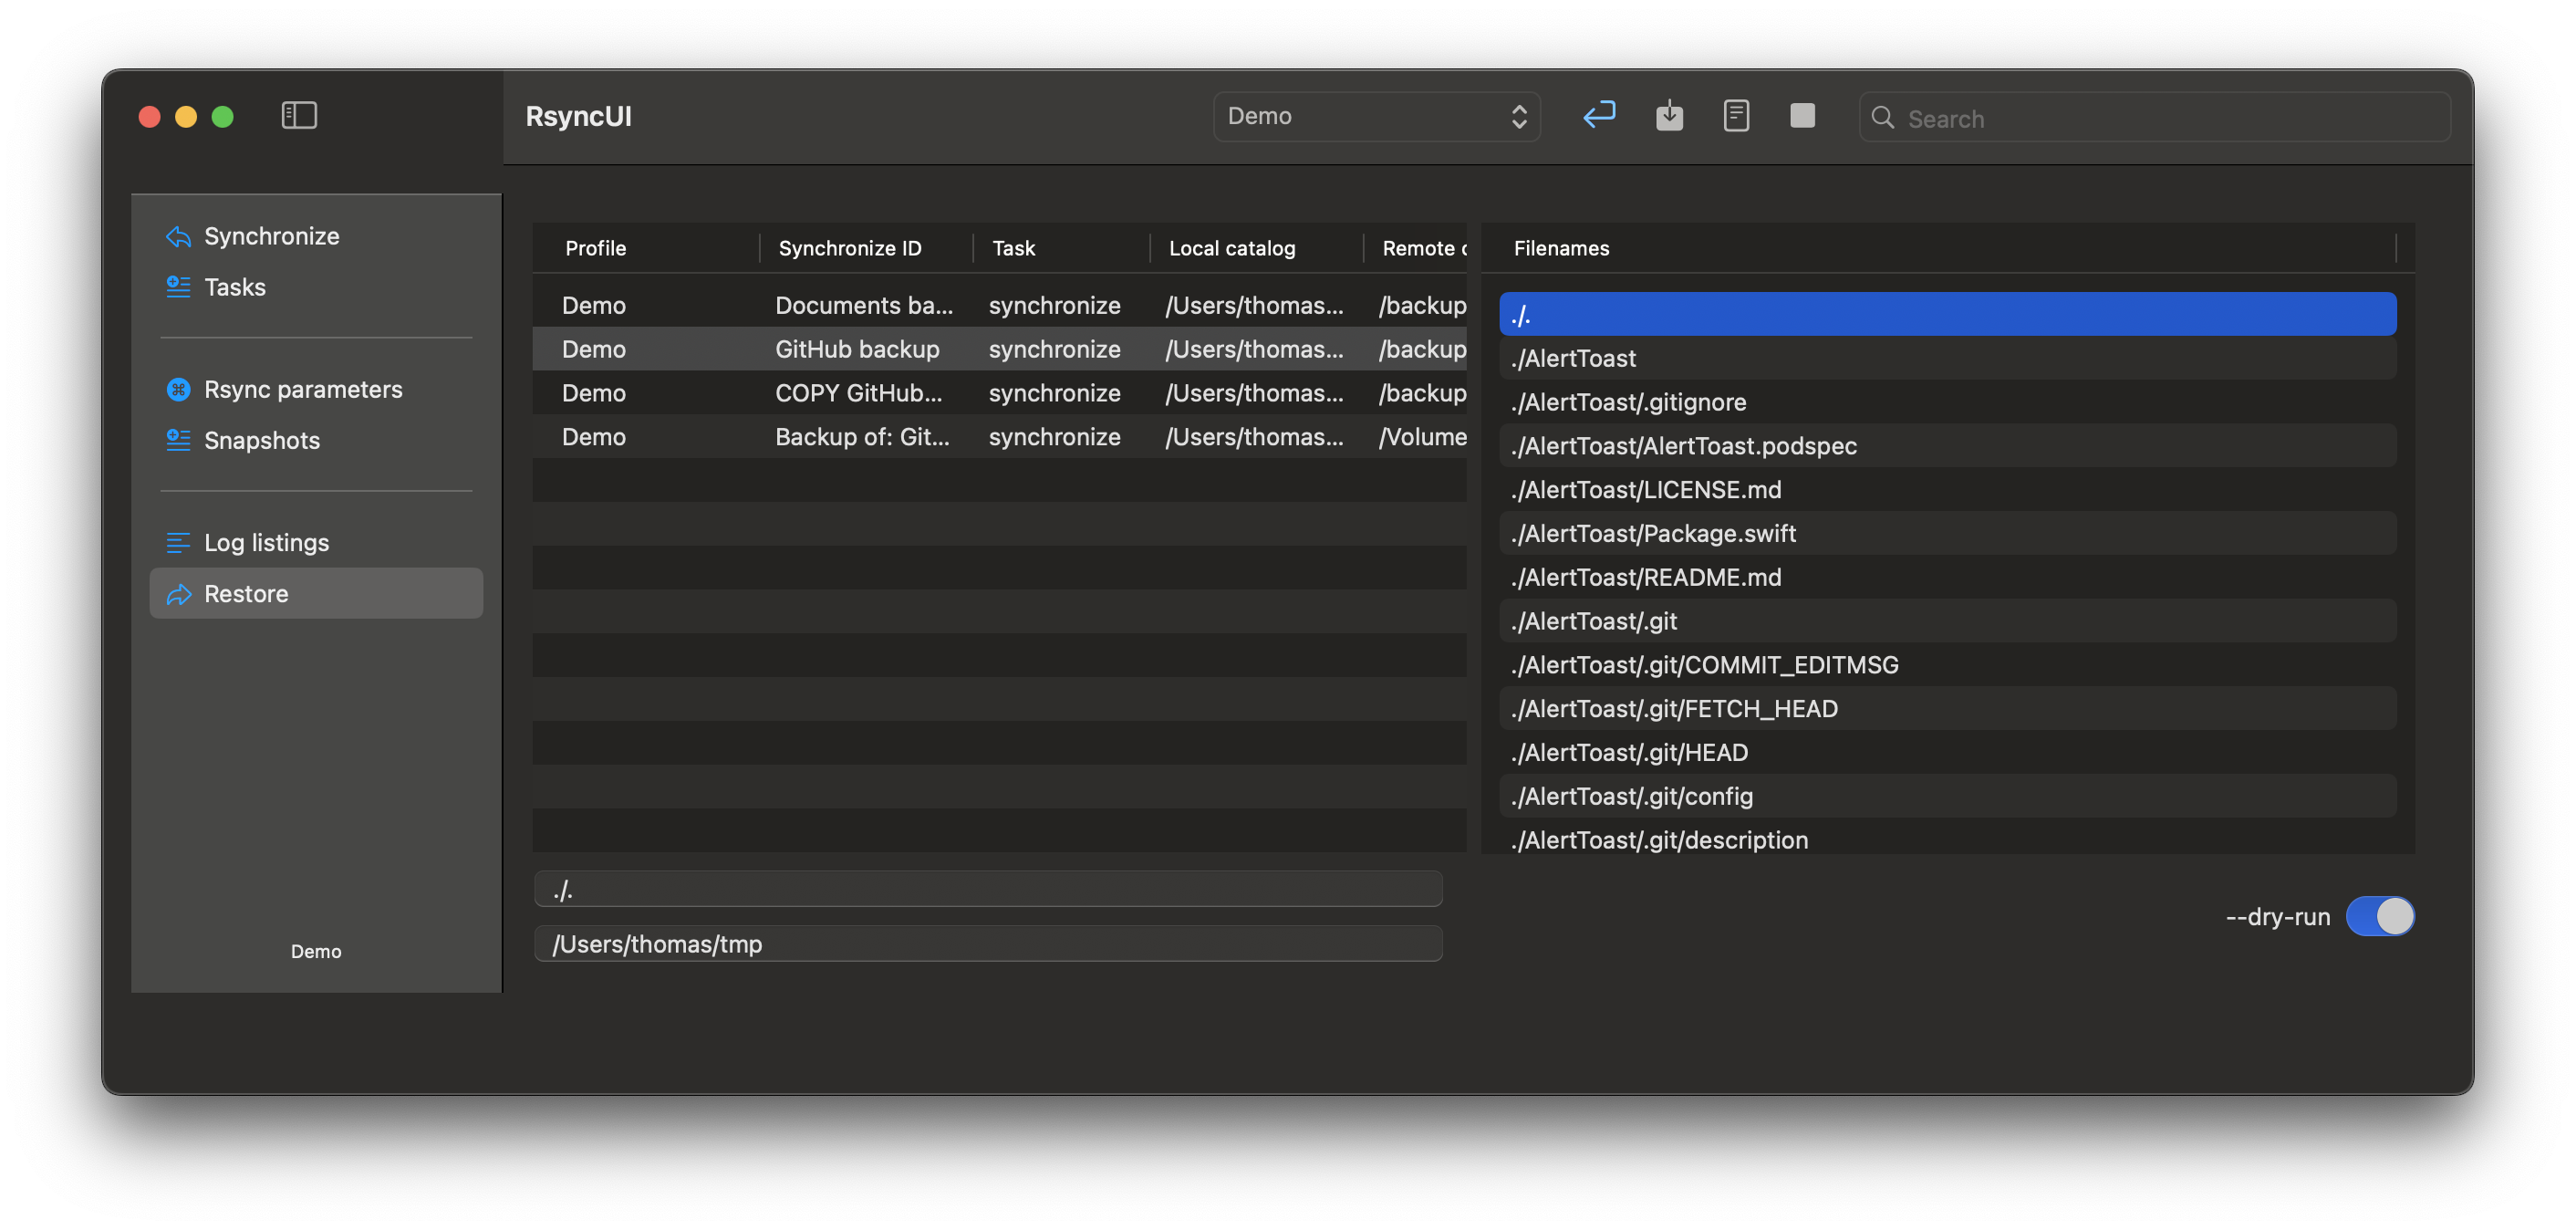
Data restoration from within RsyncUI is exclusively permitted for remote servers. Data restoration from attached volumes is only feasible using macOS Finder. A restore operation must be executed to a temporary restore path to ensure the preservation of original data. A typical restore session might proceed as follows:
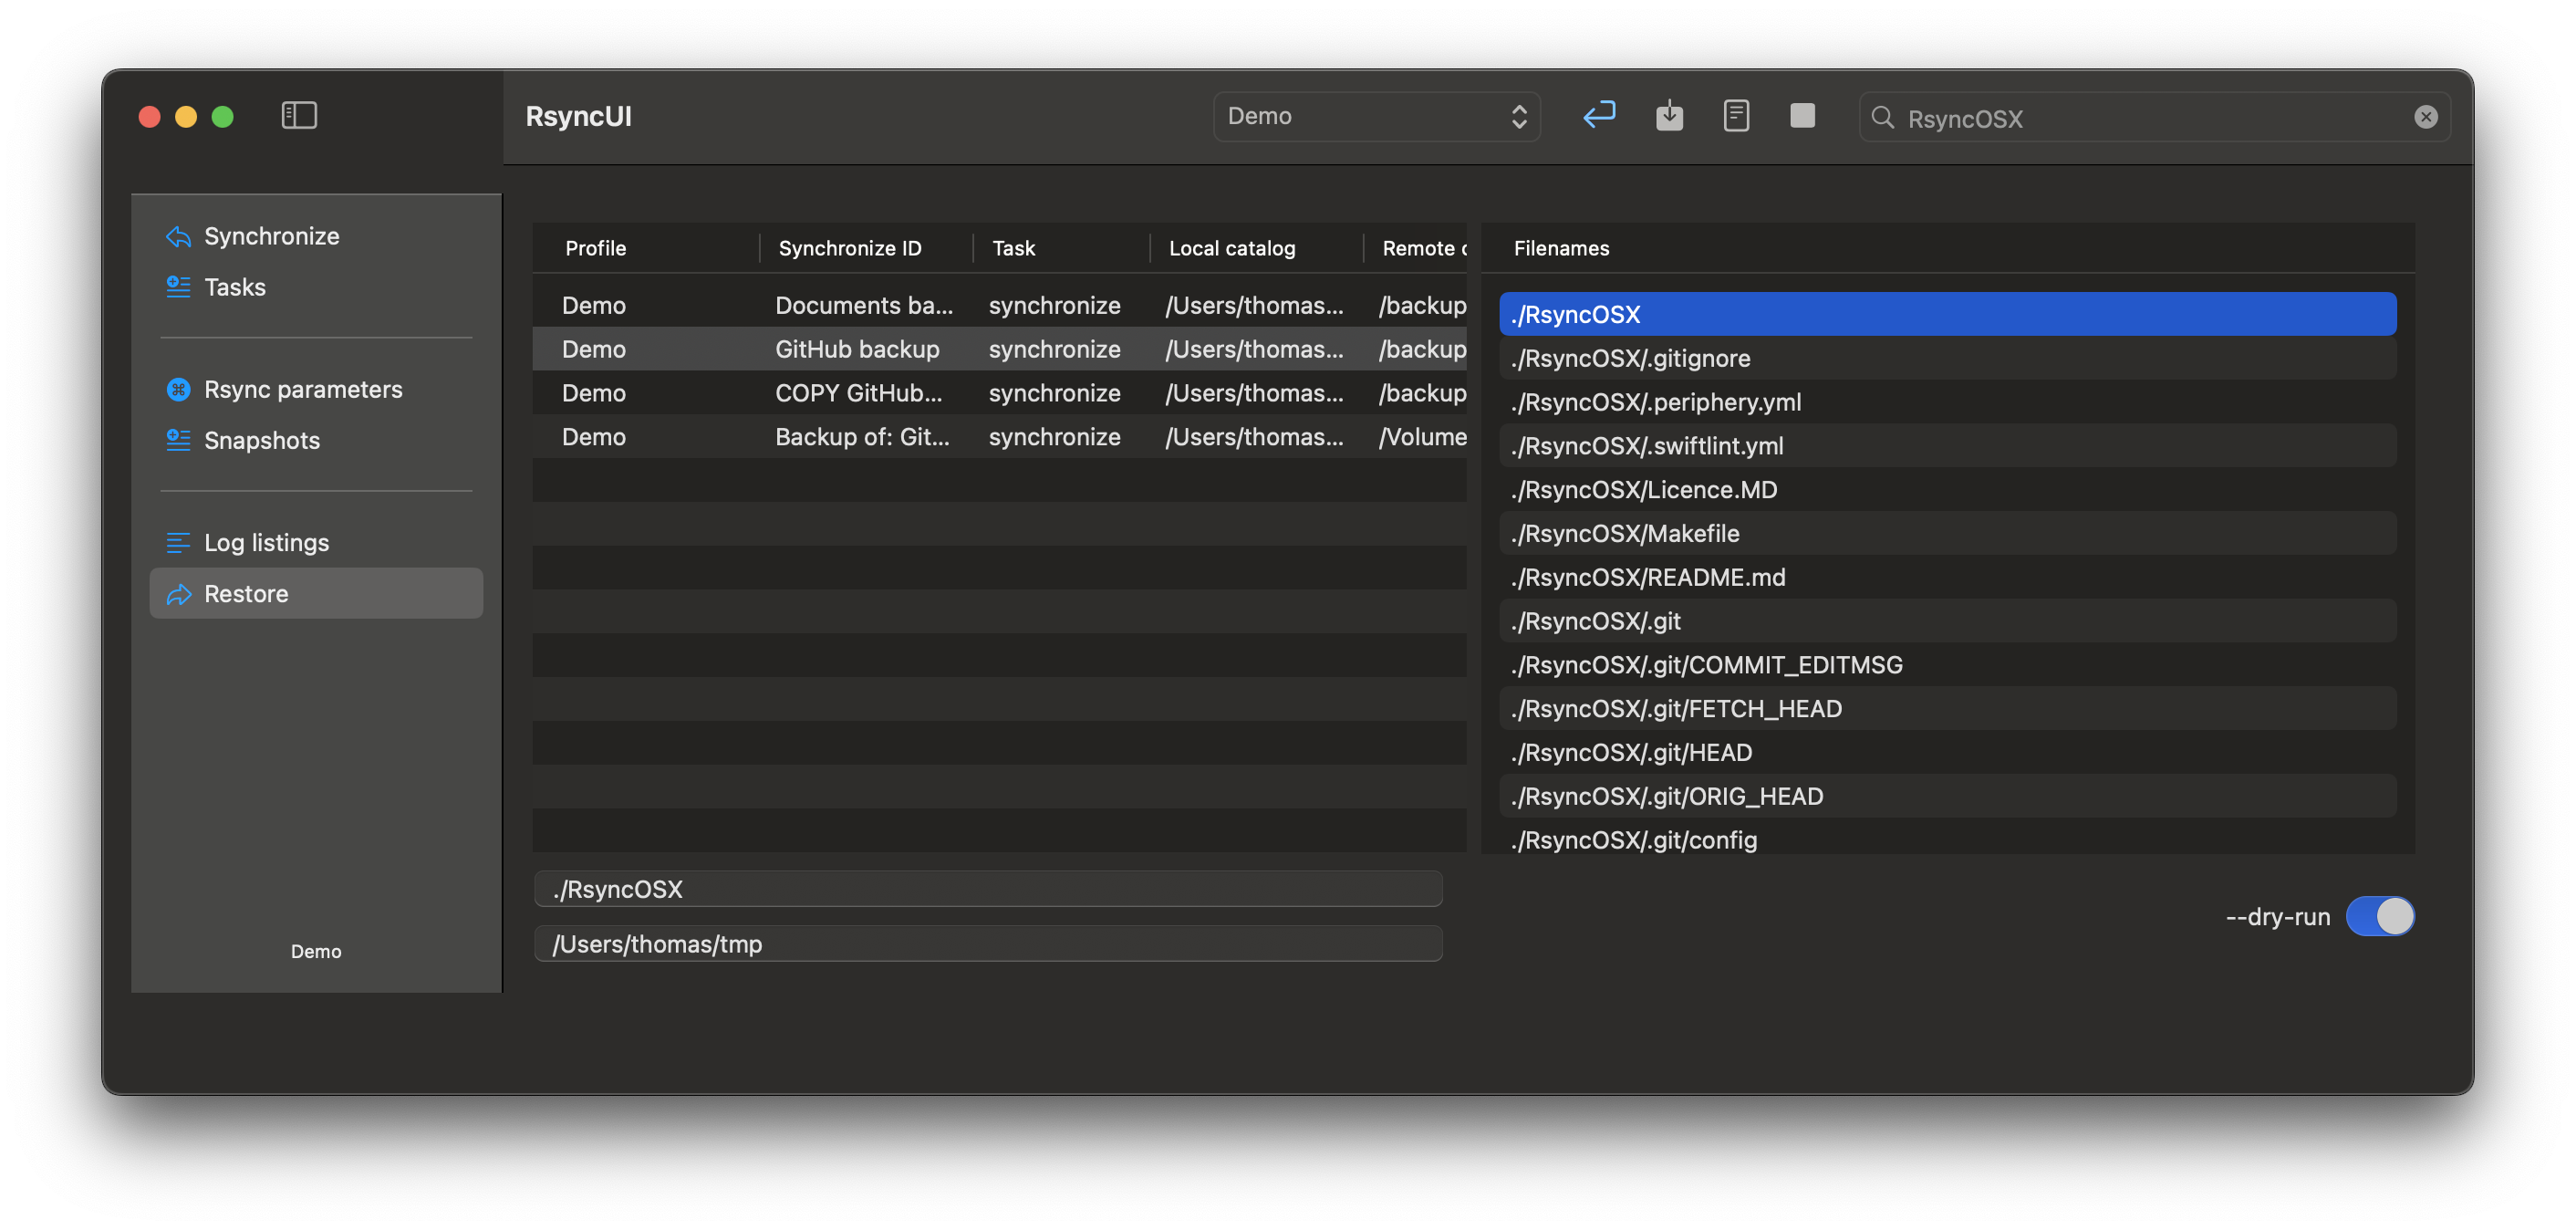
Filters will only retrieve filenames that contain the specified filter string.
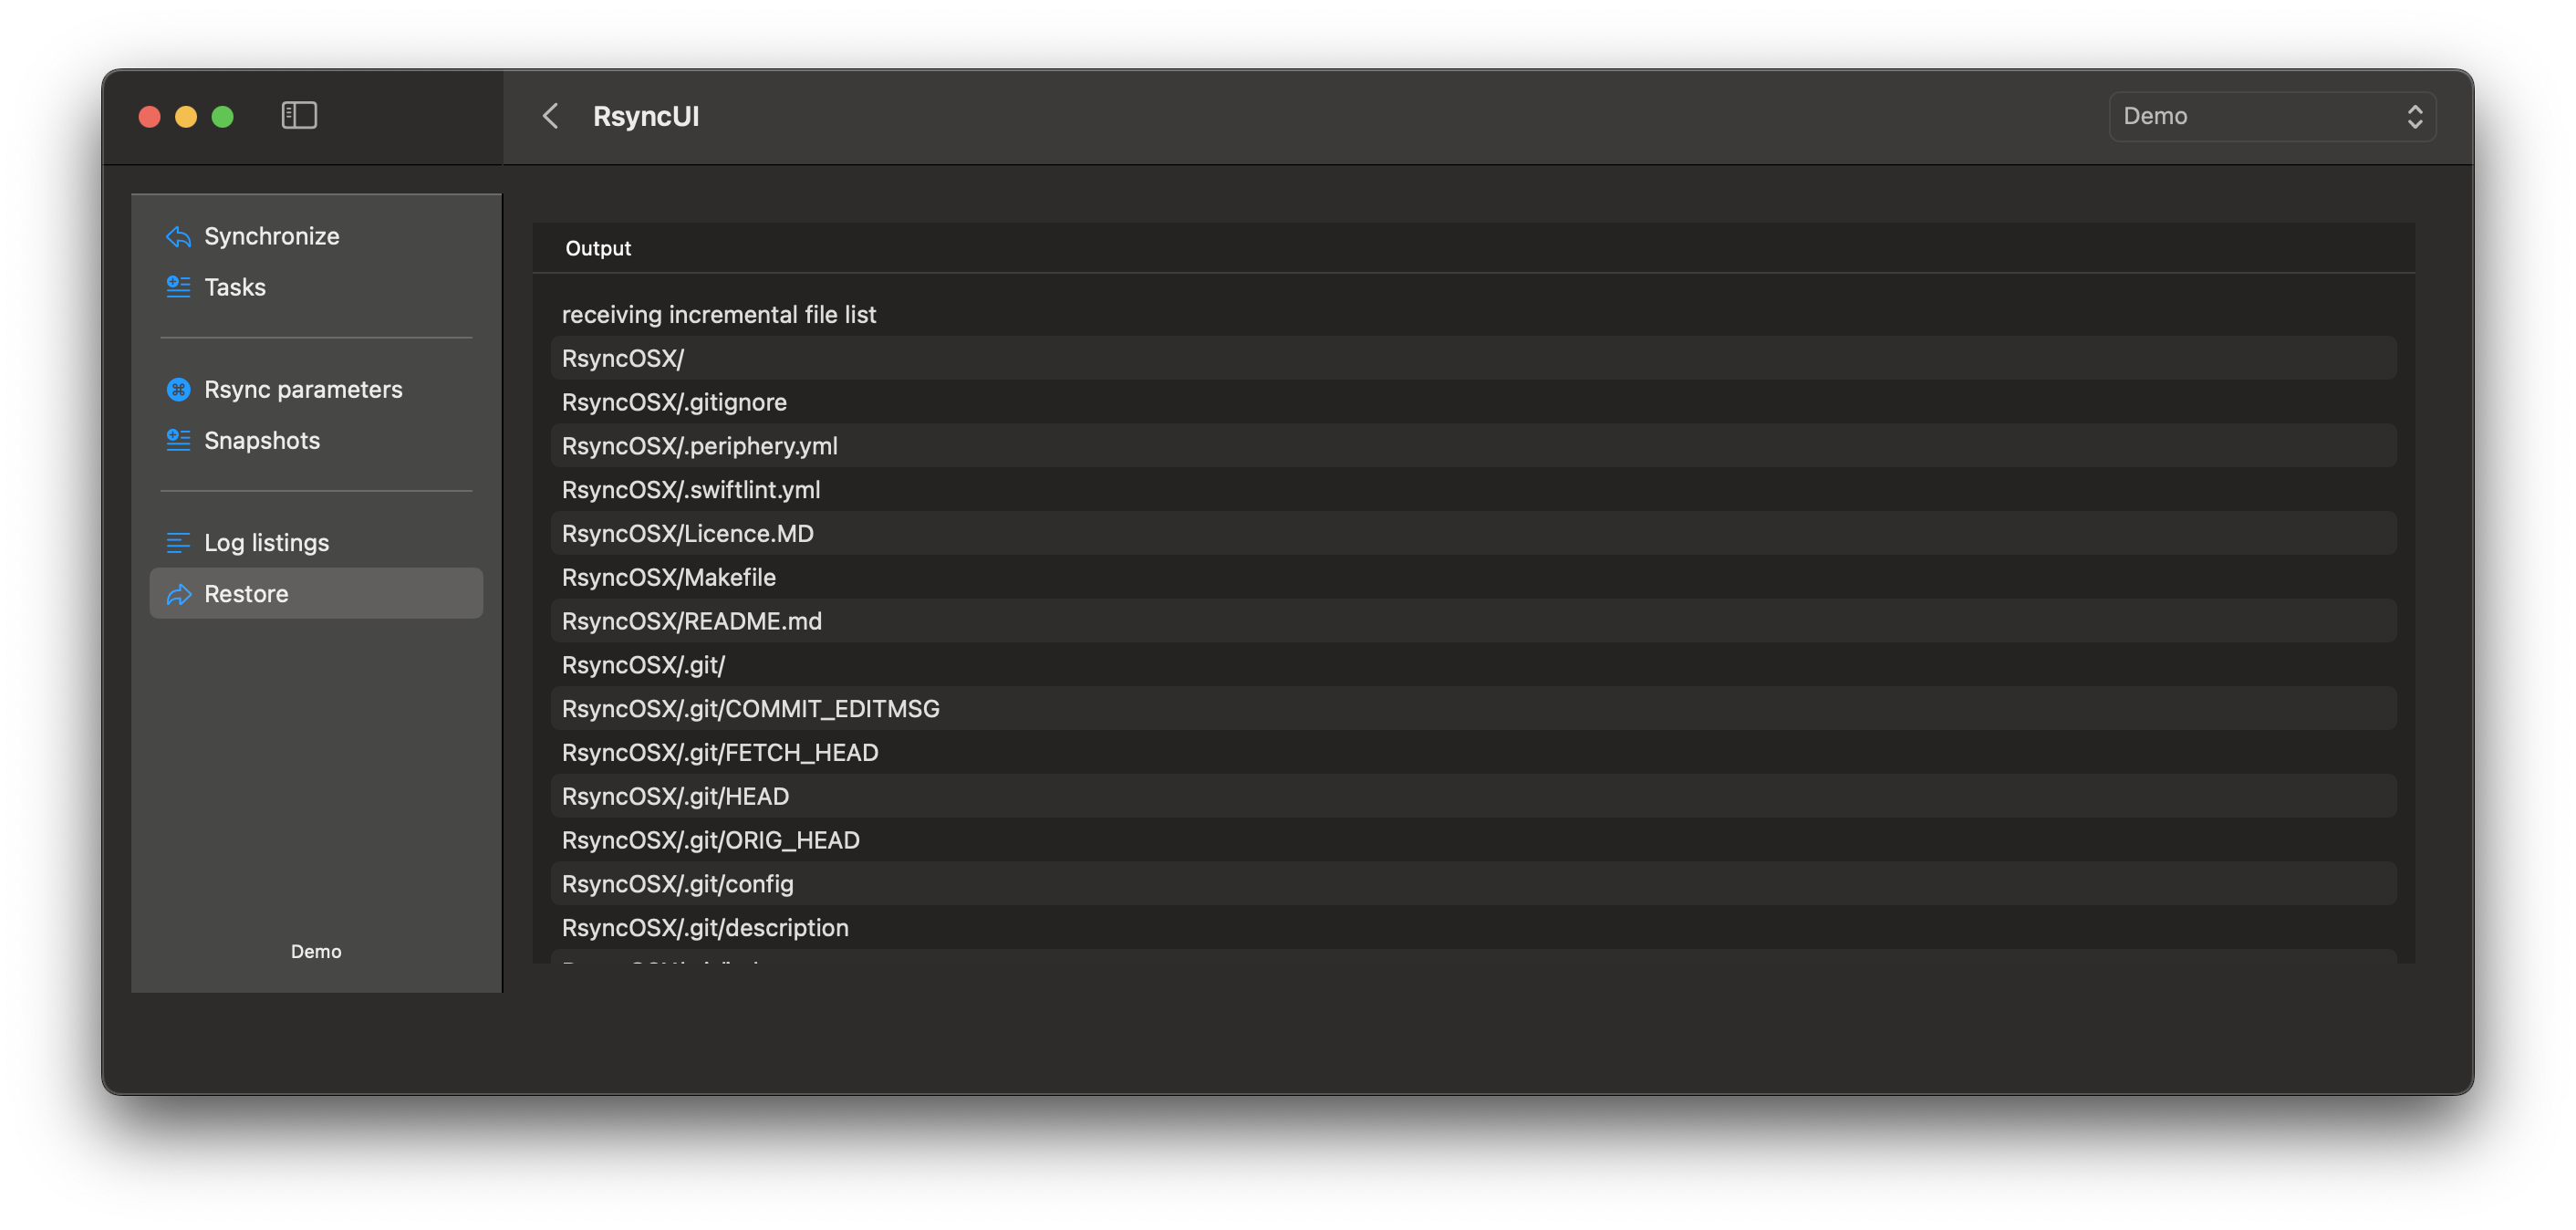
Select either a file or a directory to restore. Switching the command toggle reveals the actual restore command. Selecting “restore” displays a “–dry-run” of the restore operation. Switching the “–dry-run” toggle to “off” initiates the actual restore of files. After a restore, a view displaying the output from rsync will be presented.