RsyncUI is a macOS application built with Swift and SwiftUI for macOS Sonoma and later. The command-line tool rsync performs the synchronization; RsyncUI provides the GUI on top.
RsyncUI is free and open source. Please review the MIT license before you start using it. The project will remain open and free.
RsyncUI is digitally signed and notarized by Apple to protect against tampering. It is not sandboxed—sandboxing would block access to hidden directories such as .ssh or .rsyncosx and prevent using Homebrew’s rsync, making RsyncUI ineffective.
Concealing Actions
See Getting started for details on Concealing Actions. Toggle action visibility on the main toolbar with ⌘S.
Privacy statement
RsyncUI is a desktop-only app with no server component. It does not send logs off your Mac. Task data and logs stay local; you can back them up to your Documents directory from Settings. Data leaves your Mac only when you enable tasks that target a remote server, and you are responsible for securing that data.
Changelog and Installation
For current updates, see the changelog. RsyncUI ships as a Universal macOS Binary and runs natively on Apple Silicon and Intel Macs.
RsyncUI can be installed via Homebrew or downloaded from GitHub.
brew install --cask rsyncui
If installed via Homebrew, the SHA-256 hash is automatically verified. For downloads from GitHub, please verify the SHA-256 hash manually.
1 - Getting Started
Essential information to get started with RsyncUI. Read these pages first — they cover prerequisites, key warnings, and known limitations.
1.1 - Important
Before using RsyncUI, review these key notes.
The interface may feel challenging if you are new to the rsync command-line tool. RsyncUI focuses on making rsync easier to use, not on teaching every rsync concept.
Not a backup tool for everyone
RsyncUI specializes in synchronization and file management. The command-line tool rsync performs the actual work. If you need a full system backup tool that creates complete disk images, RsyncUI is not the right fit.
Delete parameter
The --delete parameter keeps the destination in exact sync with the source. When a file is removed from the source, rsync removes it from the destination. With --delete disabled, the destination will accumulate files removed from the source.
Know whether --delete is on or off before you run; it controls whether the destination mirrors the source.
As a safety precaution, --delete is not enabled by default on new tasks. Turn it on if you need the destination to mirror the source.
Add and remove the delete parameter
Select Parameters tab within the Tasks menu, select the task, and toggle Add –delete parameter (ON means included). After toggling, remember to update the task.
if ON, the –delete parameter is included
if OFF, the –delete parameter is removed
Always verify new task
Before running a new task, perform a --dry-run and inspect the result. If you set an empty source and --delete is enabled, rsync will delete all files in the destination.
Incorrect rsync parameters can delete data, and RsyncUI does not block such choices. See Getting started or Tasks for how to verify a task before running it.
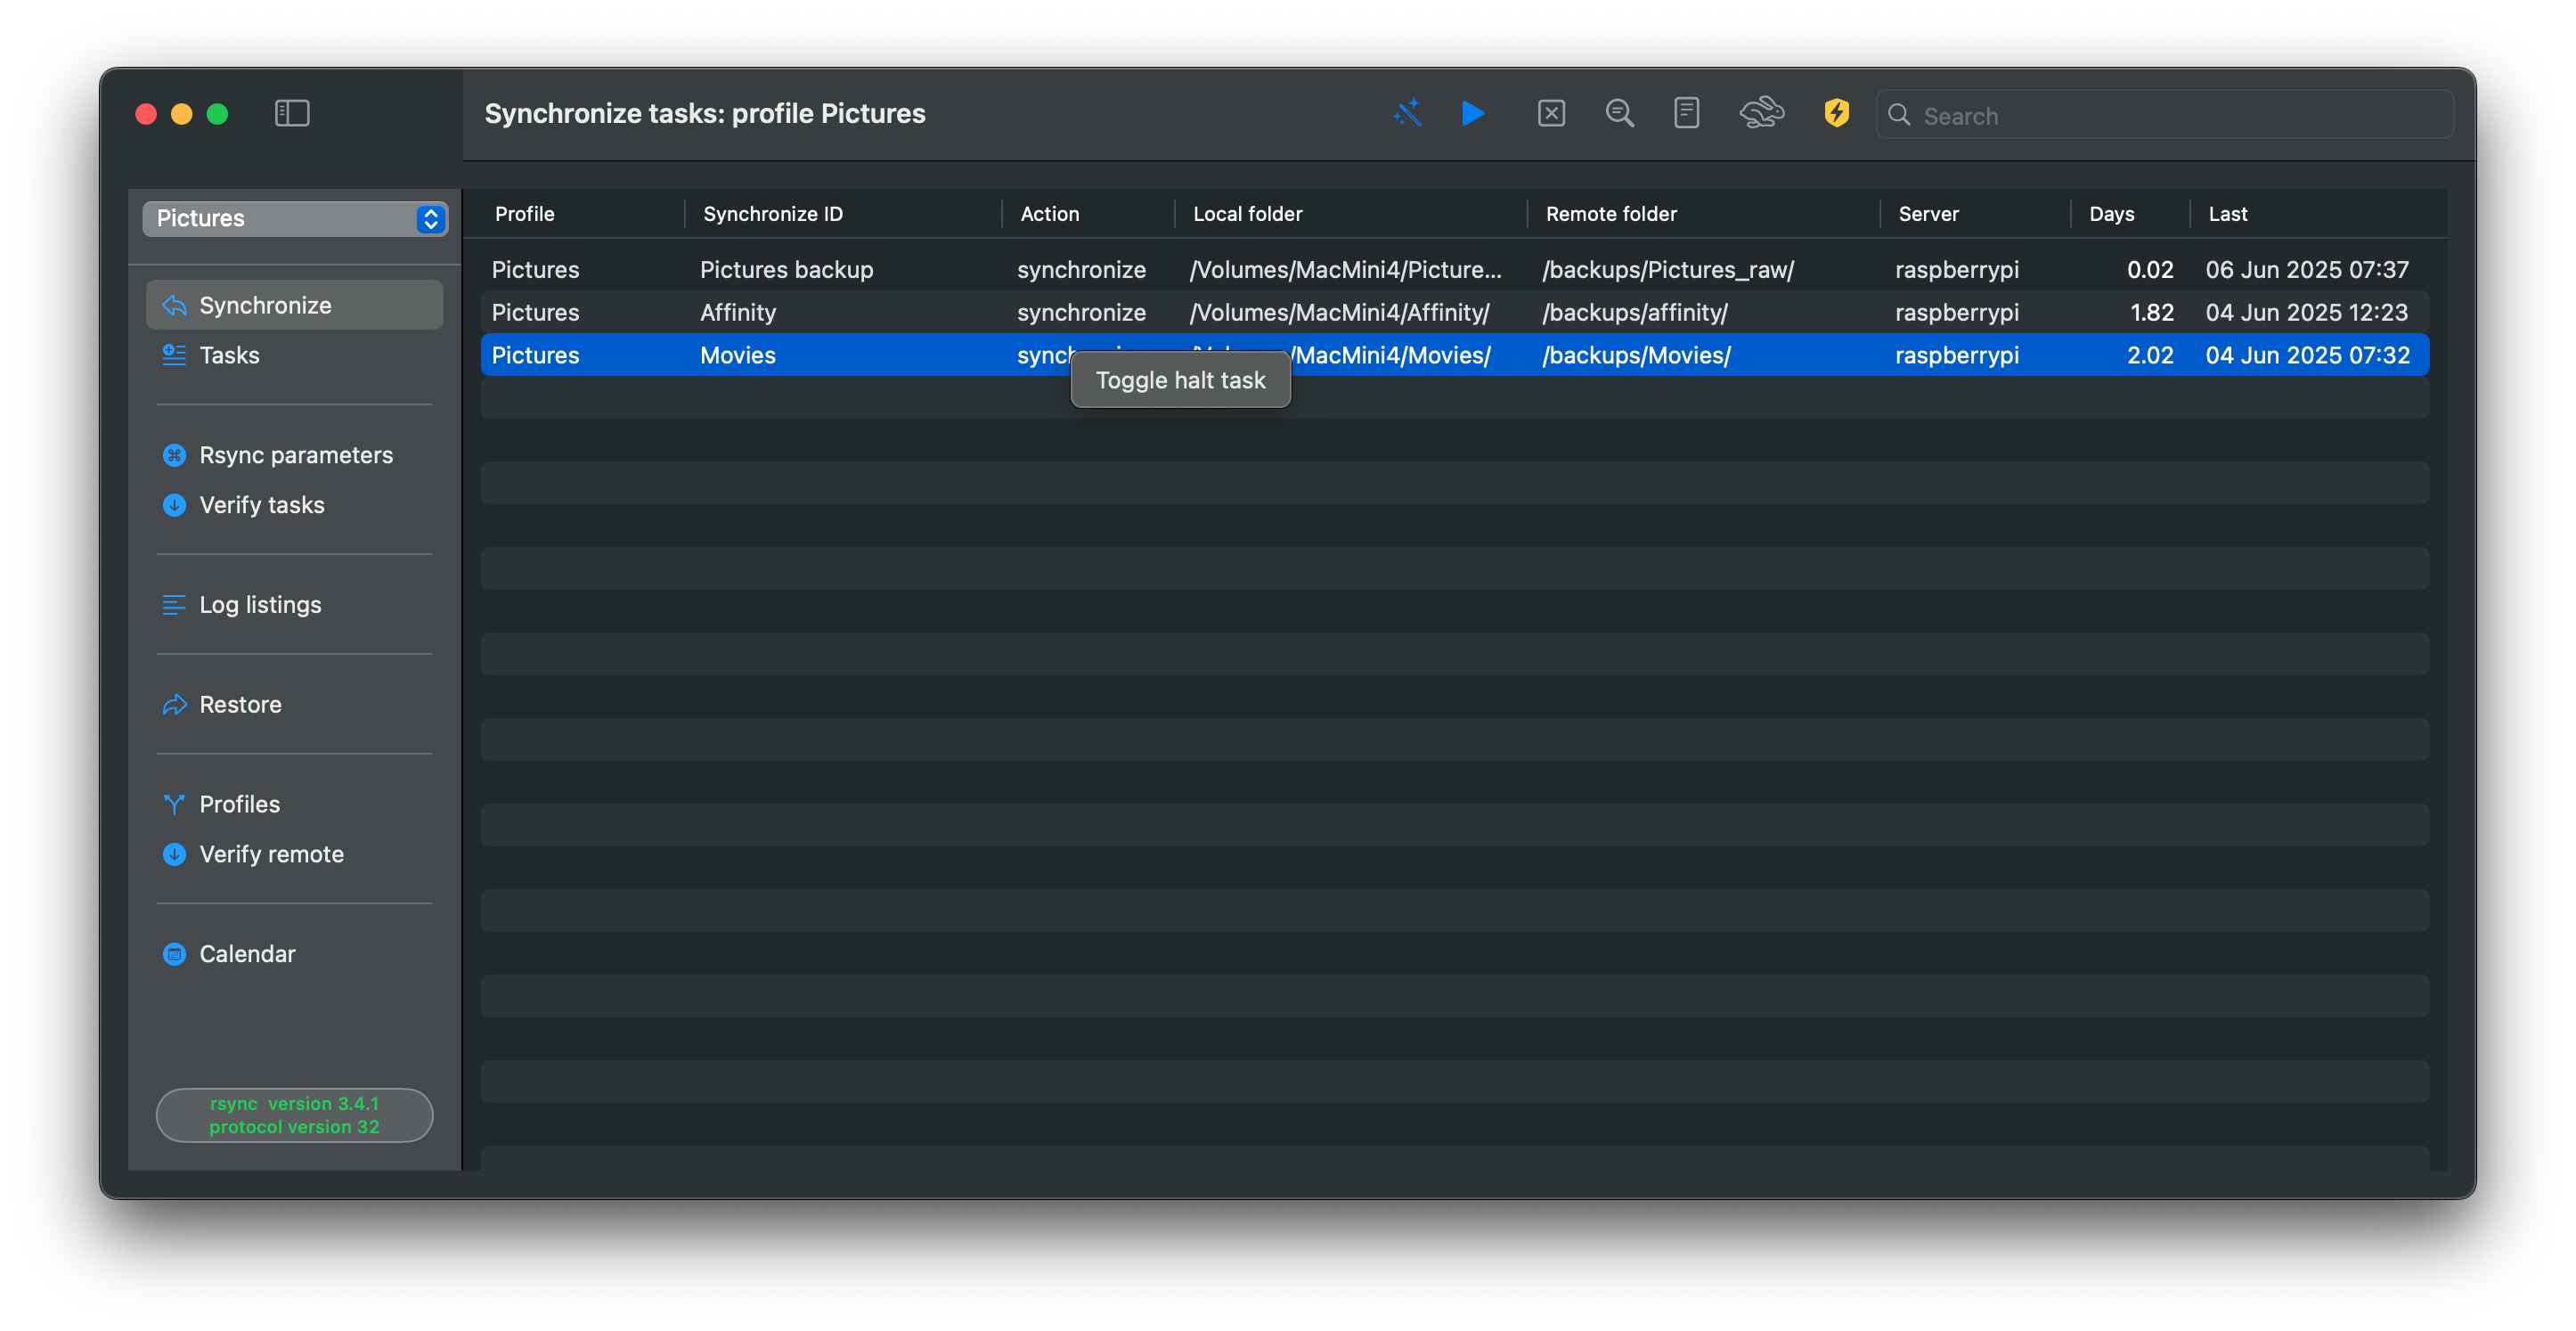
Temporary halt tasks
You can temporarily halt a task. In the Synchronize view, right-click a task to halt it; the task keeps its type when resumed. Halted tasks display a red stop sign in the action column.
Two options to save updates to data
These options apply to the data synchronized by RsyncUI. By enabling either of these options, you can save changes to data, such as deletions or updates, prior to a synchronization task.
There are two options to automatically save changes to data when it is changed or deleted.
Option 1:rsync supports a backup flag. Switching this on in the Rsync parameters view adds the required parameters. You may change the backup directory to any location you want.
Option 2:Snapshots require rsync 3.x. See Snapshots for details on enabling and using them.
1.2 - Limitations
There are a few limitations to keep in mind. None will corrupt data, but they may interrupt synchronization.
Long running tasks and sleep
When the Mac sleeps, RsyncUI tasks stop. An active rsync process does not prevent the Mac from sleeping. If sleep occurs during synchronization, rsync will likely error and stop. Restart the task in RsyncUI; rsync will resume from where it left off.
If this happens, RsyncUI will not log the run because it only logs after receiving a termination signal from rsync.
Adjust your Mac’s sleep settings to avoid interruptions.
Sleep interrupting an active rsync process will also affect scheduled tasks when using the Calendar function.
The Schedule
A note about scheduling: the scheduler relies on the Timer library. See Schedule for details.
The scheduler automates chosen tasks while RsyncUI is running and you are logged in. If the Mac sleeps and a scheduled task is missed, it will be listed in the Schedule view after the Mac wakes.
Aborting Tasks
RsyncUI launches the rsync command-line tool and monitors it.
You can abort a task at any time. Allow the abort to complete before starting another task; otherwise RsyncUI may become unresponsive.
1.3 - Getting started
New users should read Important first, then Latest version of rsync for installation guidance, then Tasks to create their first task.
Concealing Actions
Concealing actions reduces menu clutter and keeps focus on common tasks.
Use ⌘S or the Task main menu to show or hide Charts, Quick task, log view, and other options that are hidden by default. The primary Sidebar menu is also context-sensitive.
New Tasks and Verification
RsyncUI can synchronize data to:
local attached disk
remote servers on the Internet or local LAN
requires passwordless login by ssh-key
Local attached disk
To sync to a local attached disk, connect the disk, add source and destination, and you are ready for your first task.
Remote server and passwordless login
To sync to a remote server (internet or LAN), set up passwordless SSH. With SSH keys in place, add source, destination, login id, and server name and you can synchronize. Without passwordless login, additional setup is required.
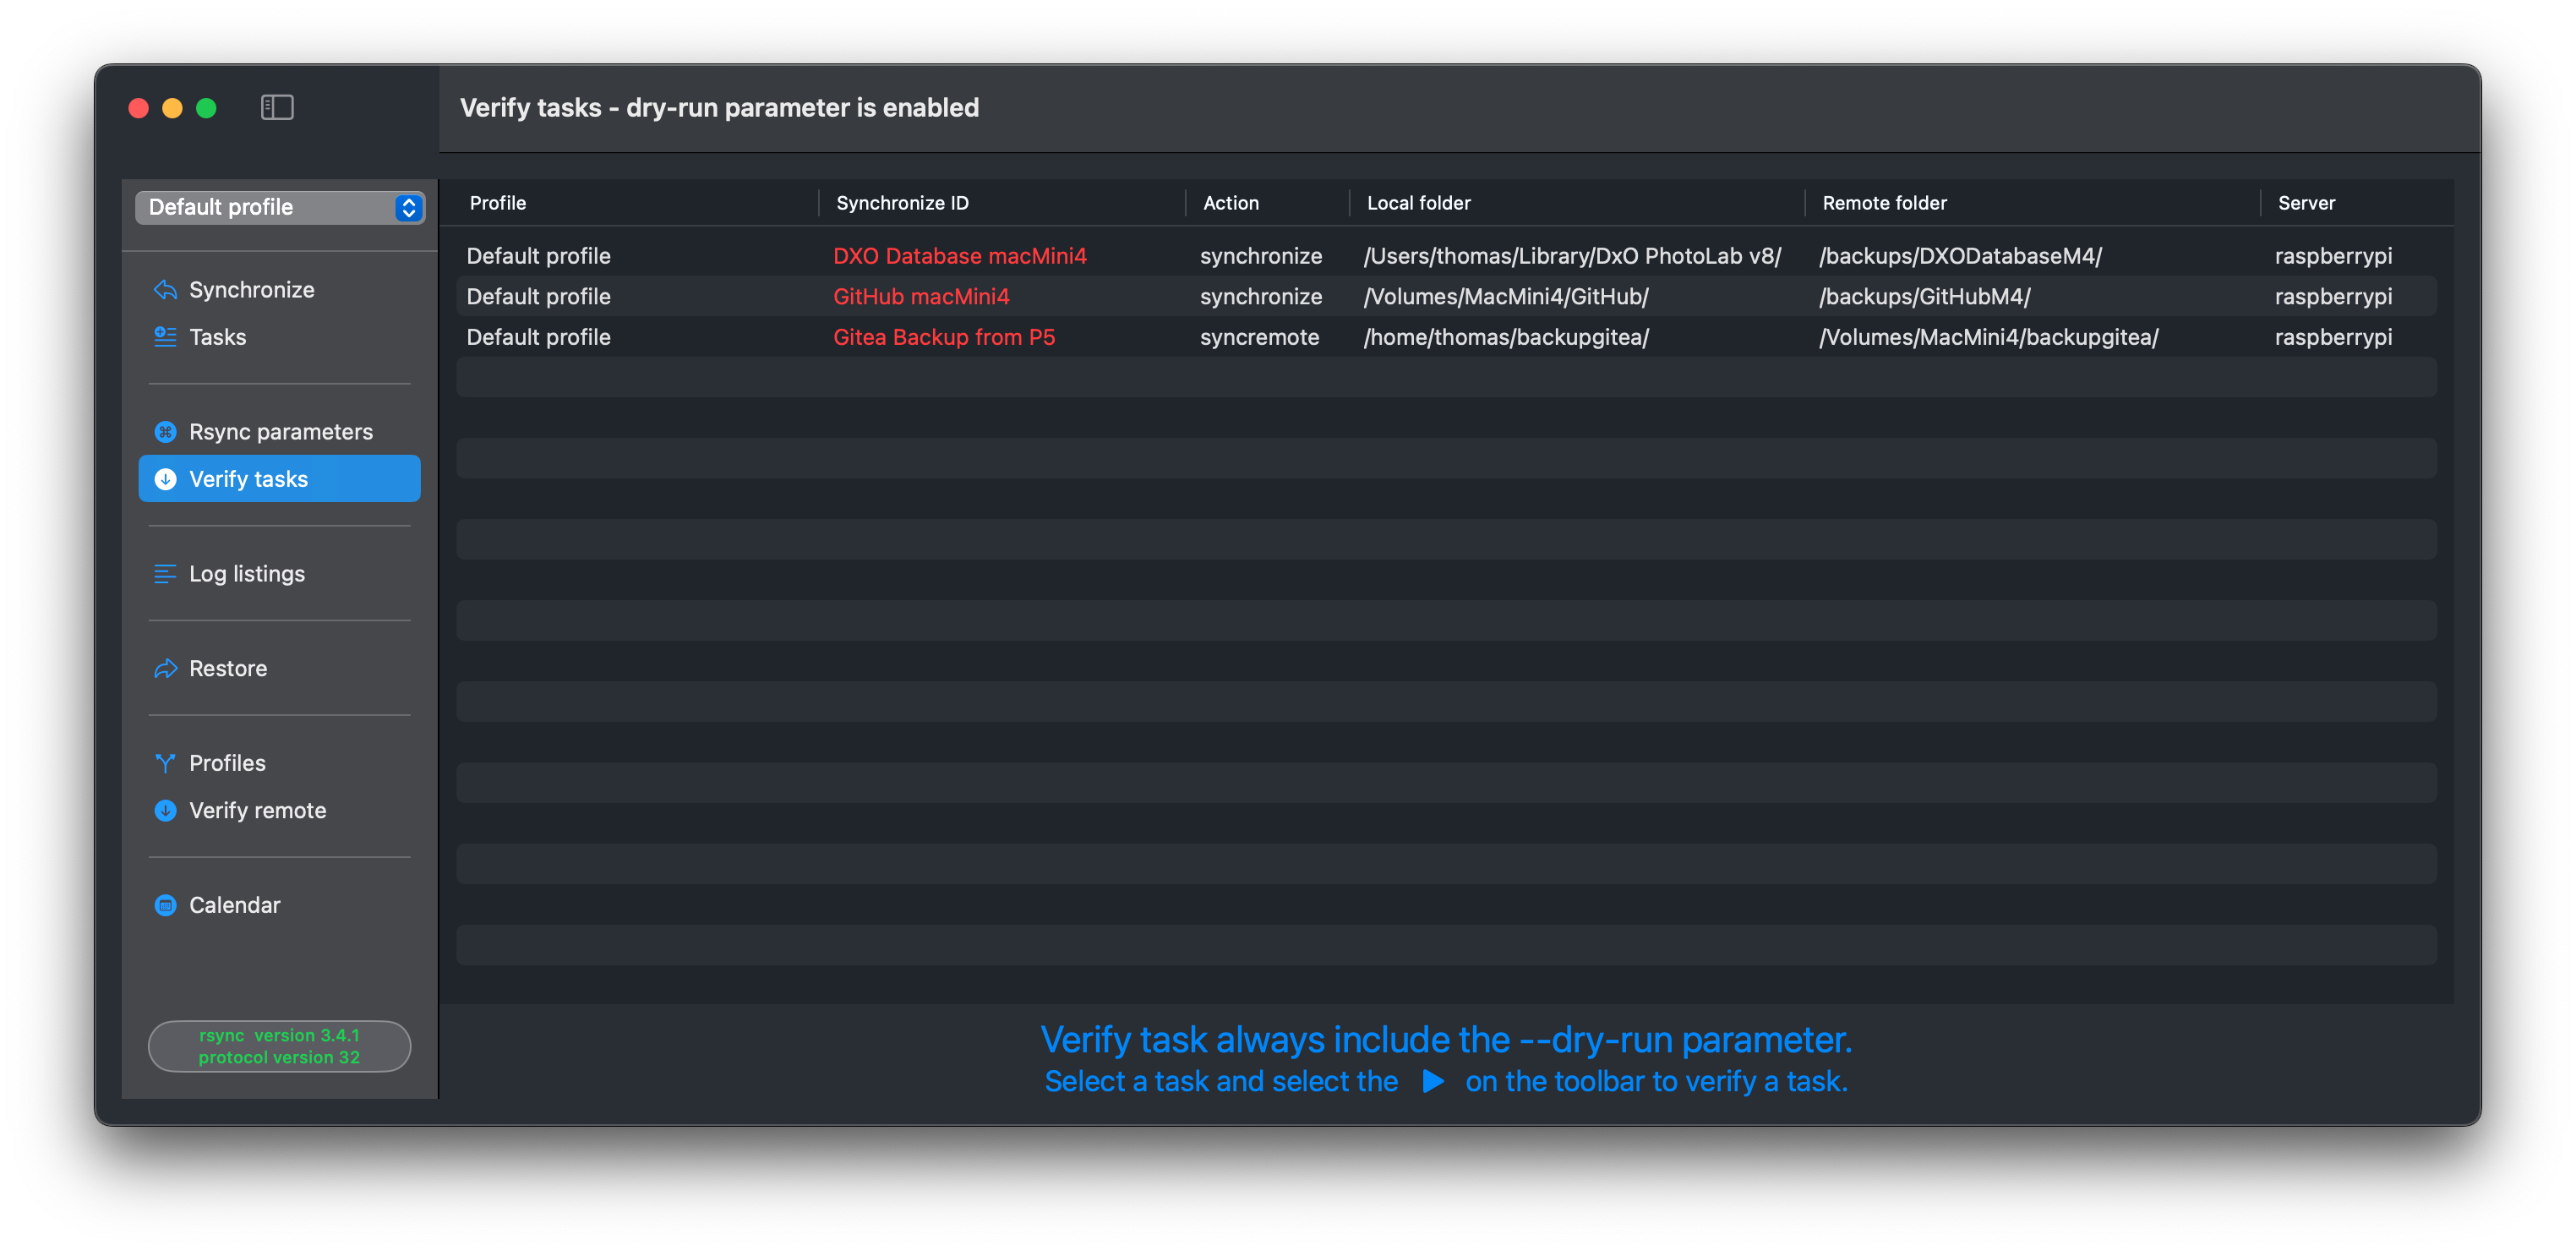
Verify tasks
Always verify a new or changed task. After adding or editing a task, or after changing rsync parameters, select “Verify tasks” from the primary Sidebar menu.
Select the task and press the play button on the toolbar. Executing the play button includes the –dry-run parameter for rsync, which is an estimation run.
Aborting tasks
RsyncUI executes the command-line tool rsync and monitors progress and termination.
You can abort a task at any time. Allow the abort to complete and cleanup to finish before starting another task; otherwise the app may become unresponsive.
Errors in tagging data
Sometimes you may get the error:
There are errors in tagging data
for synchronize ID XXXX
Most likely number of rows
> 20 lines and no data to synchronize
The message confirms that all data appears synchronized. RsyncUI bases this on rsync summary output. If there are more than ~20 lines yet no data tagged for sync, the message reminds you to double-check. To verify, run the task without an estimate.
Version 3.x of rsync:
Version openrsync:
The Sidebar Menu options
Two Sidebar menu options depend on task properties. If any task meets the requirement, the option appears.
Snapshot: available only for snapshot tasks
requires rsync 3.x
Restore: available for synchronize and snapshot tasks where the destination is on a remote server
also available for openrsync, but only for synchronize tasks
If the Sidebar is hidden, click the Hide Sidebar icon (top left) or toggle Hide the Sidebar on startup in Settings.
1.4 - Latest version of rsync
The default /usr/bin/rsync differs between macOS versions:
macOS Sonoma: Uses rsync version 2.6.9 (released November 2006)
macOS Sequoia and later: Use openrsync, a BSD-licensed implementation compatible with rsync protocol 29 and version 2.6.9
I strongly recommend installing the latest version of rsync (version 3.x) to take full advantage of RsyncUI’s features.
Installing rsync via Homebrew
Install the latest version using Homebrew:
brew install rsync
After installation, configure RsyncUI:
Navigate to Settings and select Rsync and path
Enable Rsync ver3.x
RsyncUI will automatically set the correct path
Note: RsyncUI’s snapshot and sync remote features require rsync version 3.x due to limitations in version 2.6.9.
2 - Tasks
How to add, edit, and manage tasks in RsyncUI. Always verify a new task with a --dry-run before executing it.
2.1 - New tasks
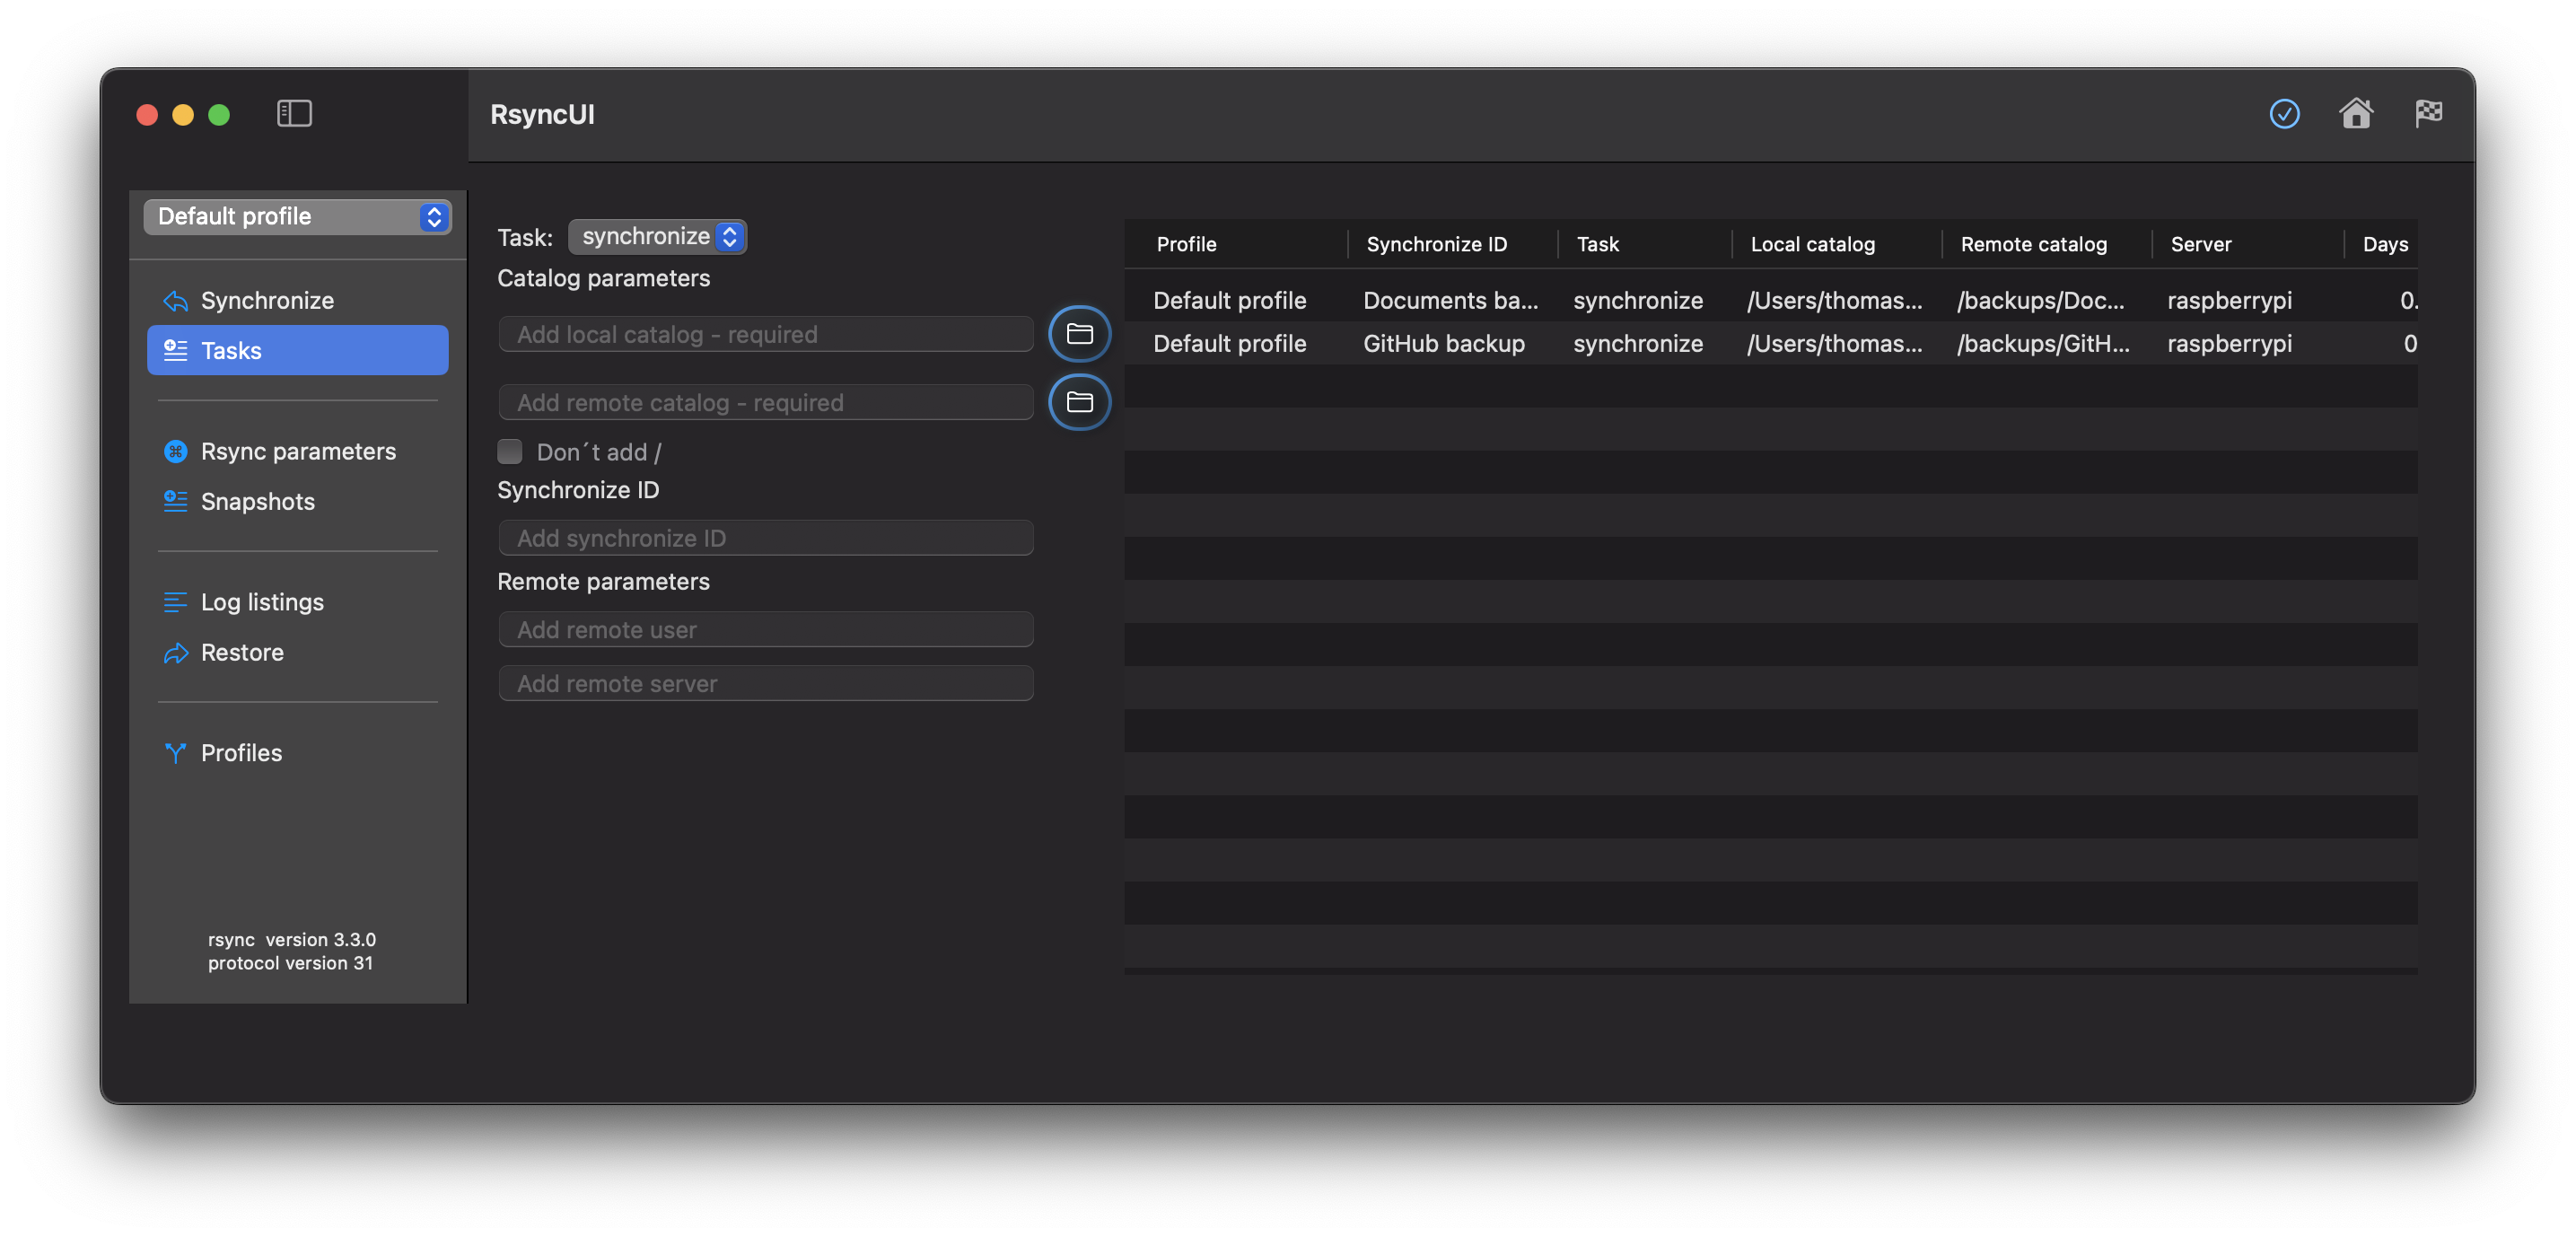
A task requires a minimum of a source directory and a destination directory. The destination can be a local attached disk or a remote server.
Always verify the result of a new task before executing. Select “Verify tasks” from the primary Sidebar menu.
Pressing the Enter key will advance to the next field. Pressing the Enter key will automatically add a new task after the last input. Tasks are saved to permanent storage after each entry.
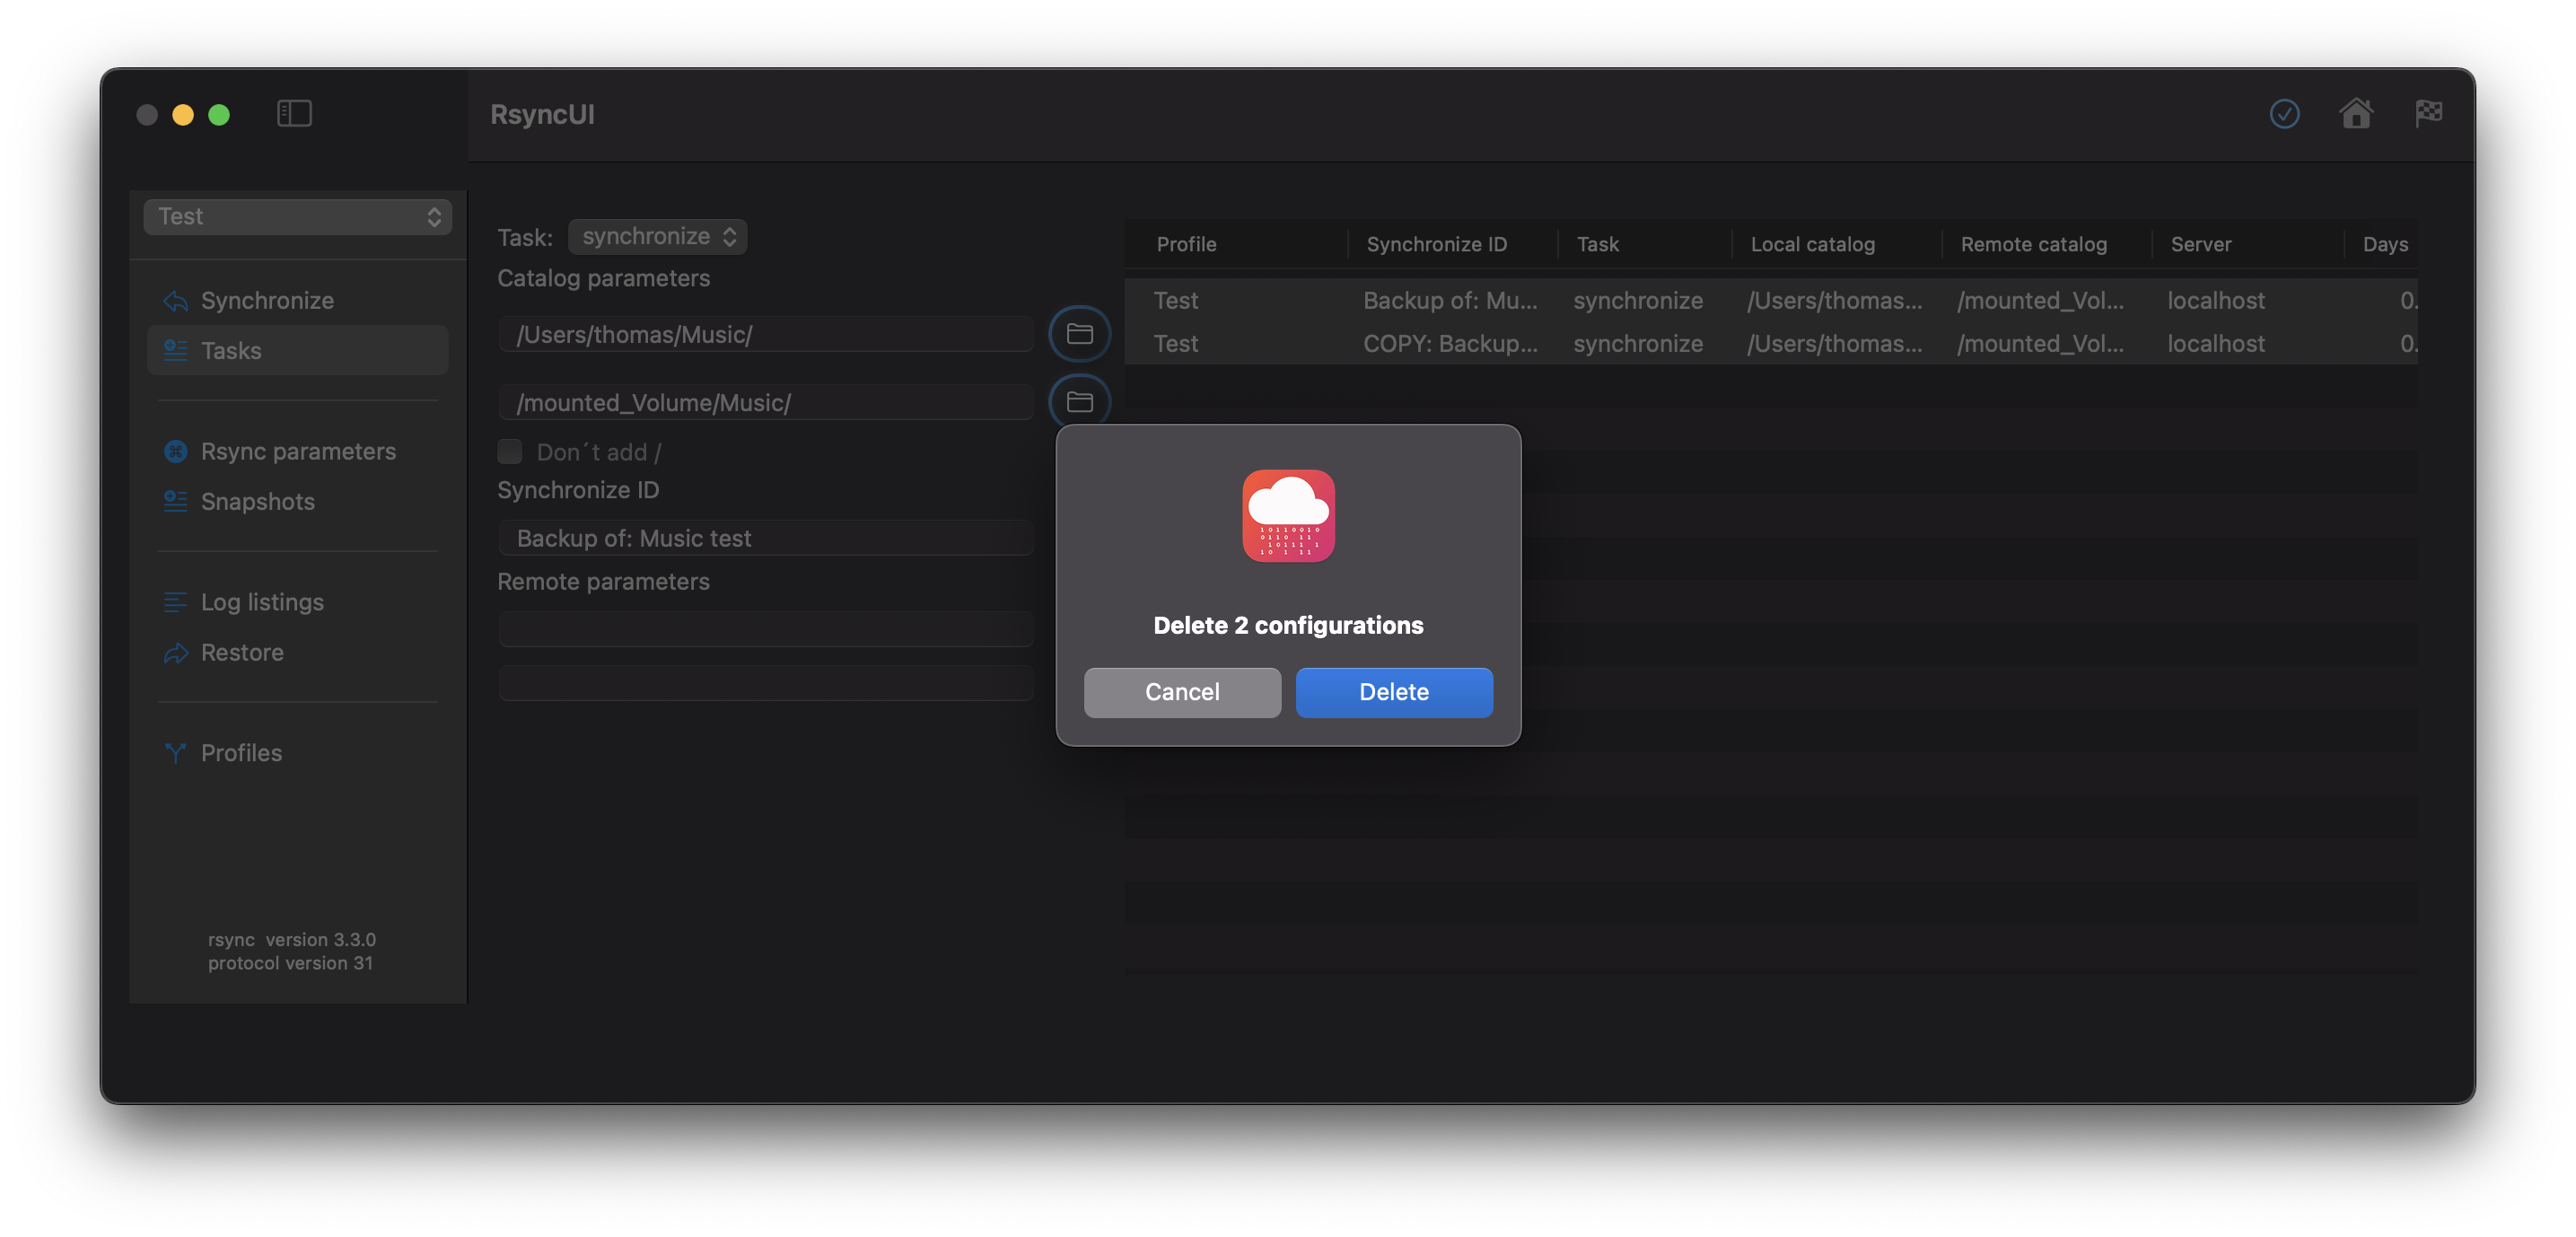
Delete Tasks
Select the tasks you wish to delete and delete them from the Edit menu or by pressing the backspace button.
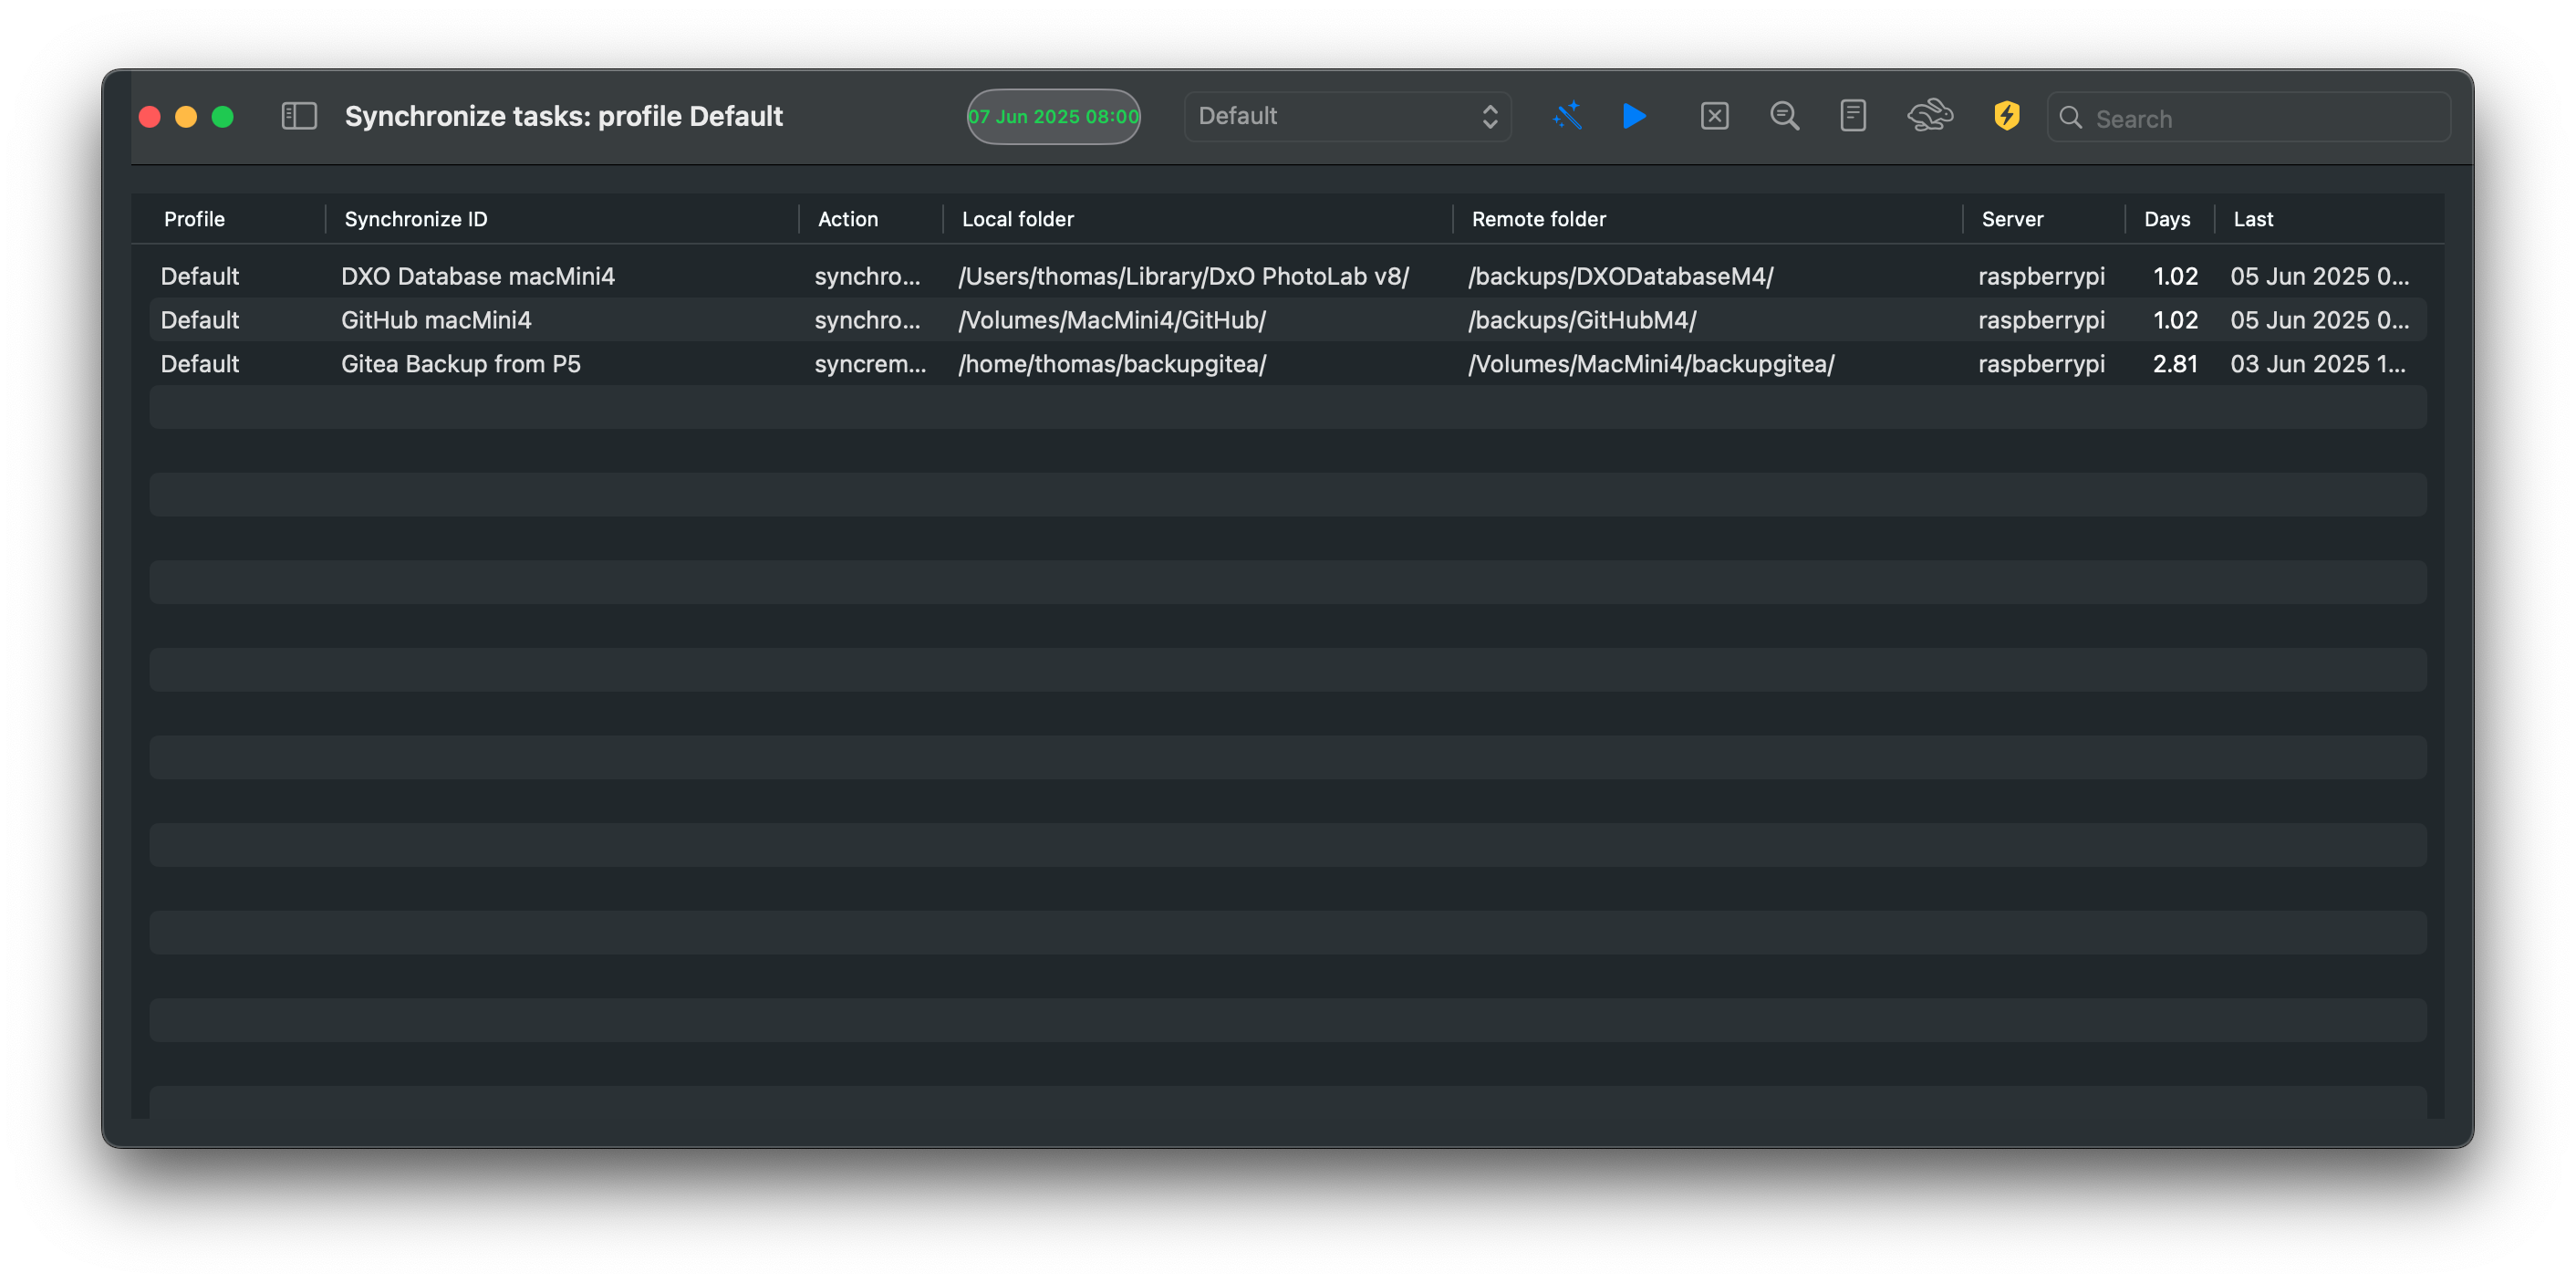
Data about Tasks
The following data pertains to tasks:
Action
synchronize - default action for synchronize data from a source to a destination
snapshot - saves changes and deletions prior to a synchronize operation
syncremote - synchronize data from a remote source to a local folder
when adding a syncremote action, add the local folder first and the remote folder as second, RsyncUI will do the flip
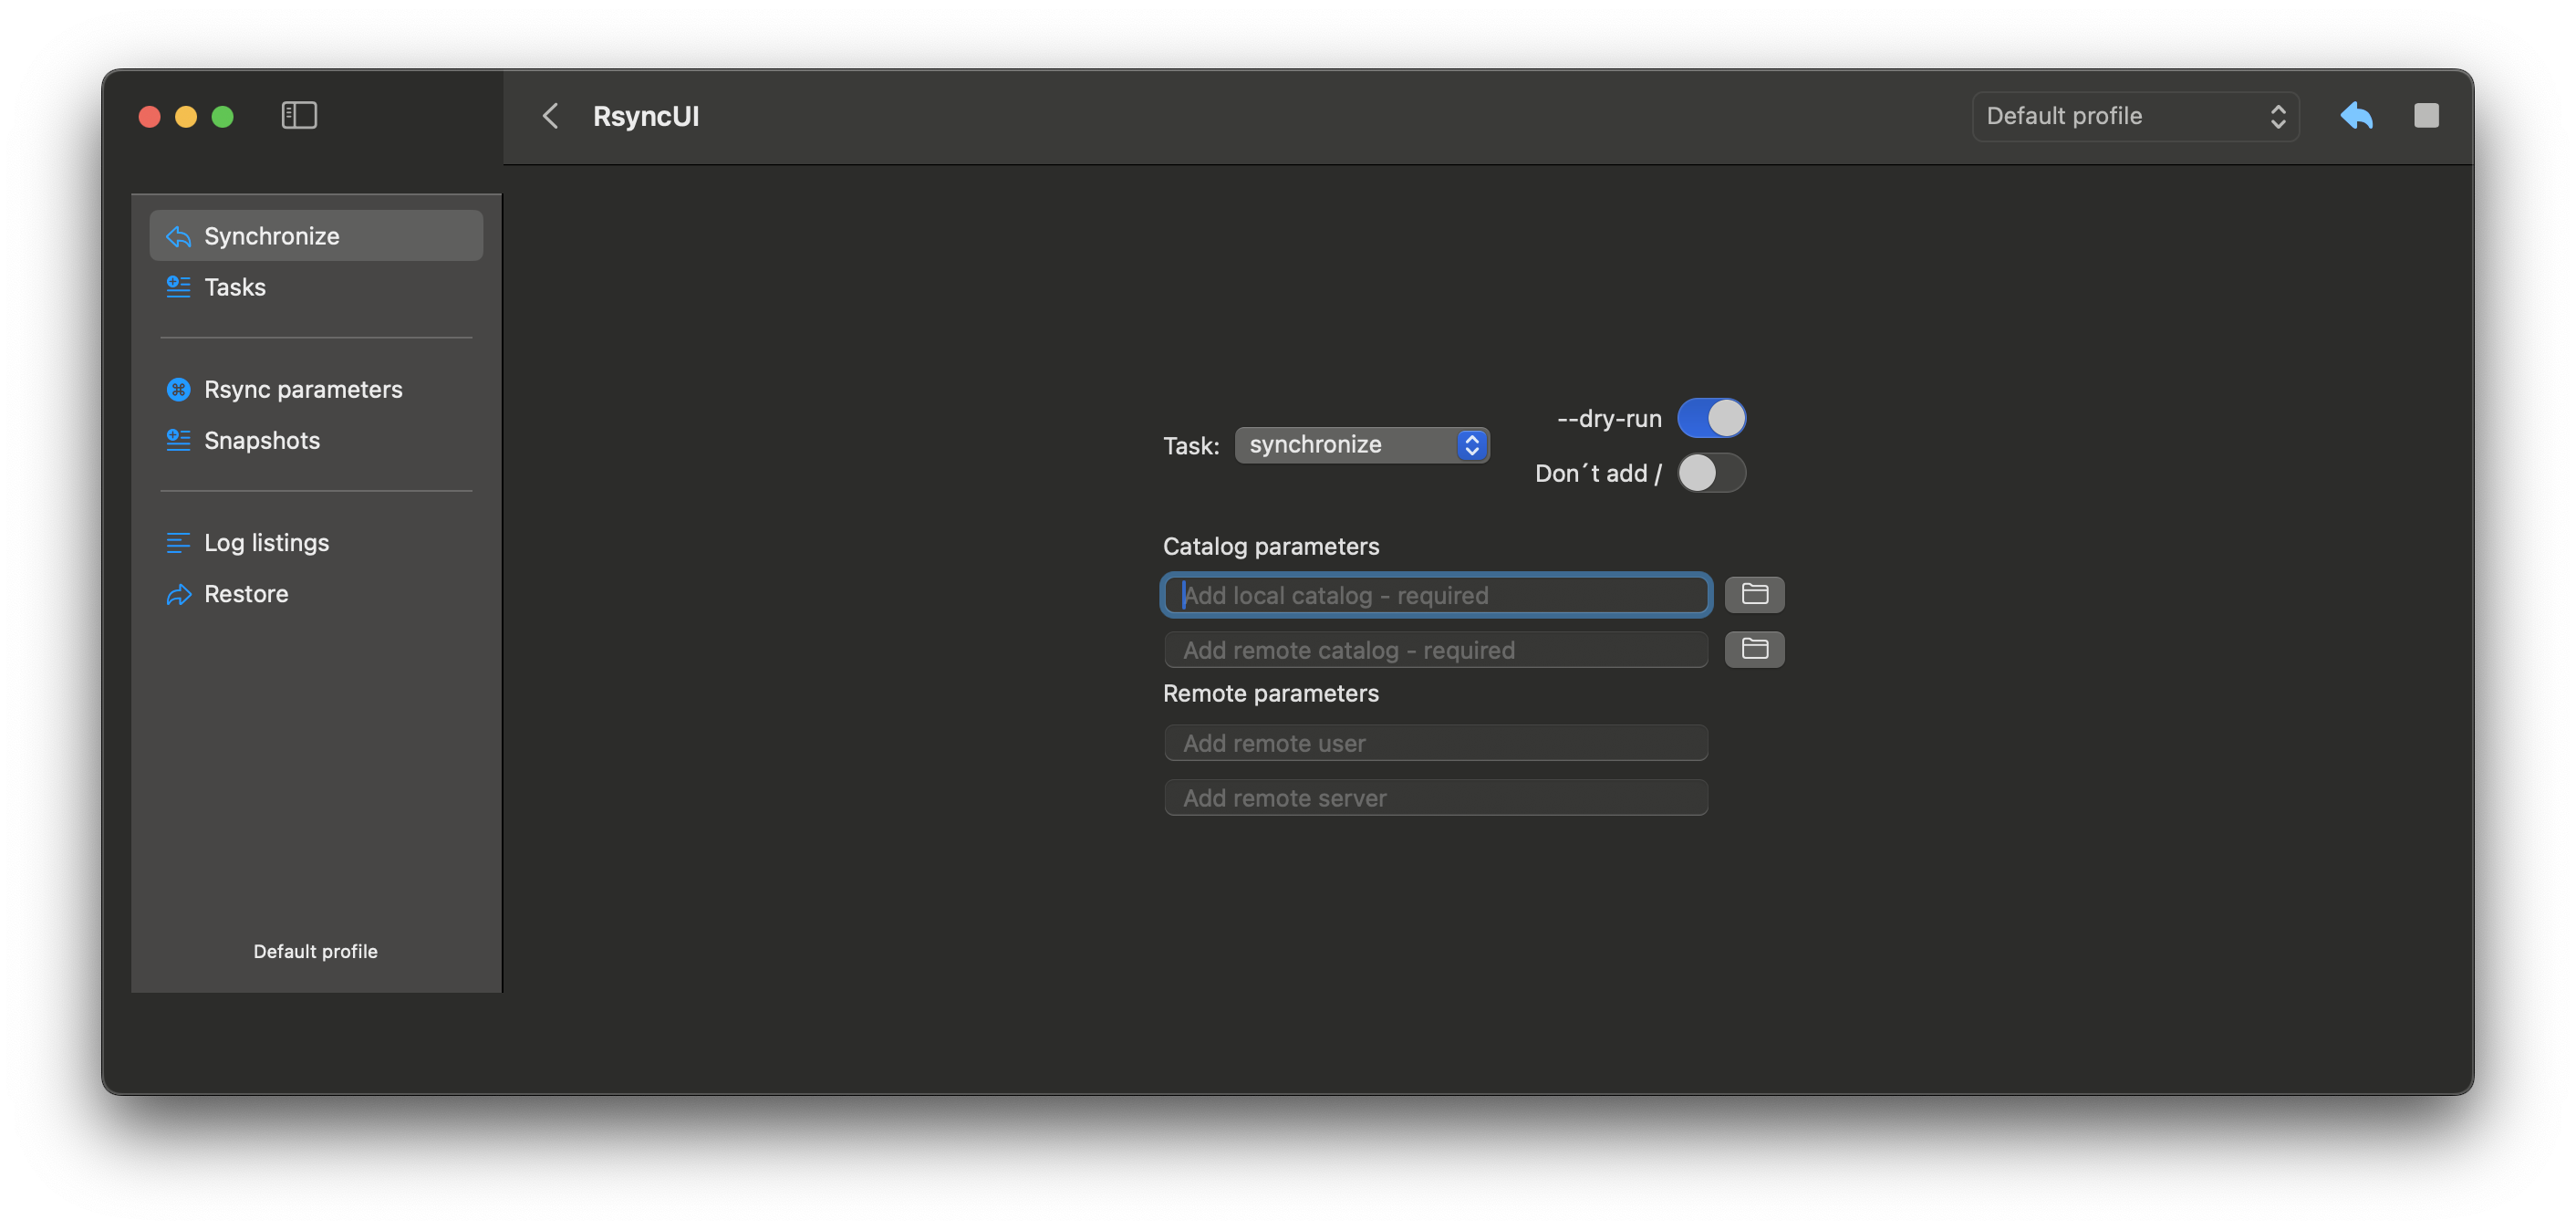
Folder Parameters
Source folder - required field
Destination folder - required field
Trailing /
Add - add a trailing slash to both the source and destination
Do not add - do not add a trailing slash, or if added remove it
Do not check - do not check for trailing slash or not on either the source or destination
Synchronize ID
Synchronize ID - informal tag for the task
Remote Parameters
Remote username - username for login to the remote server
Remote server - either server name or IP address for the remote server
Copy and Paste Tasks
Shortcuts for copy and paste are ⌘C and ⌘V, or from the Edit menu. The copy and paste operation creates a copy of the selected tasks and marks them with the “copy” status. The copied tasks retain all parameters.
2.2 - Update tasks
To update a task, select it and press the update button to write changes to storage.
Editing a task
Select the task in the task list. The Inspector opens on the right with tabs for Edit, Parameters, Log Records, and Verify Task. Make your changes in the relevant tab, then press the update button to save.
After changing any task parameter, always verify the task with a --dry-run before executing it. Select “Verify tasks” from the primary Sidebar menu.
Halting and releasing tasks
Right-click a task and select Halt to temporarily disable it. A halted task shows a red stop sign in the action column and is excluded from estimates and execution. Right-click again and select Release to restore it; the task resumes with its original type.
3 - Core Features
Documentation for RsyncUI’s main features including synchronization, snapshots, restore, profiles, scheduling, quick tasks, and rsync parameters.
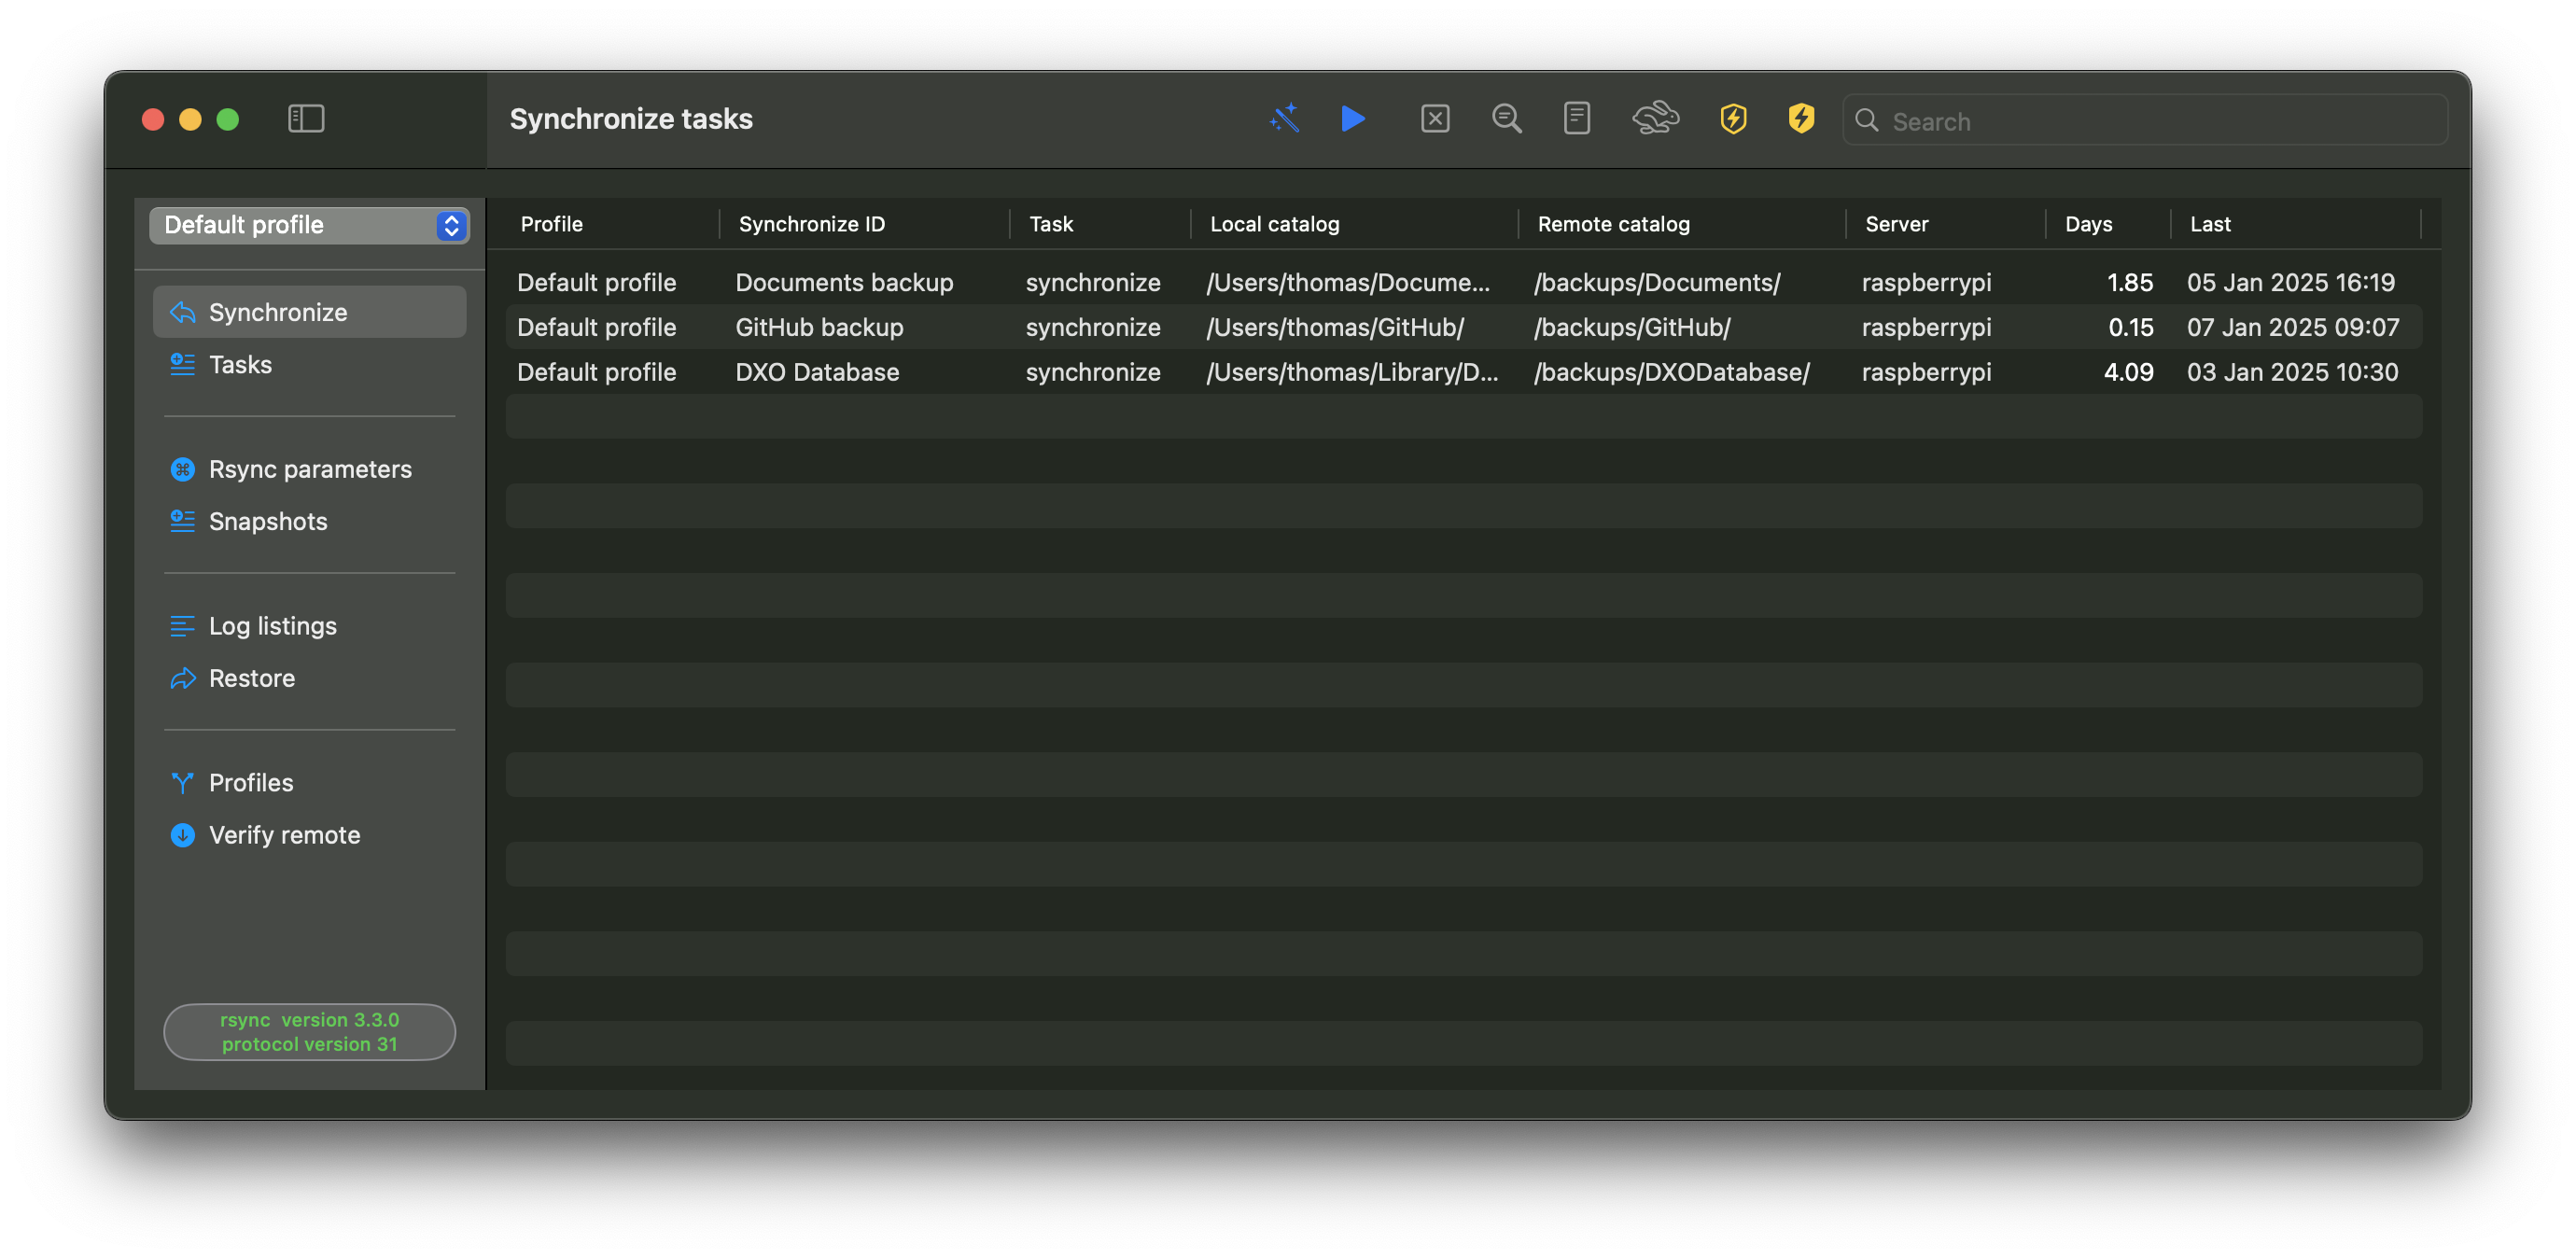
3.1 - Synchronize data
The Synchronize view runs all or selected tasks in a single operation via shortcut actions or toolbar functions.
For a single task, the first double-click initiates a --dry-run estimate; a second double-click executes the actual run.
Shortcut actions within the Synchronize view:
estimate - shortcut ⌘E estimates all or selected tasks
synchronize - shortcut ⌘R synchronizes all or selected tasks without estimation
no progress bar during synchronization; a progress bar requires estimation first
abort - shortcut ⌘K aborts and halts any ongoing task
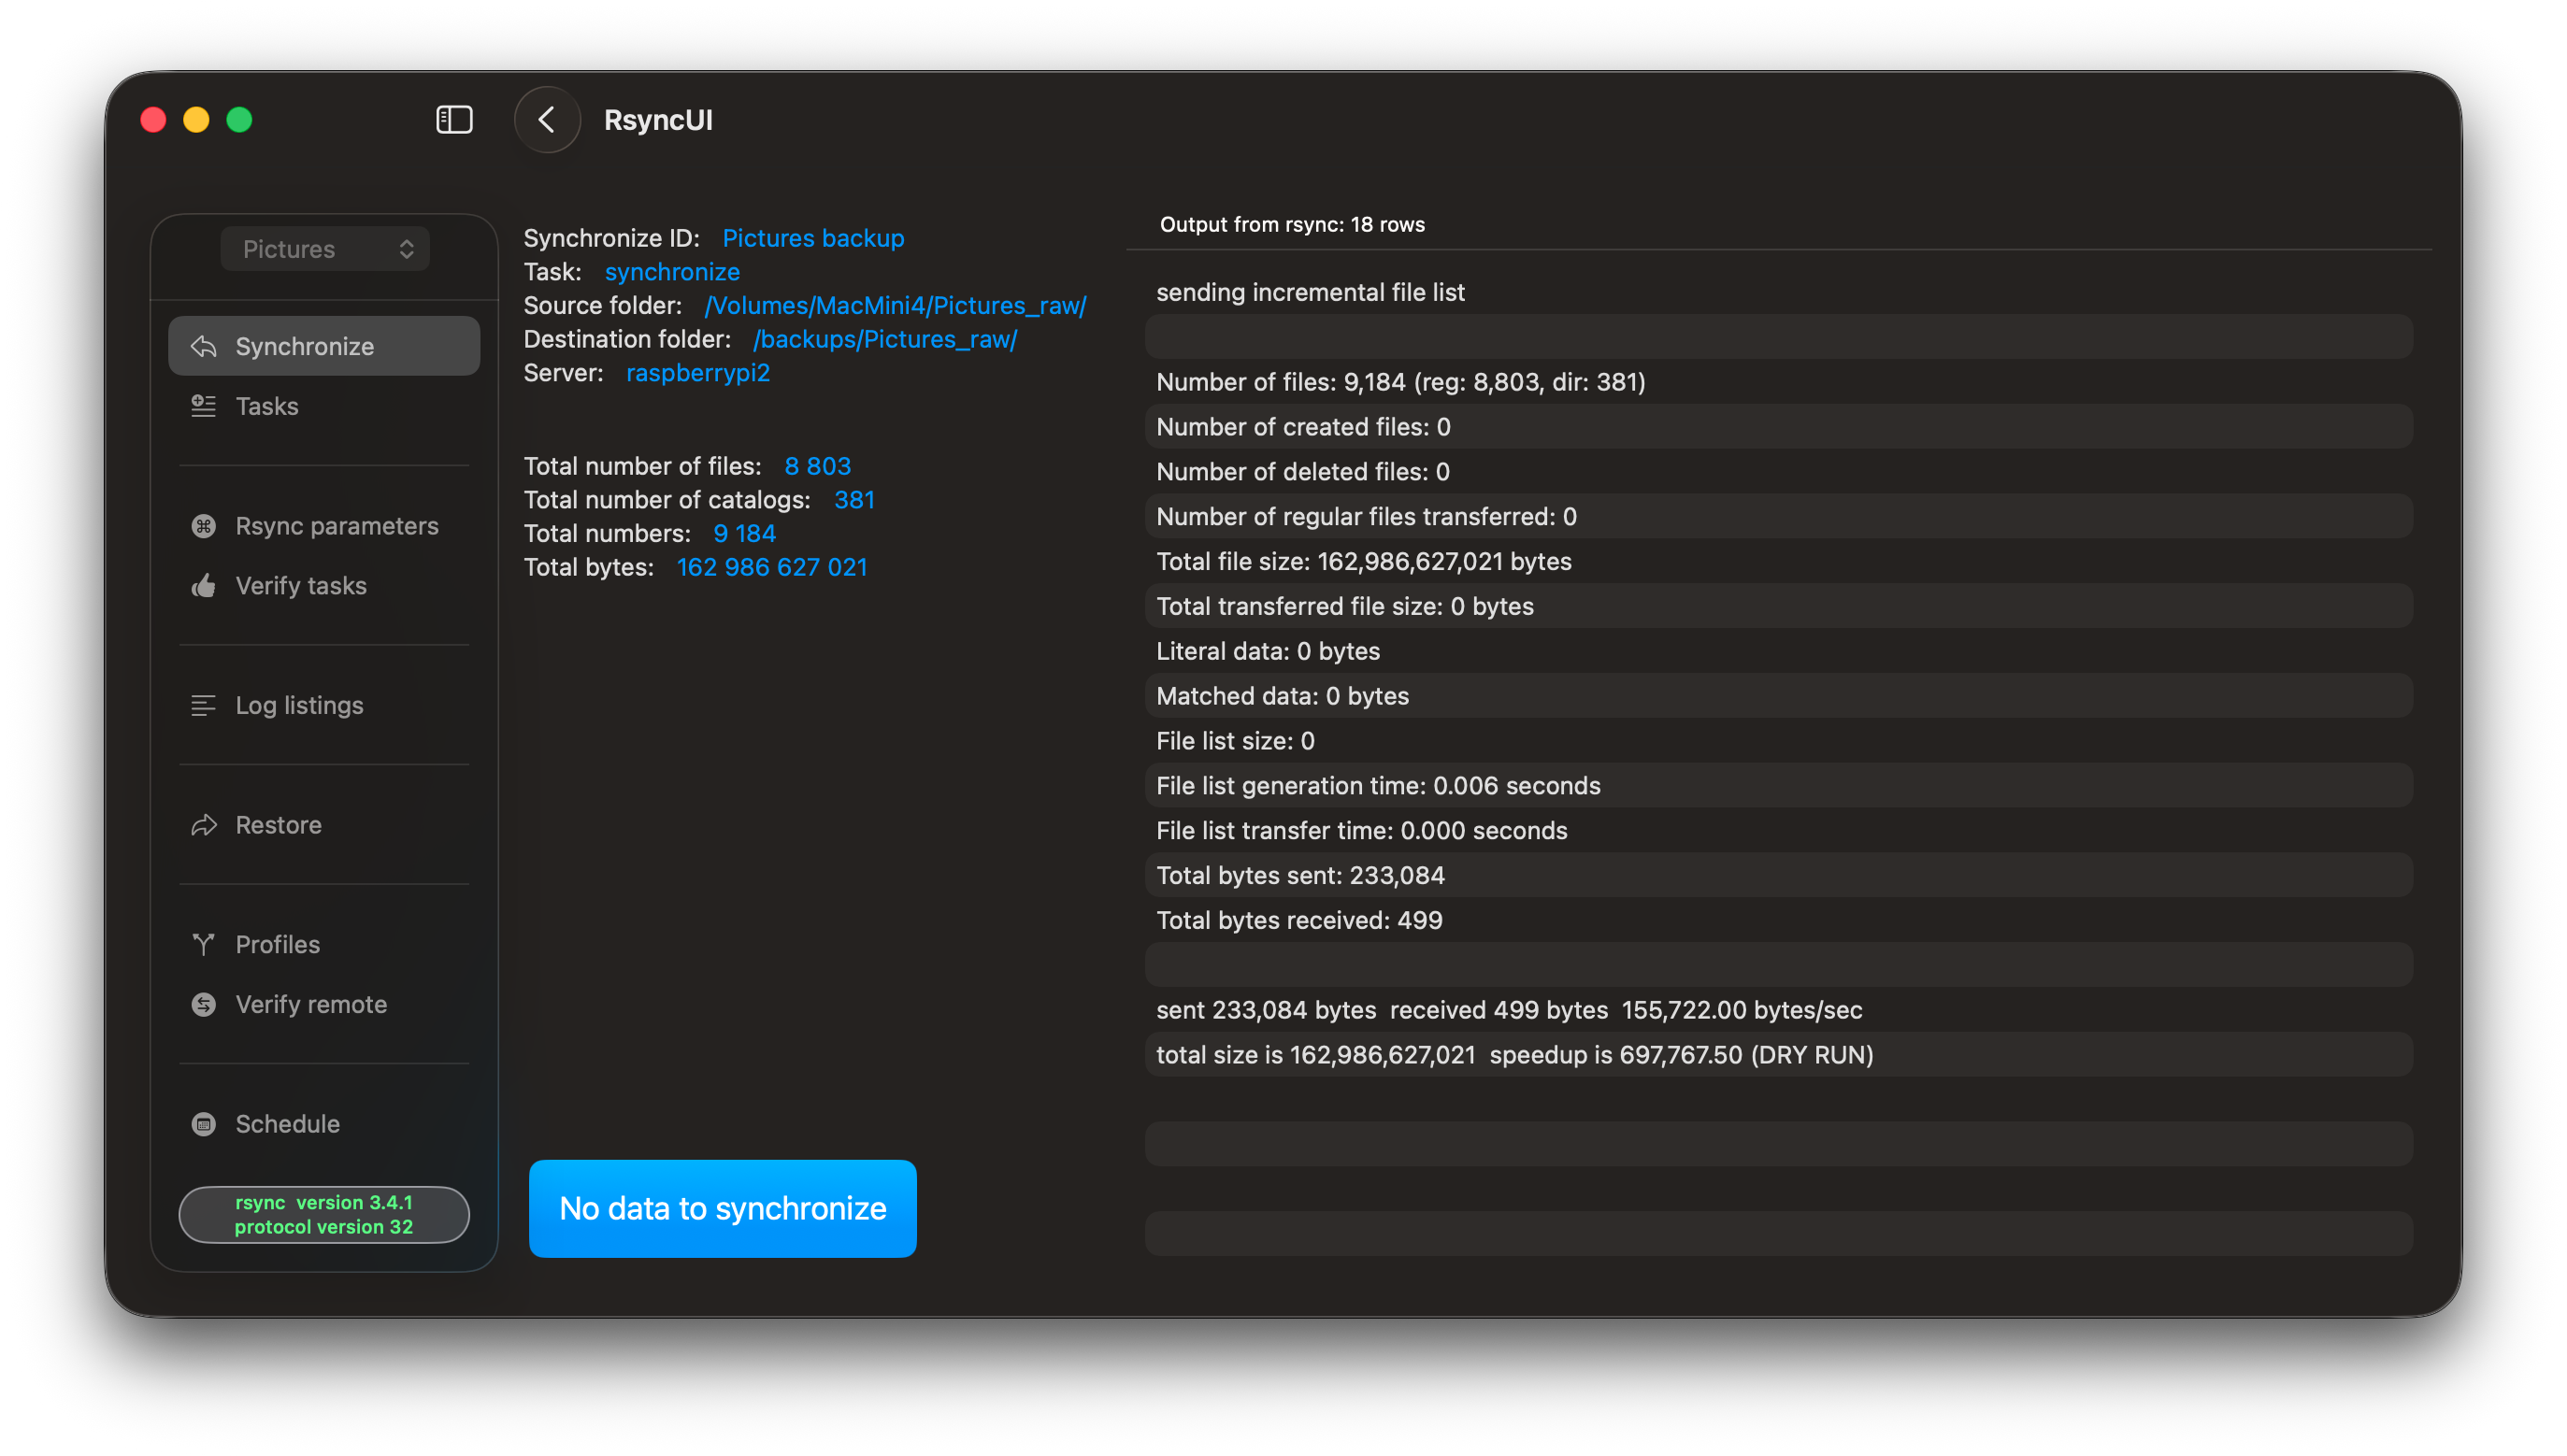
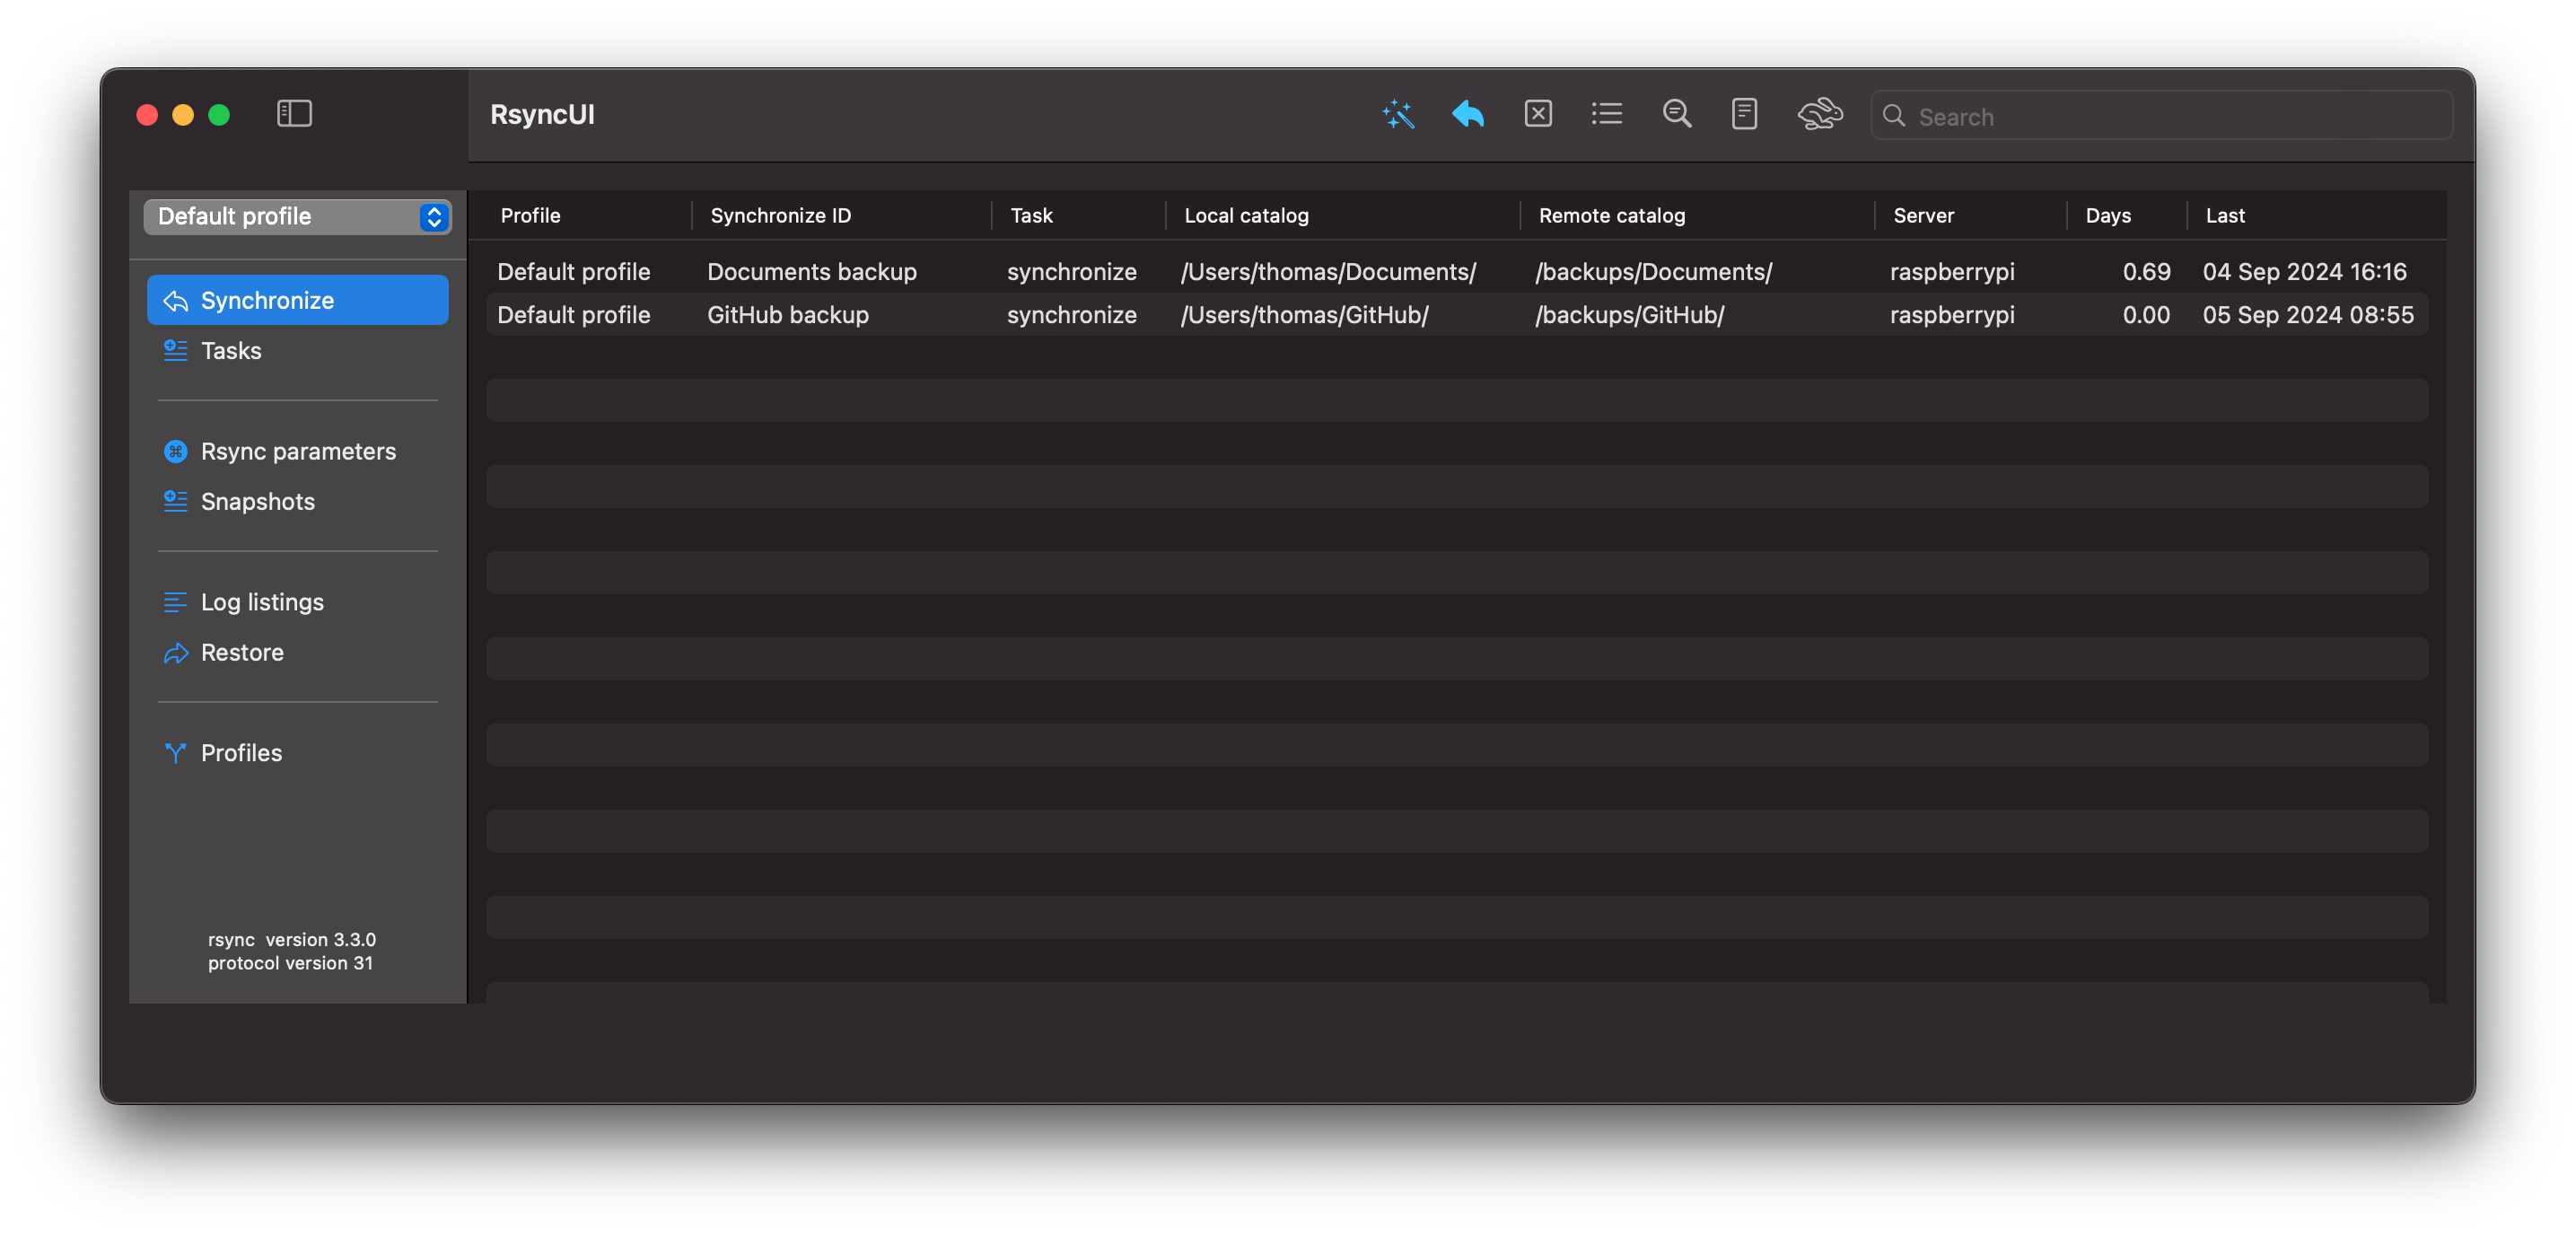
RsyncUI opens the Synchronize view at launch. Click the wand and stars (shortcut ⌘E) on the toolbar to estimate all tasks.
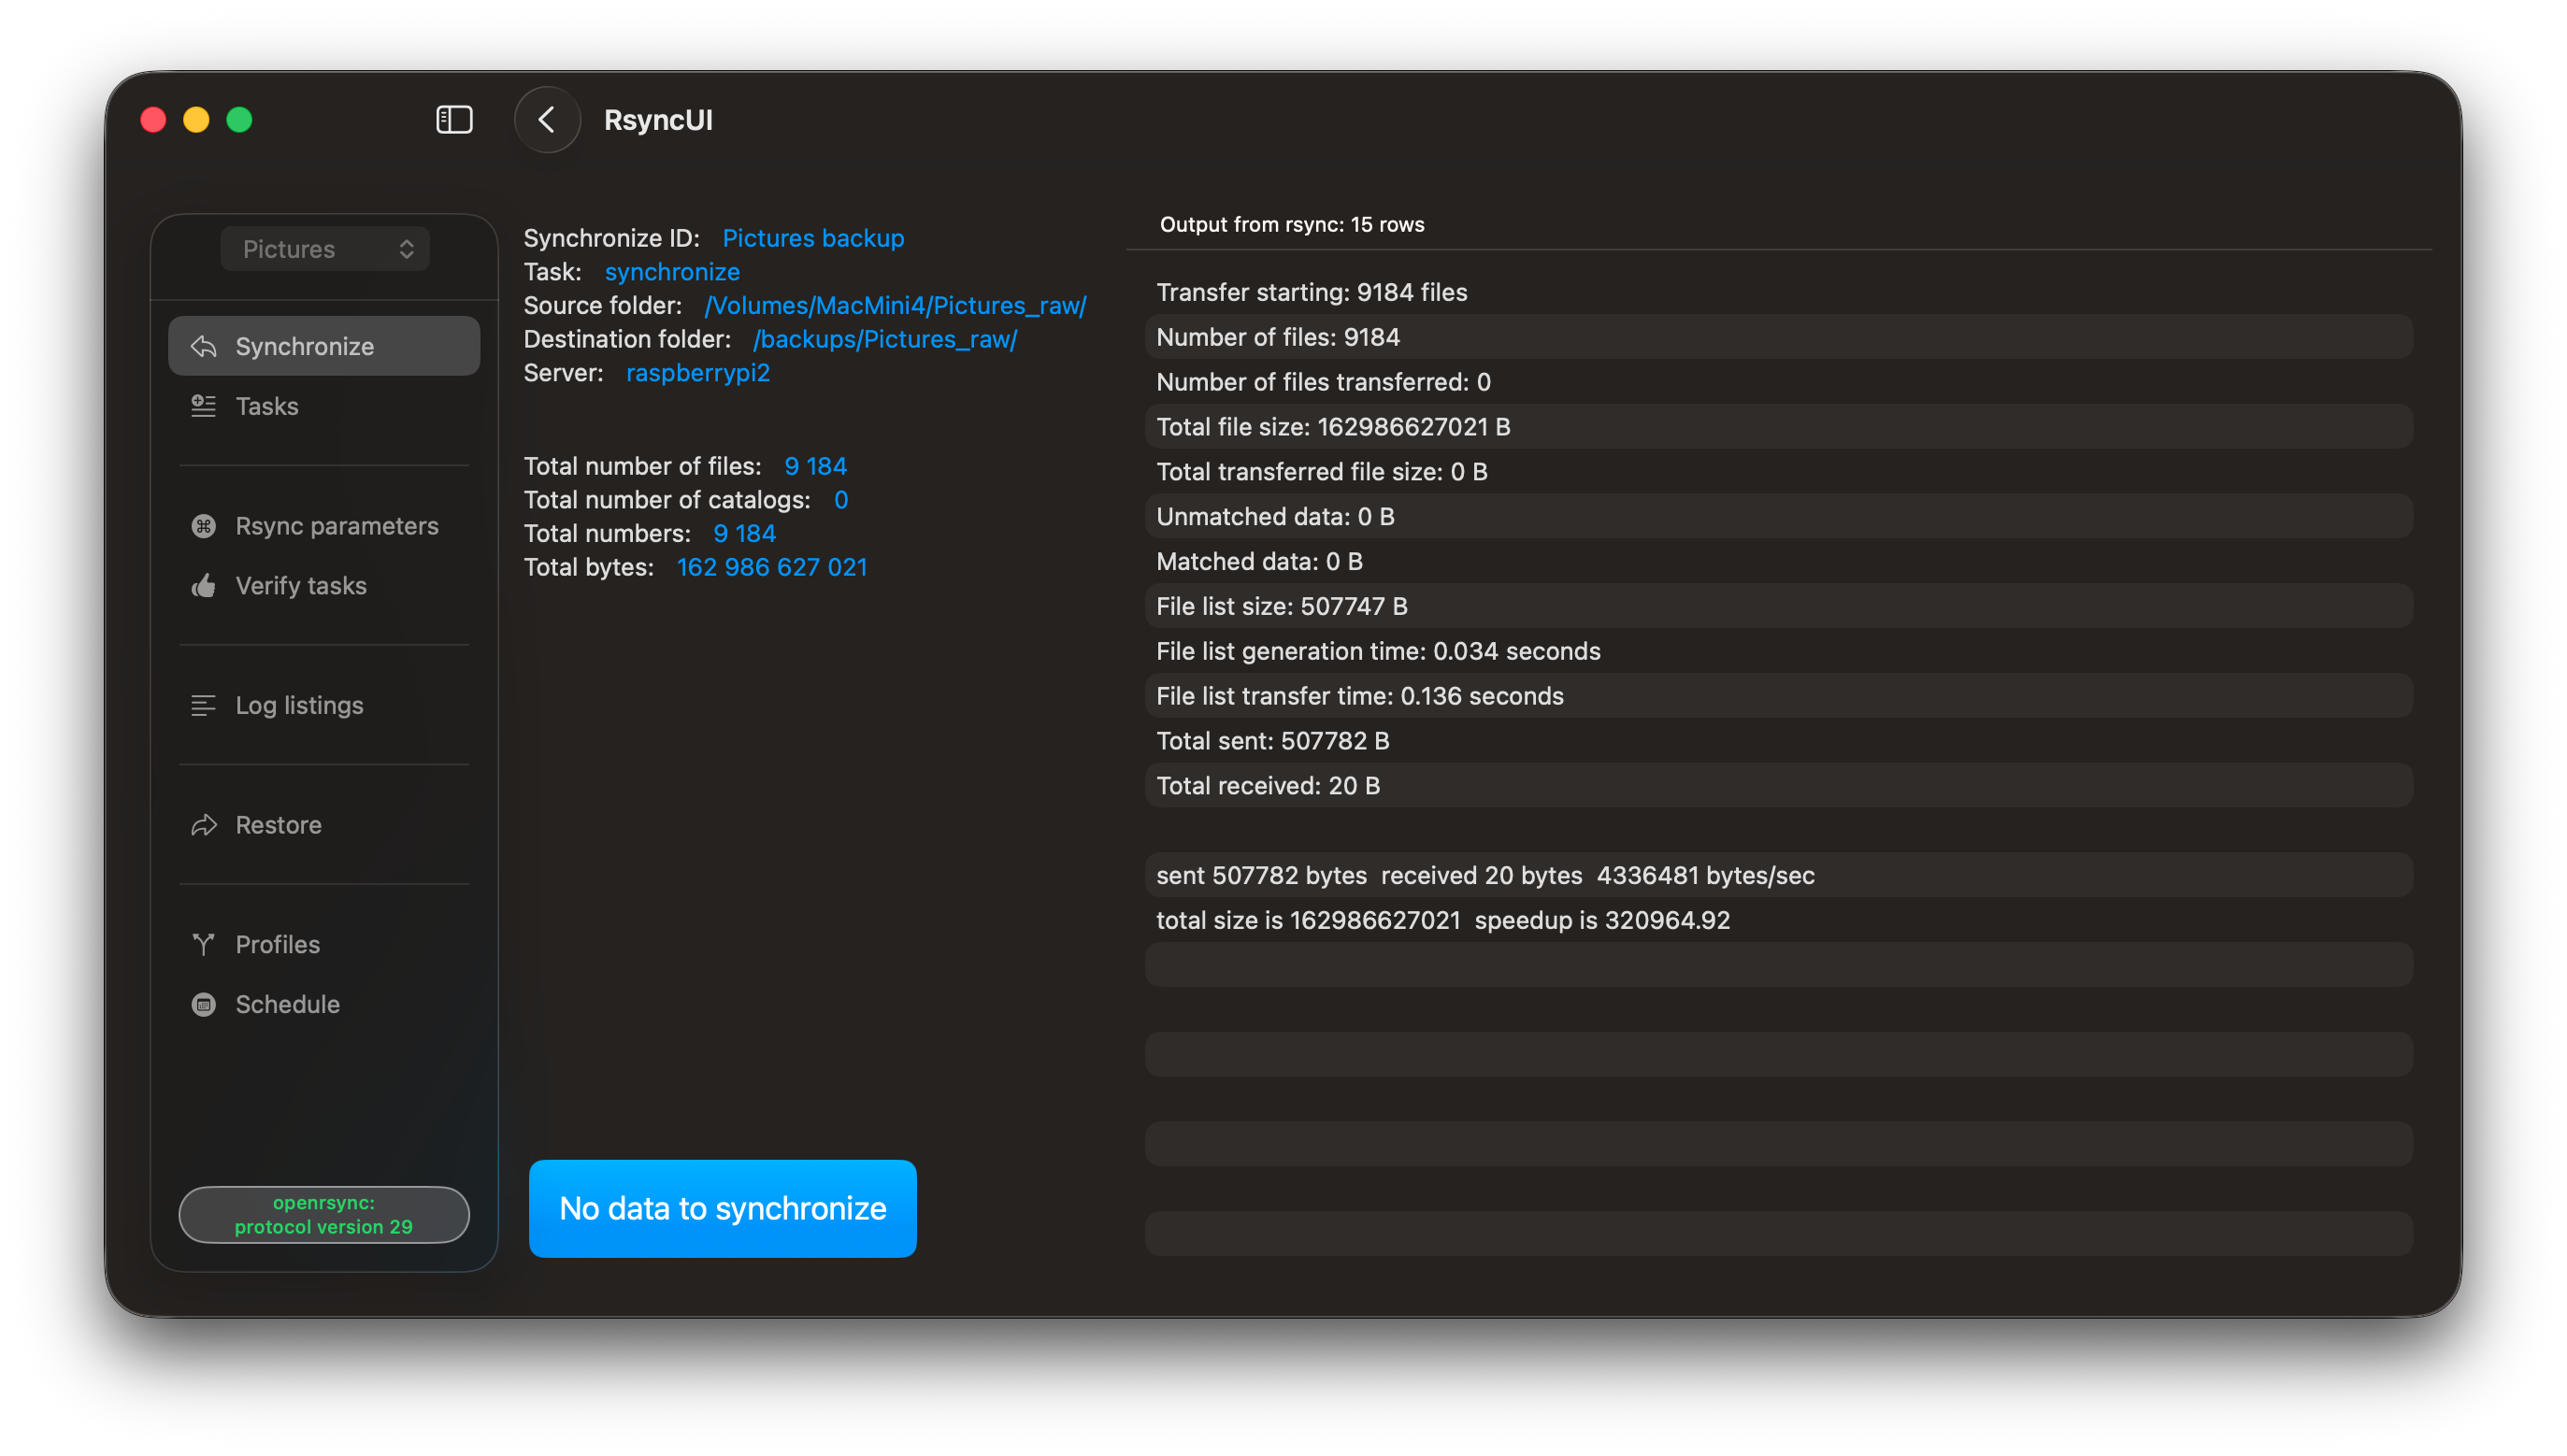
The estimate displays with blue numbers indicating data to be synchronized. To synchronize from the summarized estimate view, press the left arrow (shortcut ⌘R) on the toolbar.
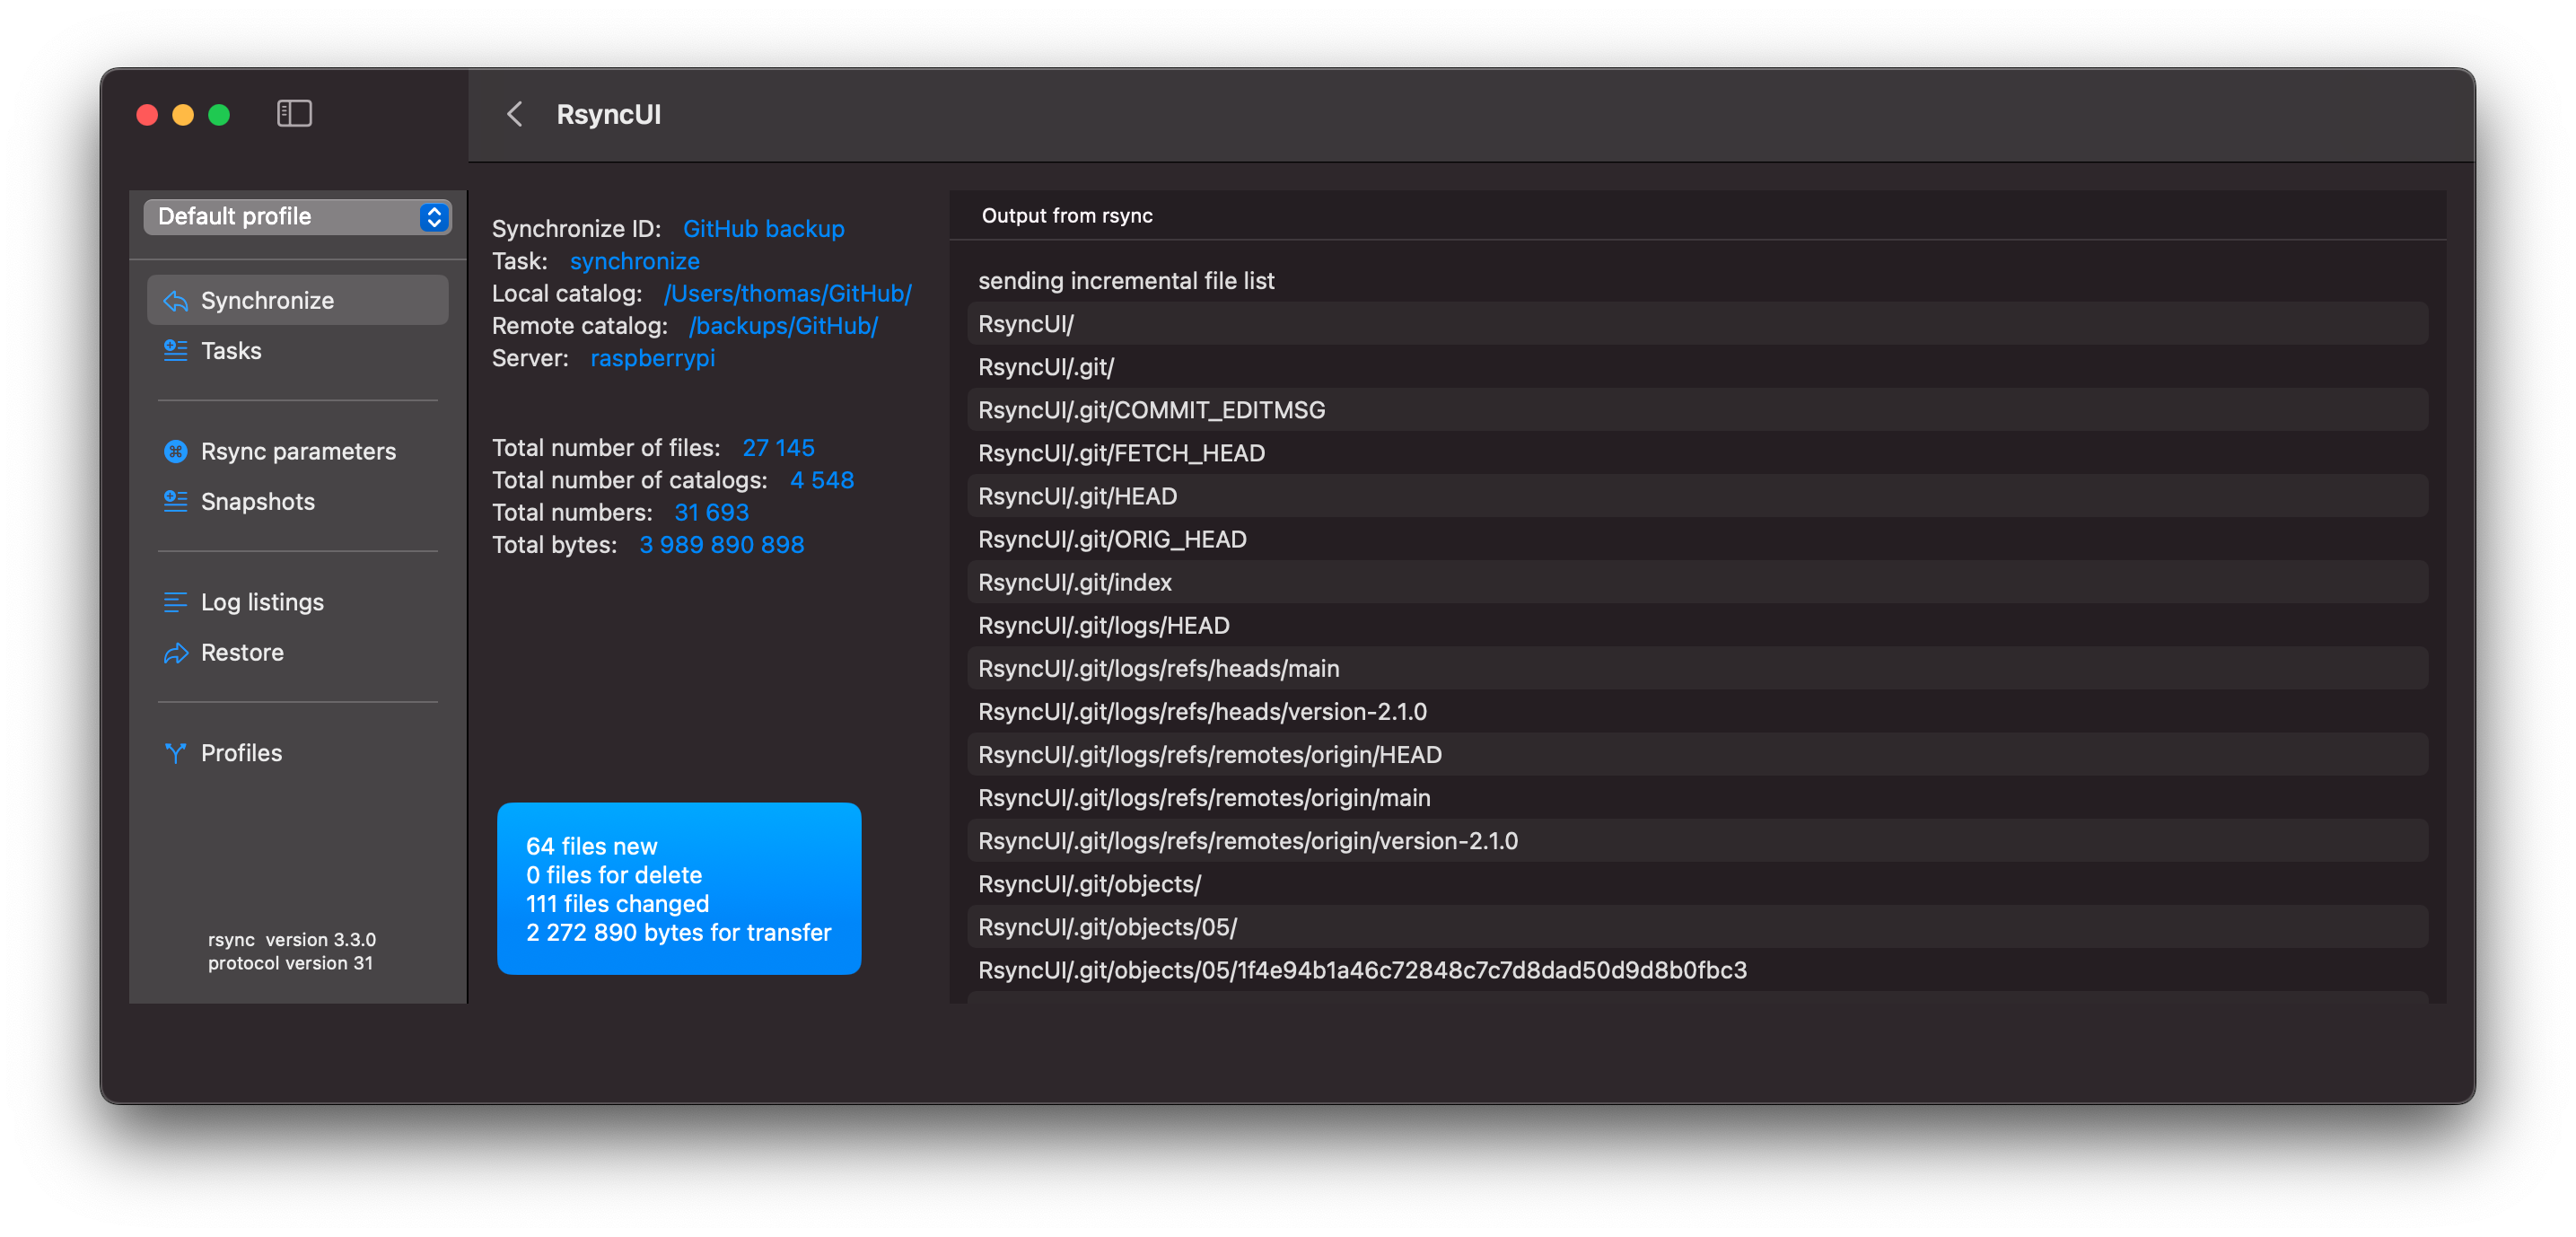
By selecting a row within the estimate view, you will be presented with detailed information about that task.
The output from rsync is as follows due to the addition of parameters to rsync. Refer to the blog post titled “Verify Remote” for further details. The parameters cause rsync to output more data.
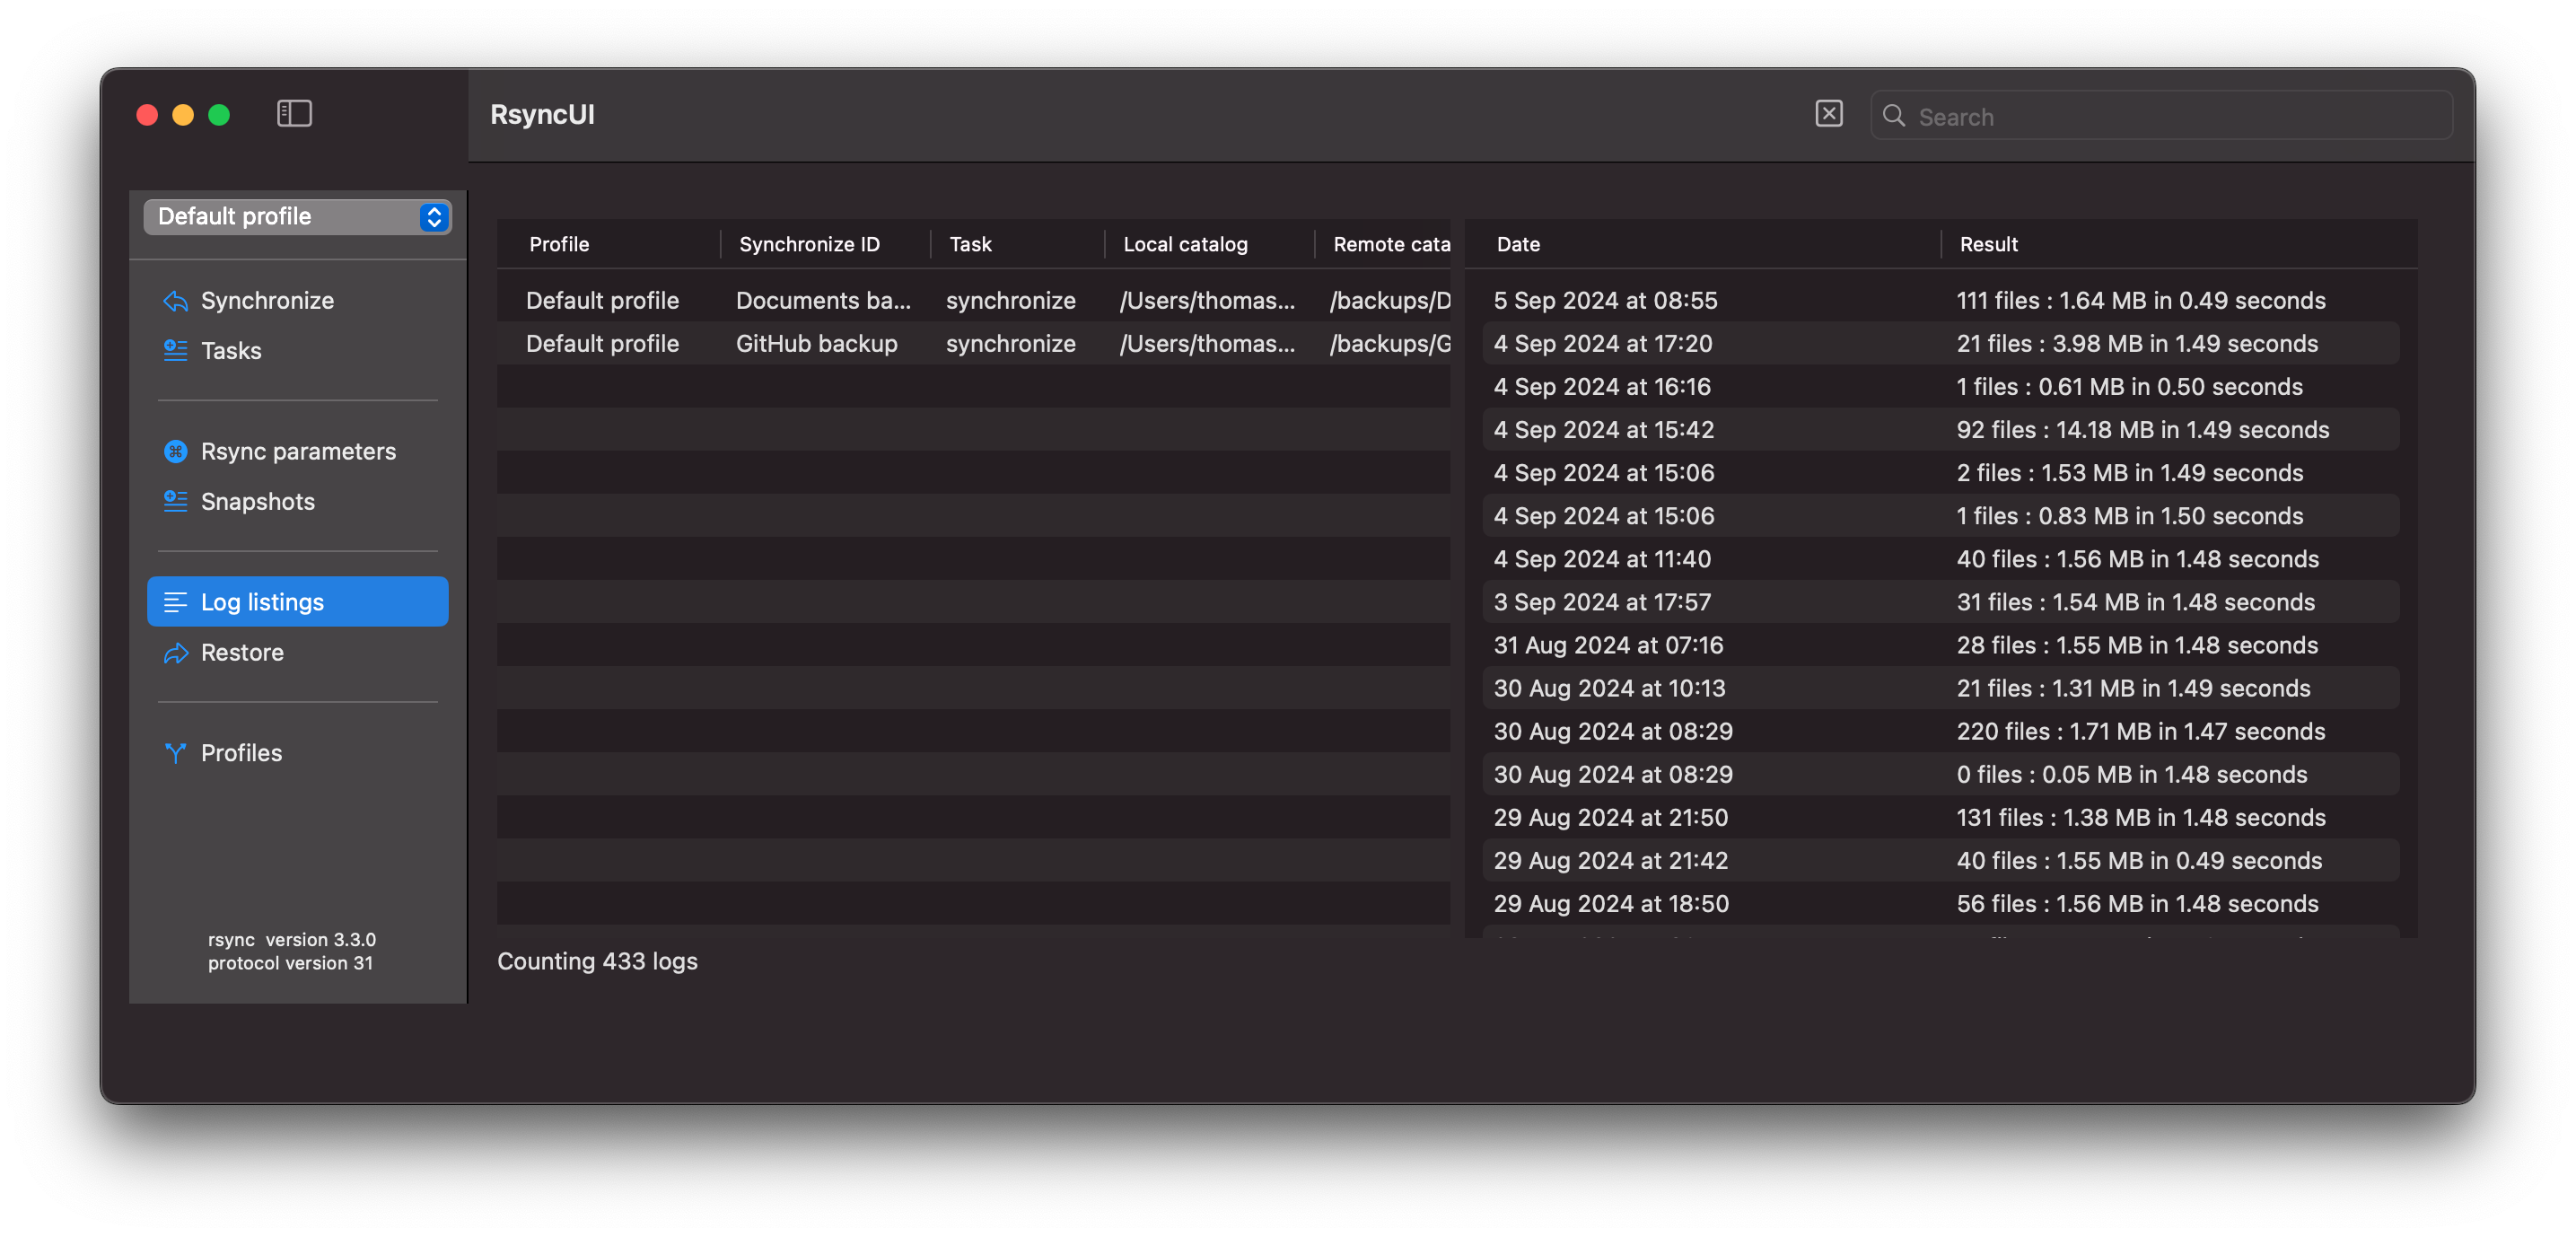
After execution, the logs are updated.
3.2 - Snapshots
Snapshots are an effective way to restore previous data and deleted files. They use hardlinks to save copies of only modified and deleted files. Unchanged files remain as hardlinks to the original.
In each snapshot task, RsyncUI stores the next snapshot number. The number increments by one after each run. Rsync automatically creates the next snapshot directory, and RsyncUI updates the stored number. The number is displayed as part of the log timestamp.
If a file named “file.txt” is saved in the initial snapshot and remains unchanged or is deleted, the “file.txt” in the latest snapshot is a hardlink to the original file in the first snapshot.
If “file.txt” is deleted from the source, the filesystem manages the hardlink appropriately during the delete operation.
In RsyncUI, the first and last snapshots are never deleted, even if all snapshots are marked for deletion.
Snapshots
A snapshot is a saved state or backup of data at a specific point in time. Each snapshot is synchronized with the source at the time of creation.
Remote Server
The rsync parameter for the next snapshot to synchronize to a remote.server is:
n is the number of the next snapshot to be synchronized
n-1 is the latest synchronized snapshot
/Users/thomas/data/ is the source directory, only read by rsync
/Volumes/backup/snapshots/ is the destination directory where snapshots are synchronized
Snapshot Creation
To create a snapshot task, select “snapshot” as the action in the Add tasks section. RsyncUI automatically manages the snapshot number “n” for the task. This number represents the next available snapshot number and is used to calculate the rsync parameter.
Snapshot Administration
Snapshot administration is essential for maintaining an organized and efficient backup system. It involves regularly reviewing and deleting unnecessary or outdated snapshots to prevent clutter and optimize backup space usage.
Deleting Snapshots
Deleting snapshots is a destructive operation that should be performed with caution. It is important to have a plan in place to determine which snapshots to keep and which to delete. RsyncUI provides a simple plan for managing snapshot retention.
The Plan for Keep and Delete
Selecting the “Tag” button evaluates all snapshots based on the date within the log record. Based on the selected plan and date, snapshots are either tagged with “keep” or “delete.” Snapshots tagged with “delete” are also preselected for deletion. To delete the marked snapshots, select the “Delete” button.
Even if all snapshots are tagged for deletion, the first and last snapshots are never deleted. They are automatically removed from the delete list during the internal preparation for deletion.
The plan is based on three time periods, where the plan parameter affects previous months (and years):
The current week
keep all snapshots within the current week
the value of plan has no effect on the current week
The current month (minus the current week)
keep all snapshots for the selected day of week, e.g., all snapshots every Sunday this month
the value of plan has no effect on the current month
Previous months (and years)
keep the snapshot in the last week of the month for the selected day of week, e.g., the last Sunday in the month
if plan == Every, keep snapshots for the selected day of week, e.g., all snapshots every Sunday in previous periods
if plan == Last, keep snapshots for the selected day of week, e.g., all snapshots on the last Sunday of every month in previous periods
Tagging and Deleting Snapshots
It is recommended to optimize the number of snapshots regularly. Select a plan, tag the snapshots, and delete the snapshots marked for deletion.
3.3 - Parameters to rsync
RsyncUI provides sensible defaults for synchronization. The defaults applied to a task depend on whether rsync runs over a network or to a local disk.
You can adjust the defaults. Task configurations store their parameters, including any task-specific SSH option, which overrides the global SSH setting.
Always verify the result after changing rsync parameters. Select “Verify tasks” from the Sidebar.
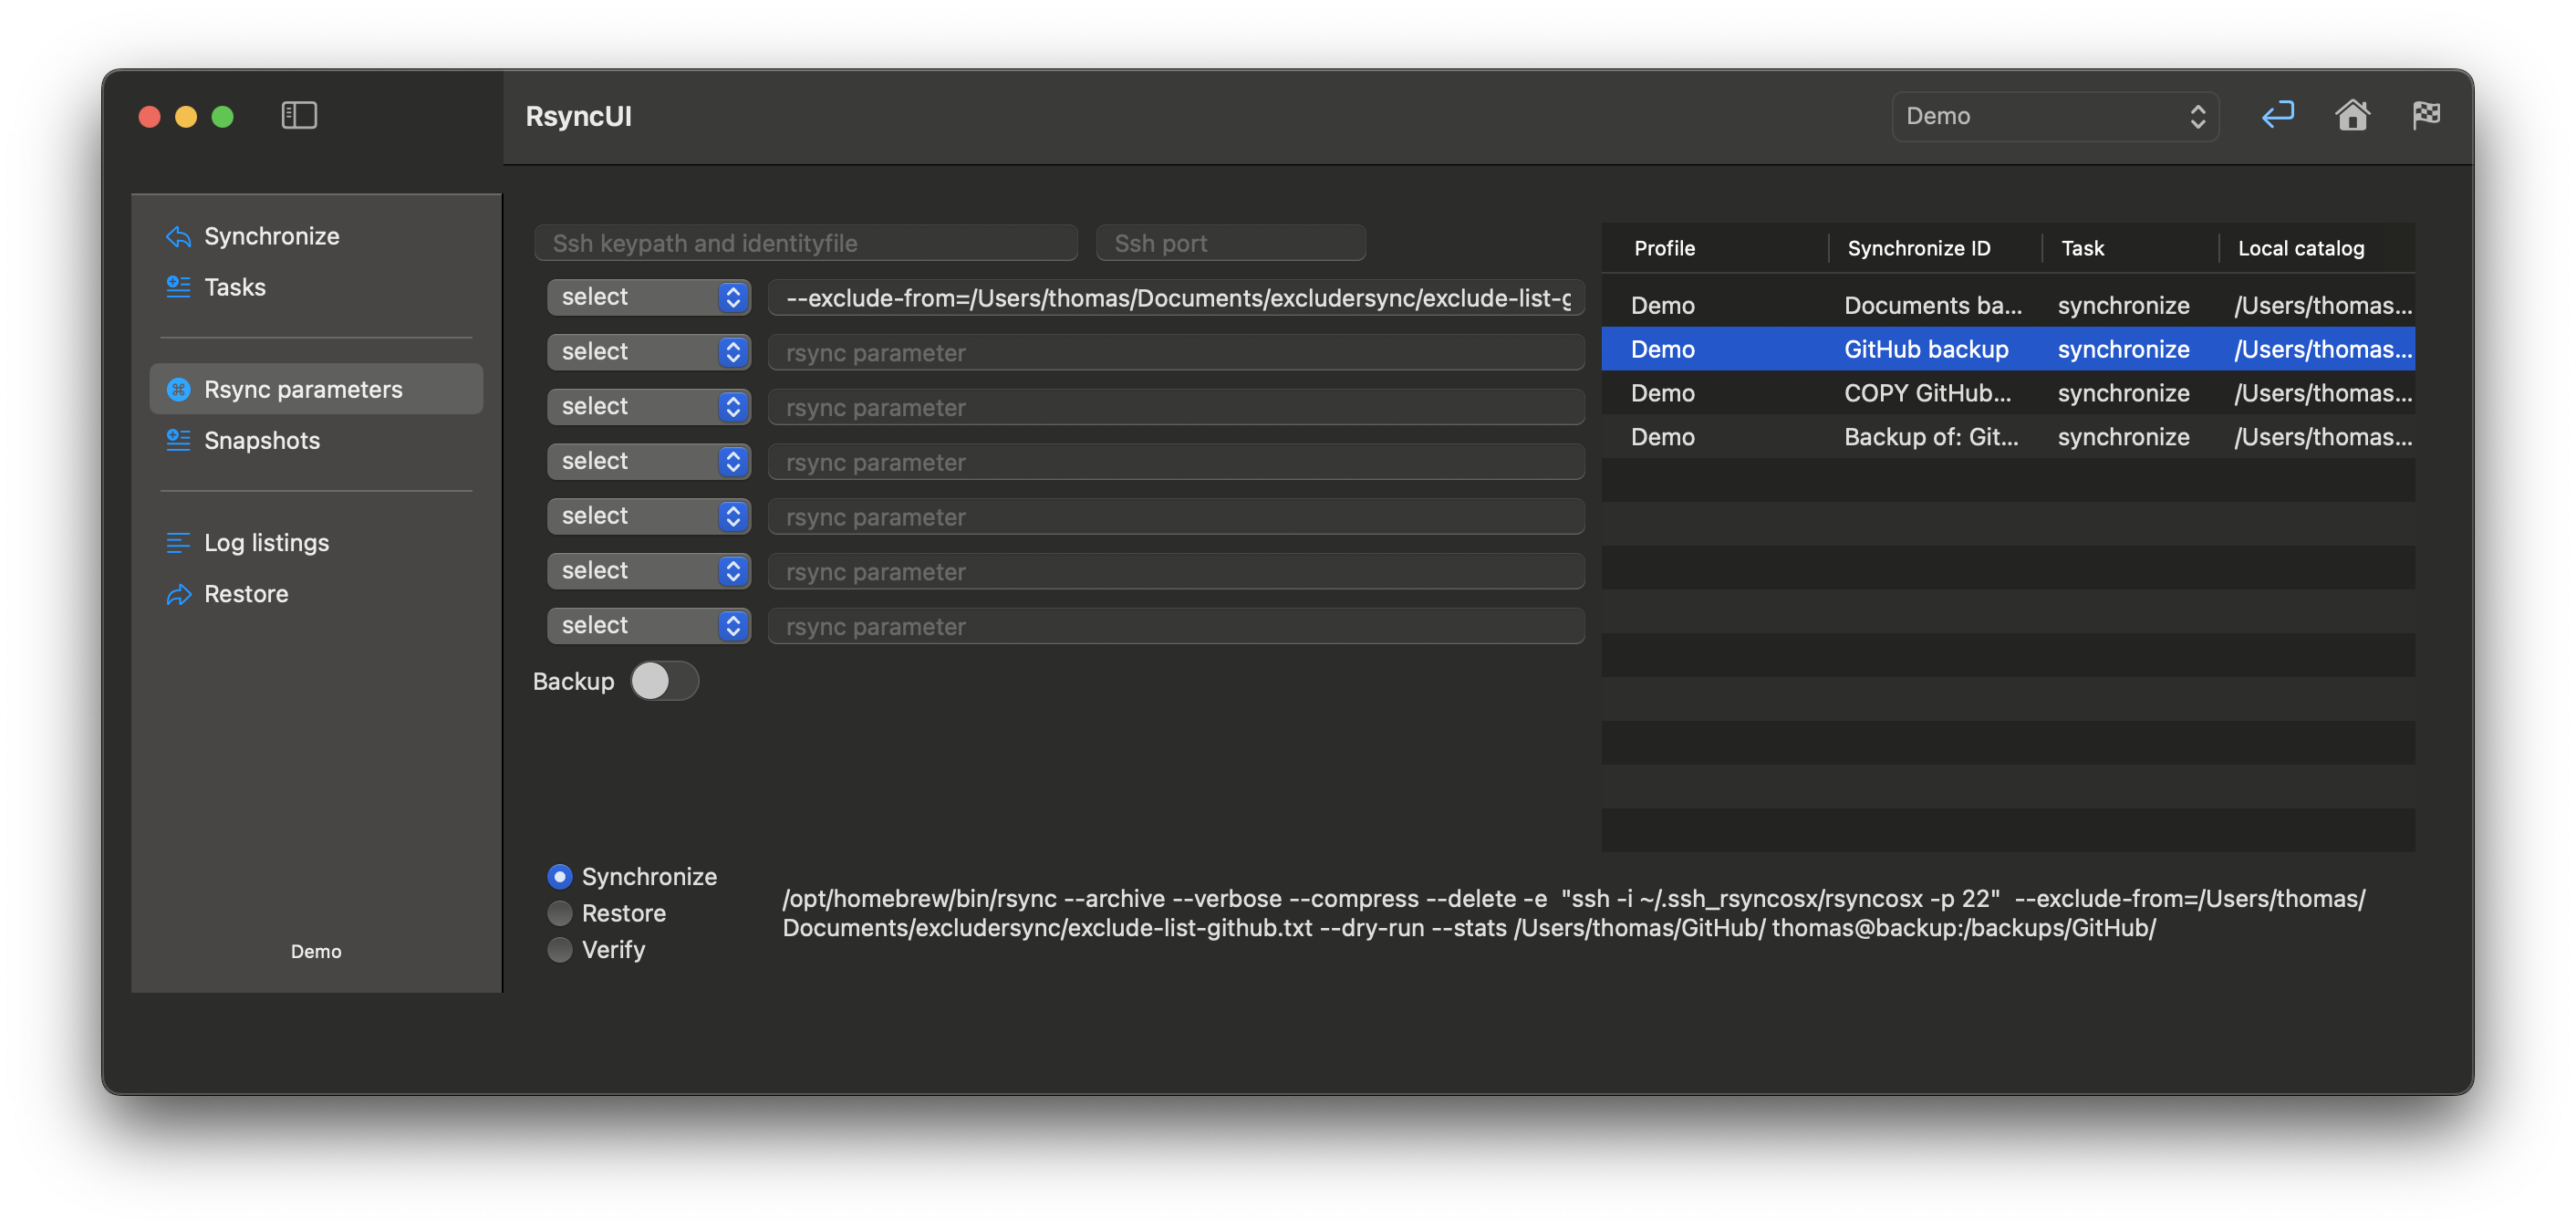
Task-Specific Parameters to rsync
To add a parameter, enter it in a field. RsyncUI supports seven user-defined parameters across the fields. You are responsible for correctness—invalid values will cause rsync errors.
Parameters to rsync are typically constructed as follows (examples only—rsync supports many options):
parameter=value
--exclude-from=/Volumes/home/user/exclude-list.txt - exclude list for rsync
parameters only
--stats - enables the display of statistics during the synchronization process
--dry-run - executes a simulated synchronization without modifying the files
For a comprehensive list of parameters for rsync, please refer to the official rsync documentation.
Task-Specific SSH Parameter
If you use default SSH keys and no custom SSH settings are configured in RsyncUI, the parameter -e ssh is appended so data is tunneled and encrypted. This applies only to remote tasks and restores.
Task-specific SSH parameters override global SSH settings.
ssh-port: specify if ssh uses a port other than the default port 22
ssh-keypath and identity file: typically, these are .ssh/id_rsa; set only if alternative ssh-keypath and identity file are to be used by ssh
The values are marked red until validated OK. Refer to the “Tools passwordless login” section for information about validated values.
Backup Switch
The rsync command allows you to instruct it to save modified and deleted files in a separate backup directory prior to the synchronization process. This feature can be enabled by setting the following parameters:
--backup - Enables saving modified files
--backup-dir - Directory where modified or deleted files are saved before synchronization
RsyncUI provides a default value for this parameter, but you can customize it as needed. For a synchronized directory named <directory to synchronize>, the default backup directory is ../backup_<directory to synchronize>, which is relative to the synchronized directory.
3.4 - Schedule
The schedule function is disabled by default. Please refer to the RsyncUI settings, Monitor and log section to enable it.
Schedules are saved automatically. RsyncUI loads tasks that are due. Tasks scheduled while the Mac was shut down are not loaded. If the Mac sleeps, missed tasks appear in the Schedule view. Missed tasks do not run automatically.
The scheduler uses the Timer library. According to Apple: “A timer that fires after a certain time interval has elapsed, sending a specified message to a target object.” The timer has a strong reference to the run loop on the main thread. If the app goes to sleep, so does the run loop. The timer is active only while RsyncUI is running.
If the Mac sleeps before scheduled tasks execute, they will appear in the Schedule view.
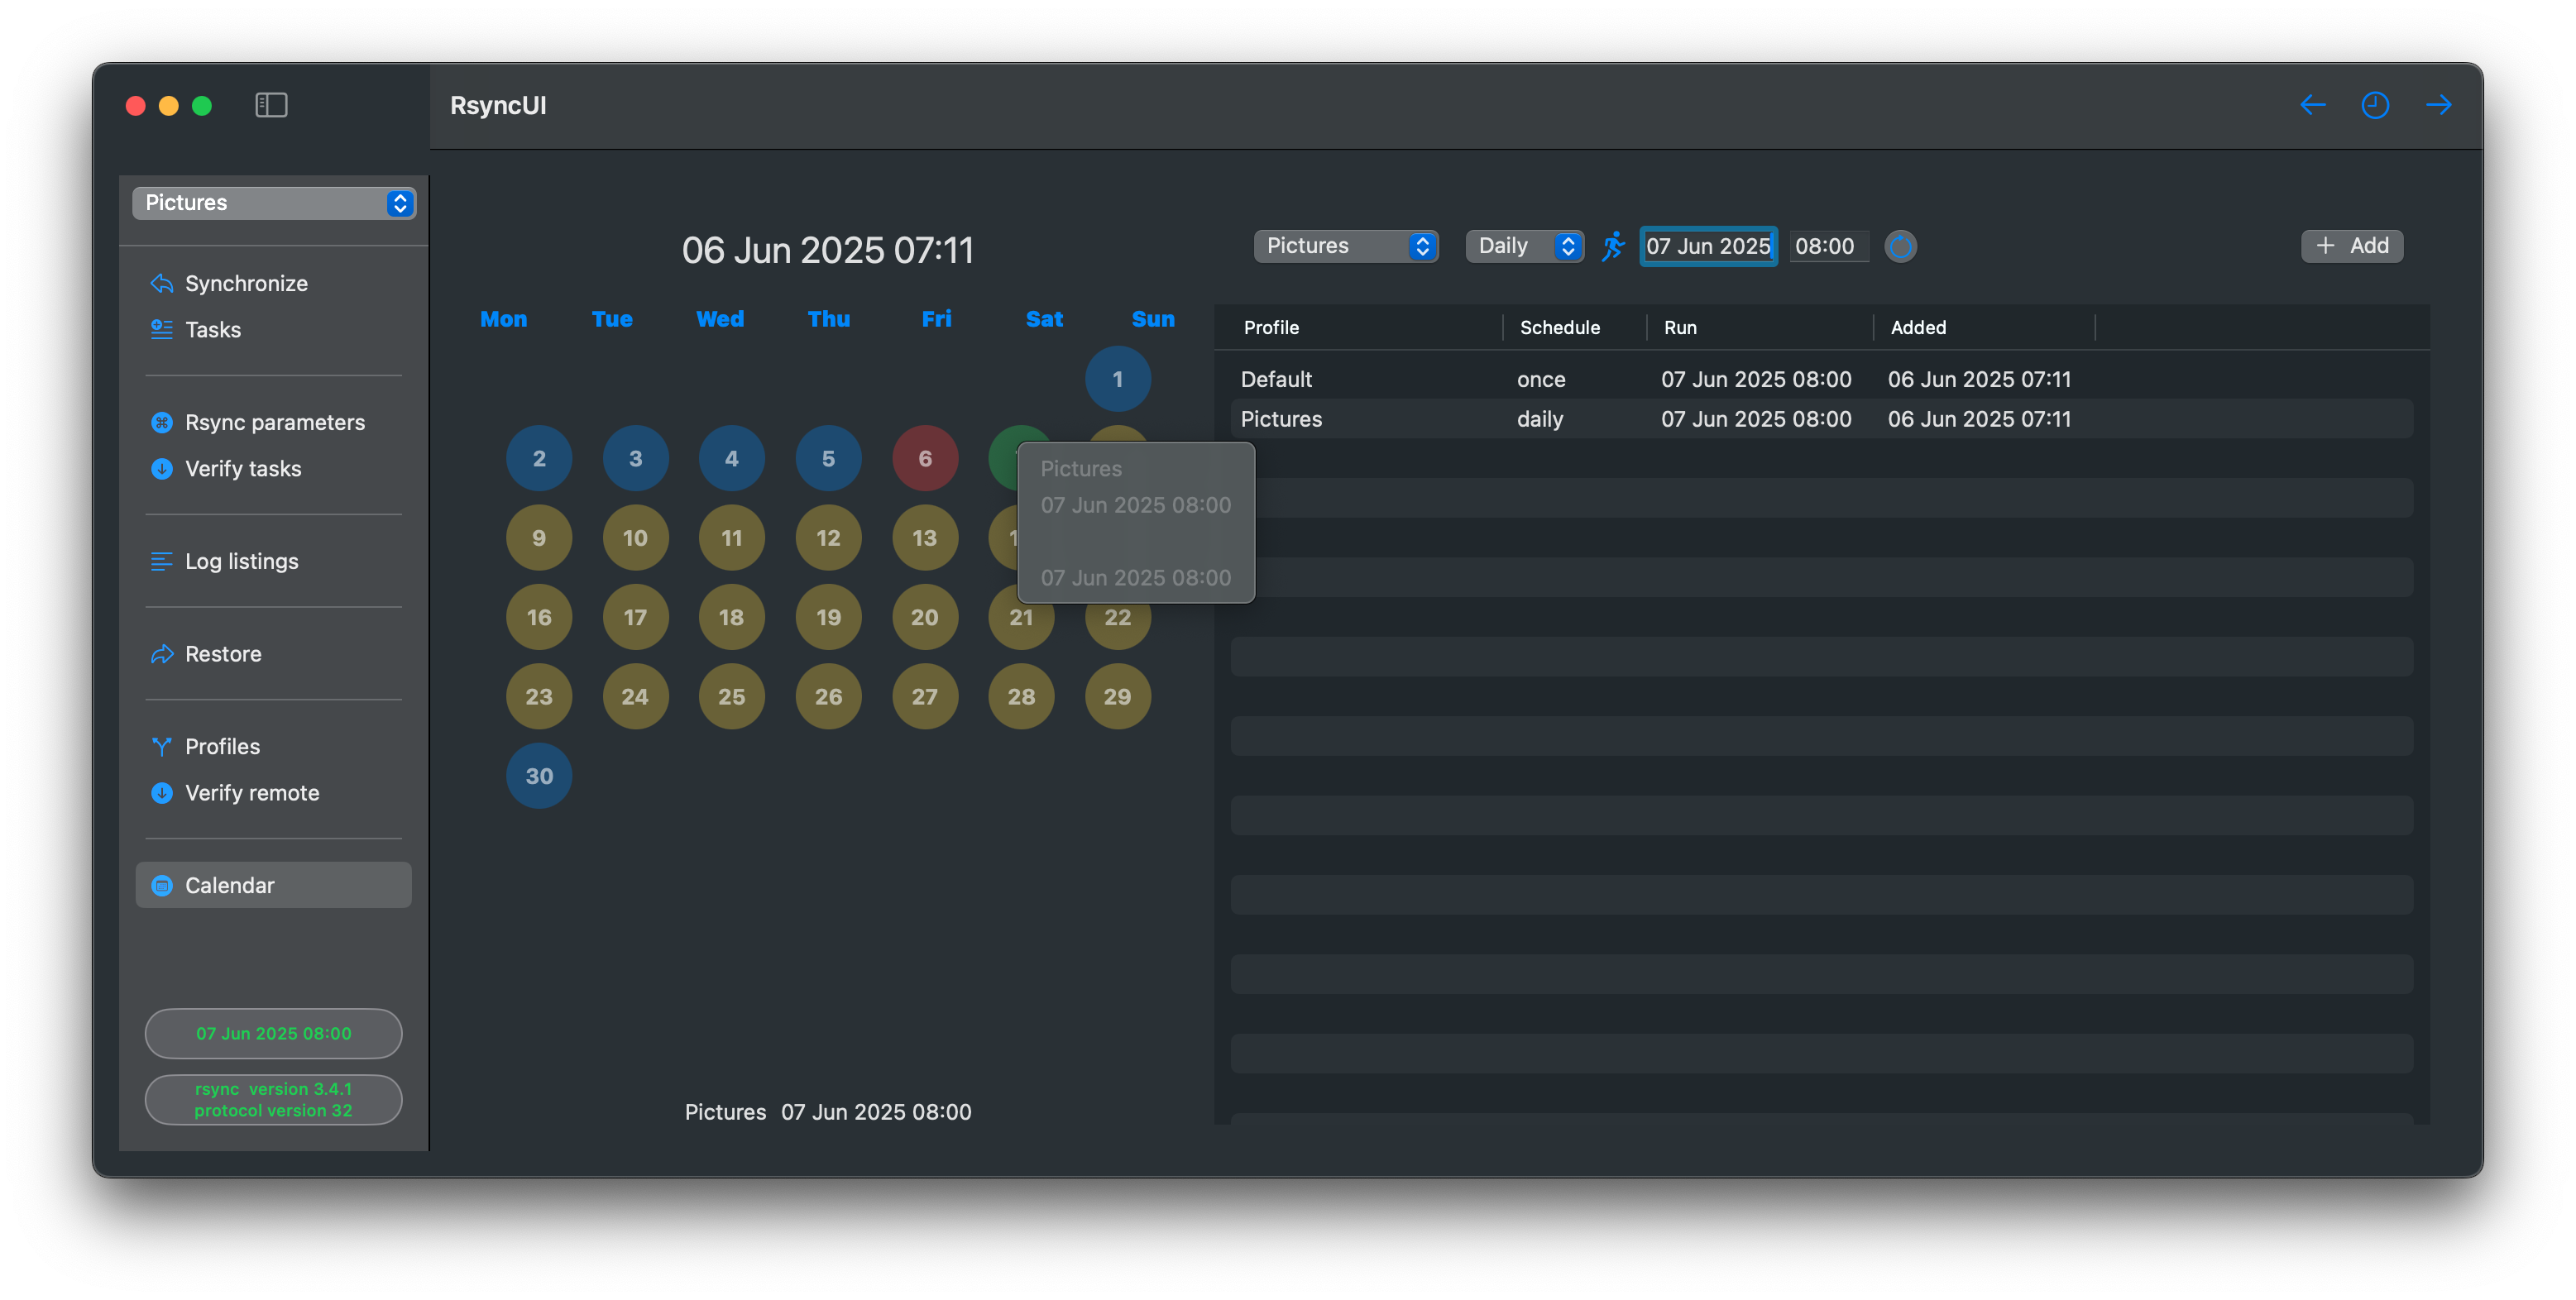
Add Schedule
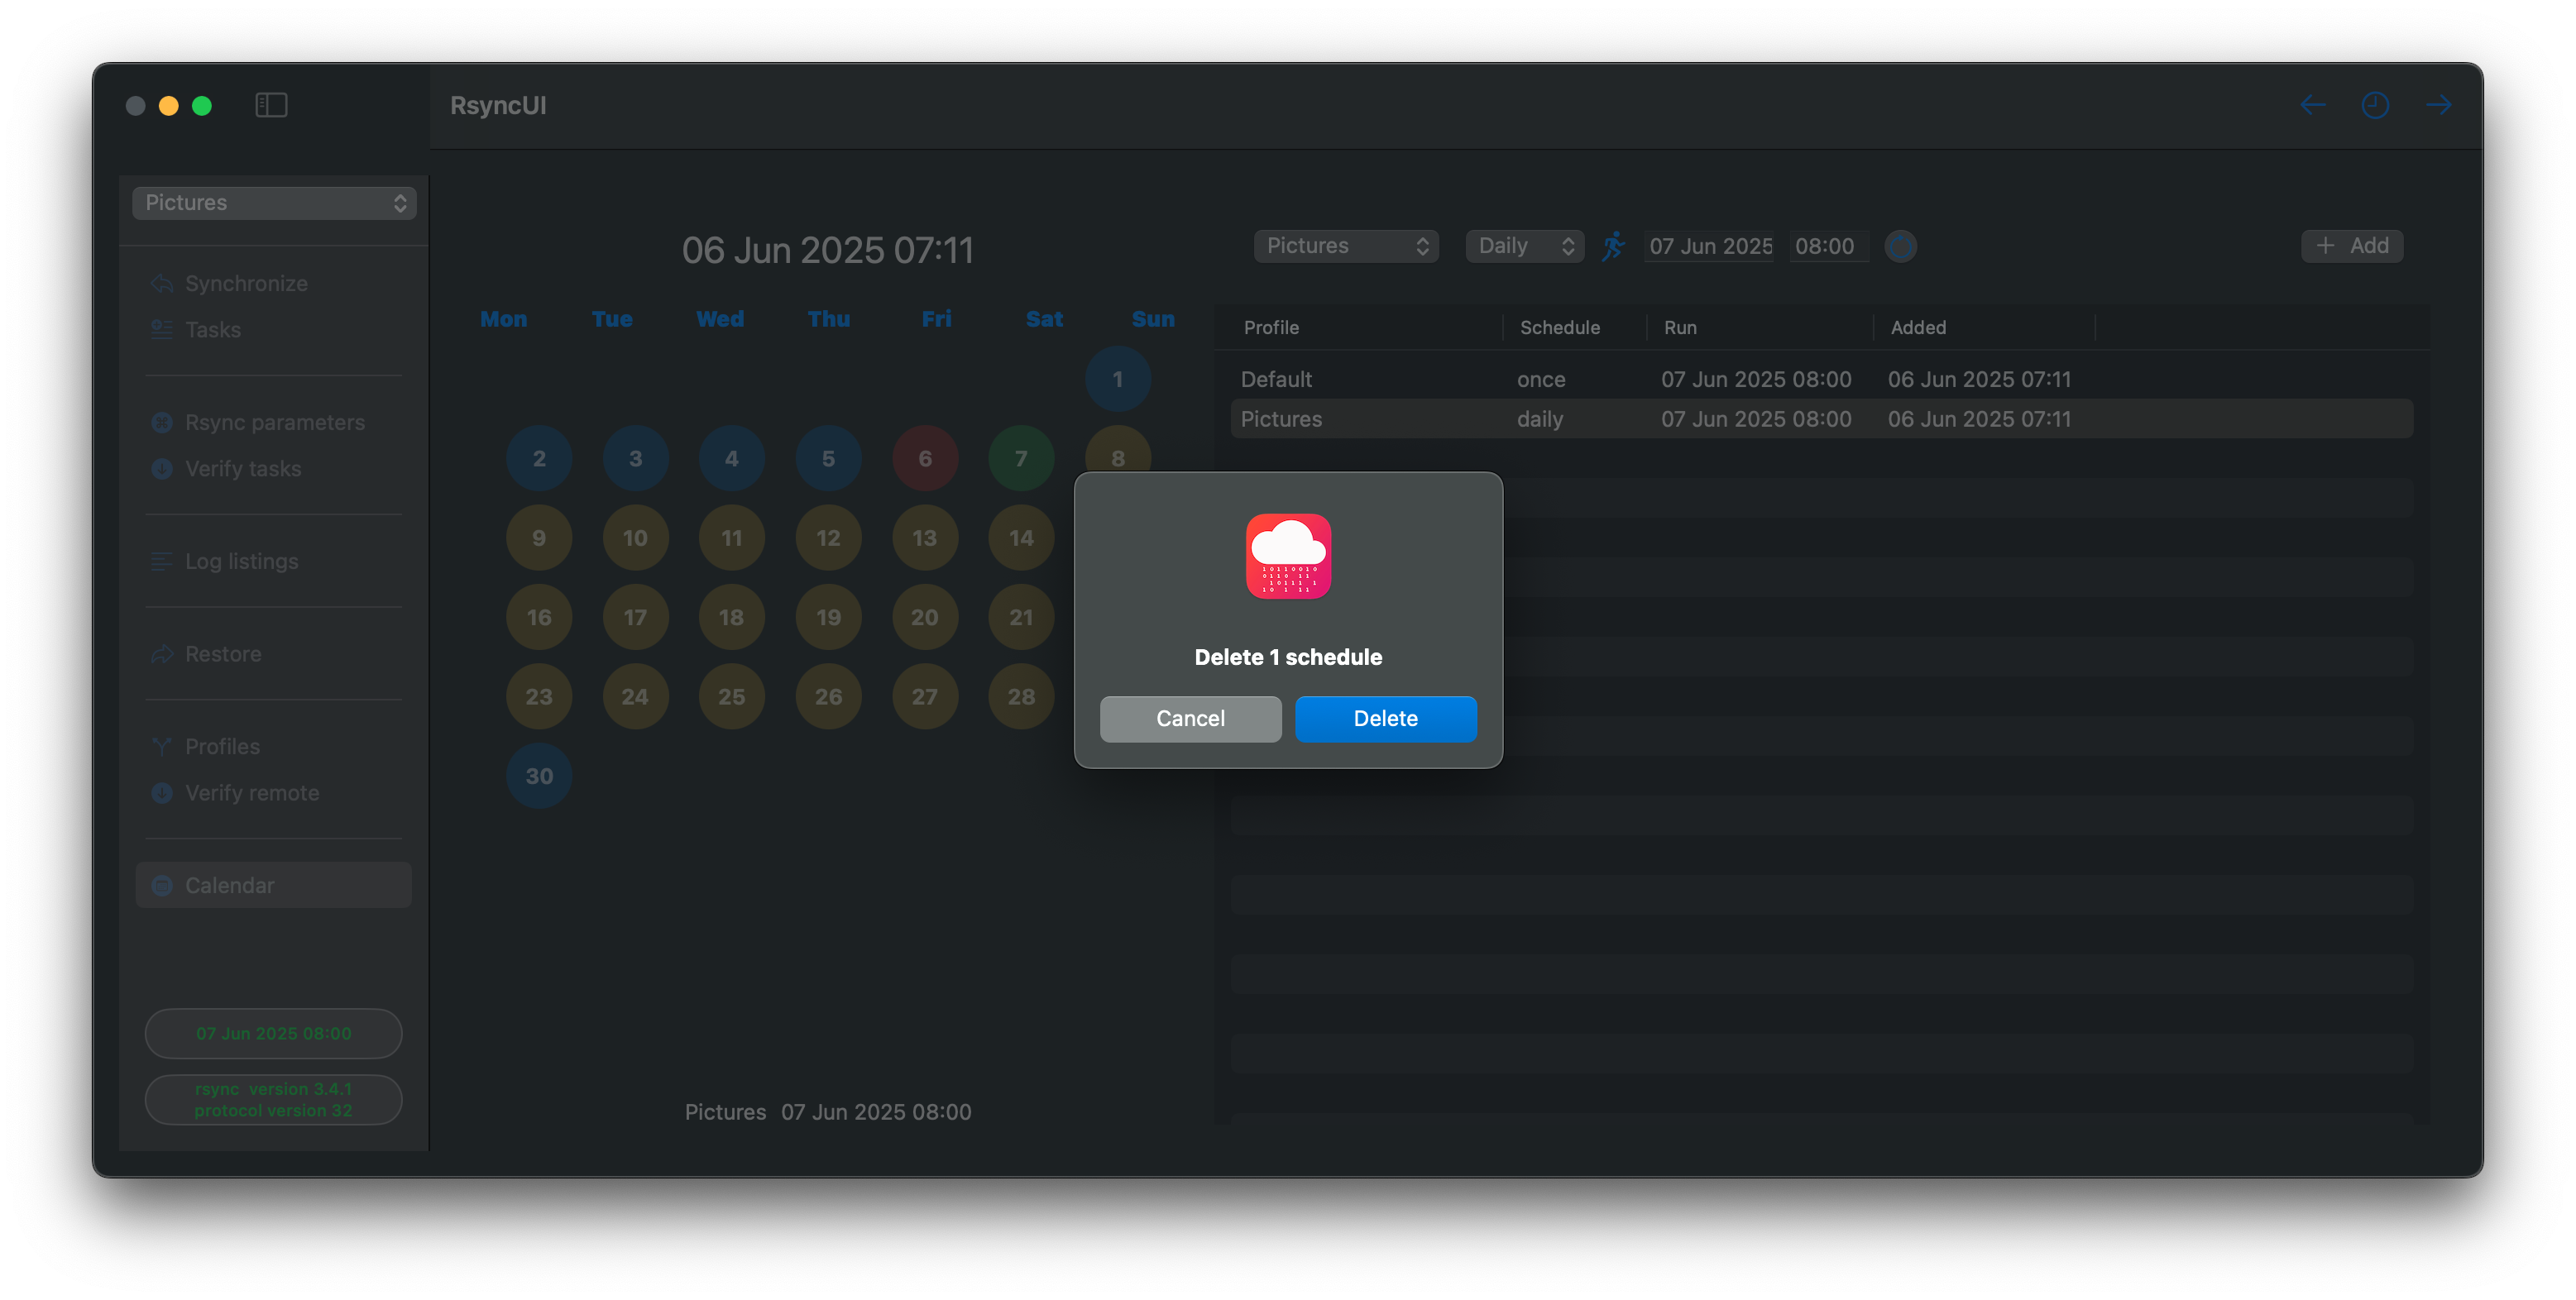
To add a schedule, click on the date, set the time, and schedule the task. When a schedule is active, the user is notified in the sidebar or on the toolbar when the sidebar is hidden. Right-clicking on a date will present schedules by date.
Tasks added to the schedule are validated. The planned next task schedule must either:
be at least 10 minutes after the first schedule in queue
the first schedule in queue is always later than the current time
be within 10 minutes before the first schedule in queue
the planned next schedule must also be later than the current time
The Schedule function is designed to handle Mac sleep mode:
when a scheduled task is not executed because the Mac enters sleep mode, the Schedule function retrieves missed tasks and displays them in a table
the user can move the missed tasks back to the schedule table
The Schedule view visually distinguishes invalid times in red font. Only validated task schedules are incorporated into the schedule.
Delete Schedules
Select one or more schedules and press the backspace key.
3.5 - Profiles
Tasks can be organized into profiles. A profile is a named directory where RsyncUI stores its files.
When you create a profile (for example, newprofile), RsyncUI creates a new directory at:
$HOME/.rsyncosx/<macserialnumber>/newprofile
where <macserialnumber> is your Mac’s serial number. All tasks and log files for that profile are stored within this directory.
Why use profiles?
Profiles are useful for separating unrelated sets of tasks — for example, one profile for work backups and another for personal photos. Switching profiles loads only the tasks for that profile, keeping the task list focused.
Creating and switching profiles
Open the profile picker from the toolbar or the File menu. Enter a name and confirm to create a new profile. Selecting an existing profile loads its tasks immediately.
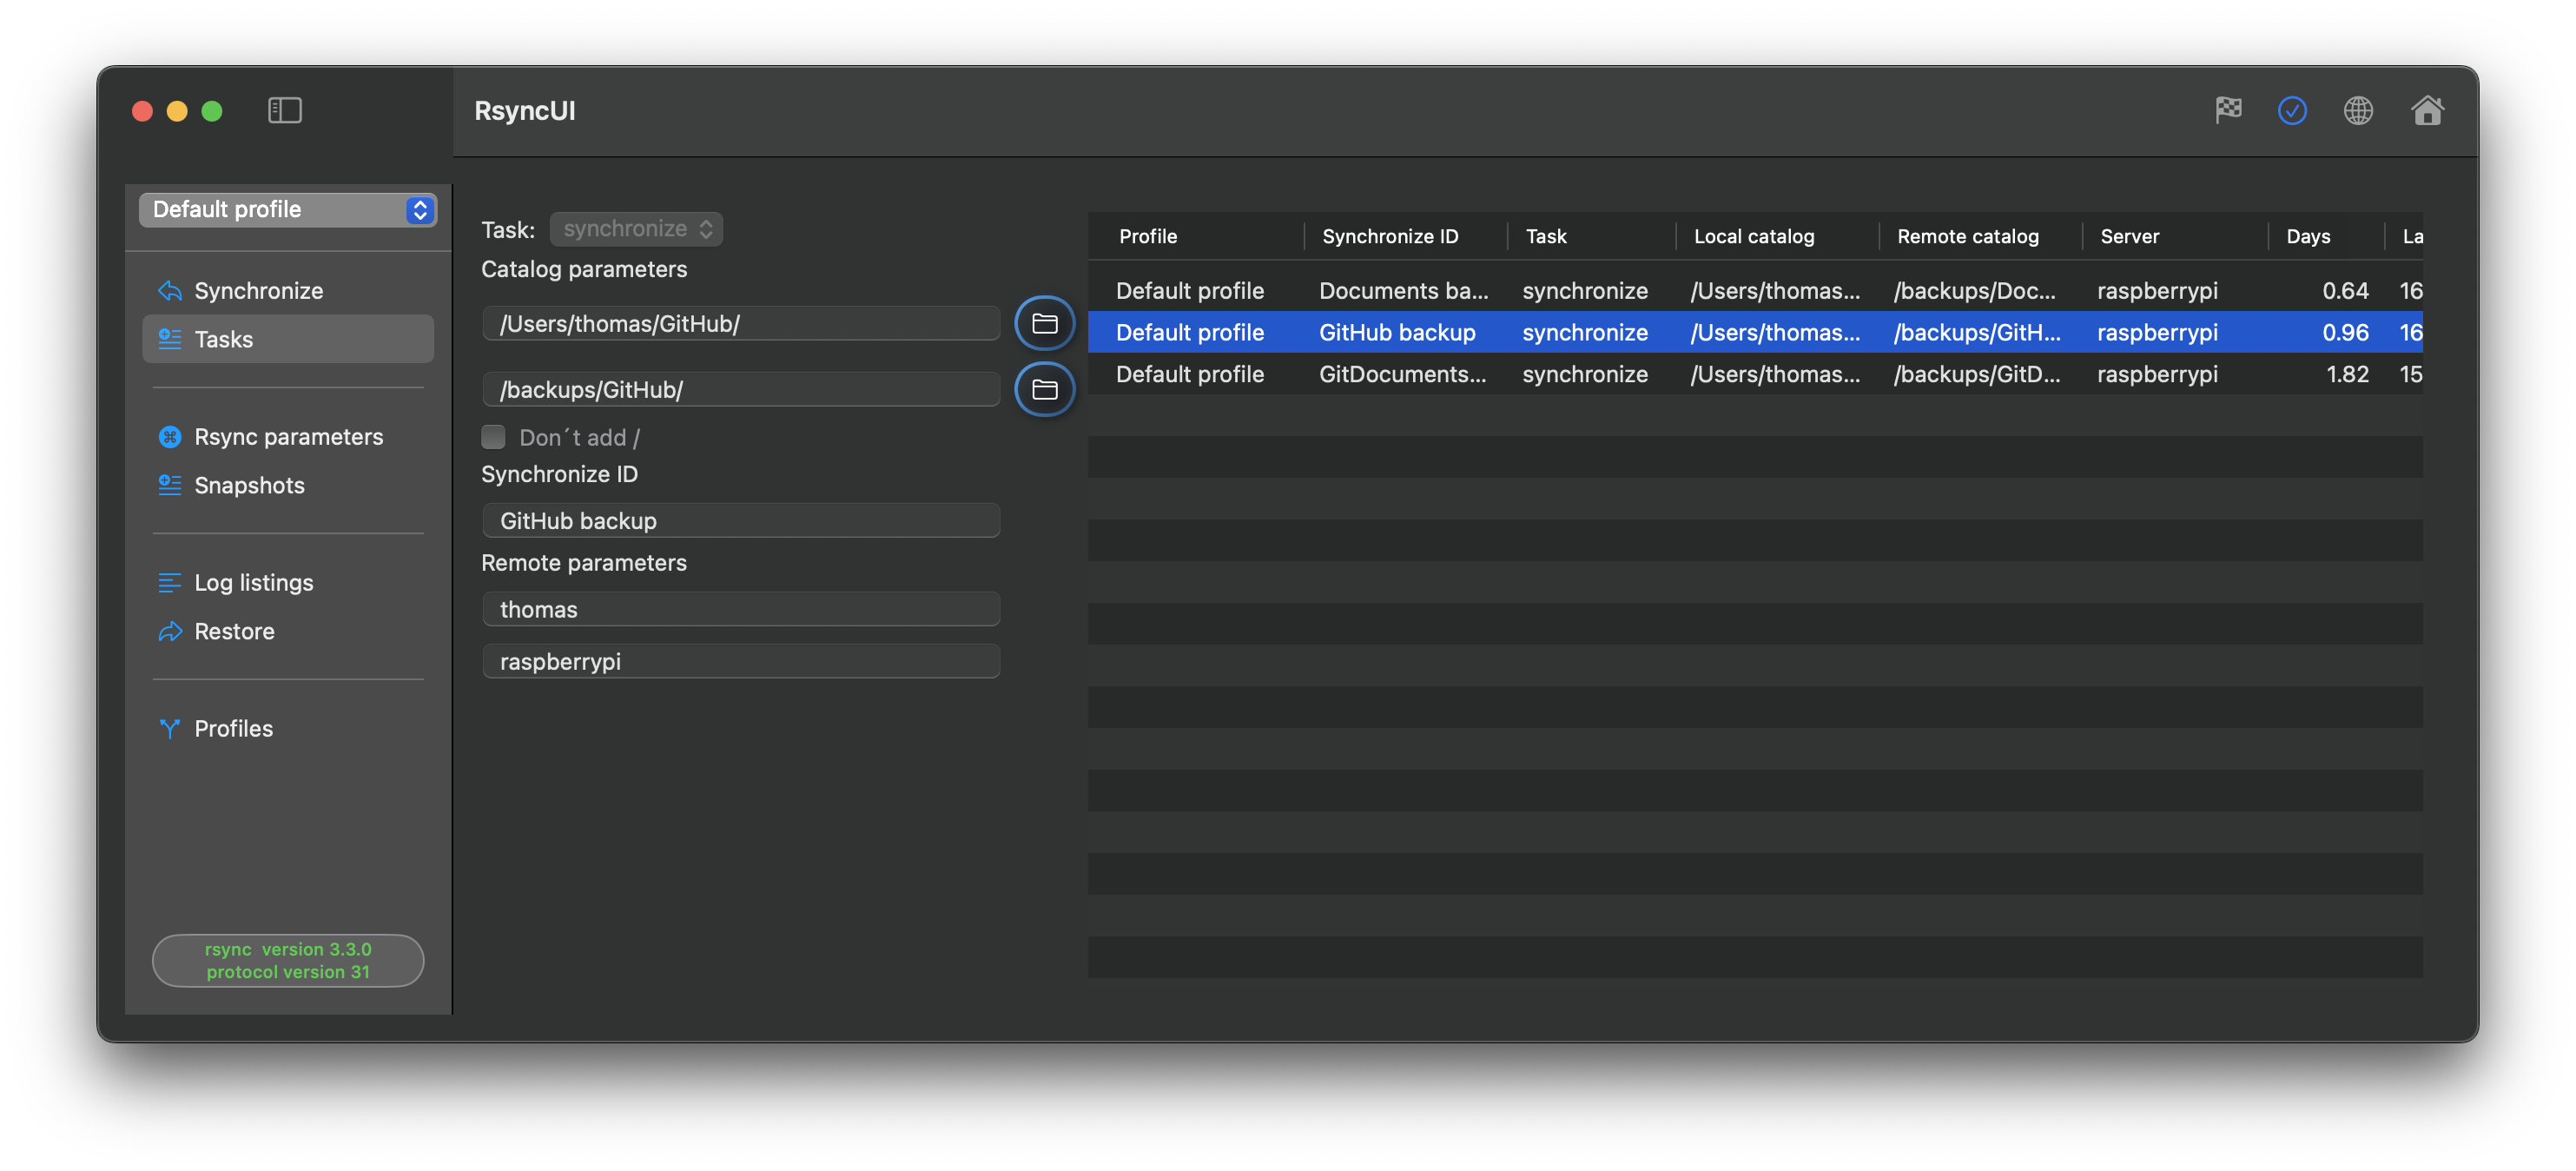
Stale task indicator
The list on the right shows tasks not updated within the number of days set under “Mark days after” in Settings. Tasks older than that threshold are highlighted in red as a reminder to run them.
3.6 - QuickTask
Use QuickTask to quickly copy or transfer files. QuickTask remembers the last task as defaults; you can clear them via the toolbar. QuickTask works only with remote servers and requires passwordless SSH login.
There are two types of quick tasks:
synchronize - synchronize local files to remote (push data)
syncremote - synchronize remote files to local (pull data)
Trailing Slash Options
Add - adds a trailing slash to both the source and destination
Do not add - does not add a trailing slash, or if added, removes it
Do not check - does not check for a trailing slash on either the source or destination
After entering data, the default task is a --dry-run task. Inspect the result before executing the actual run.
Folder Parameters
Source folder - required
Destination folder - required
~ expands to the remote home directory
you can also use the full path, depending on where the backup is stored on the remote
Remote Parameters
Remote username - username for login to the remote server
Remote server - either server name or IP address for the remote server
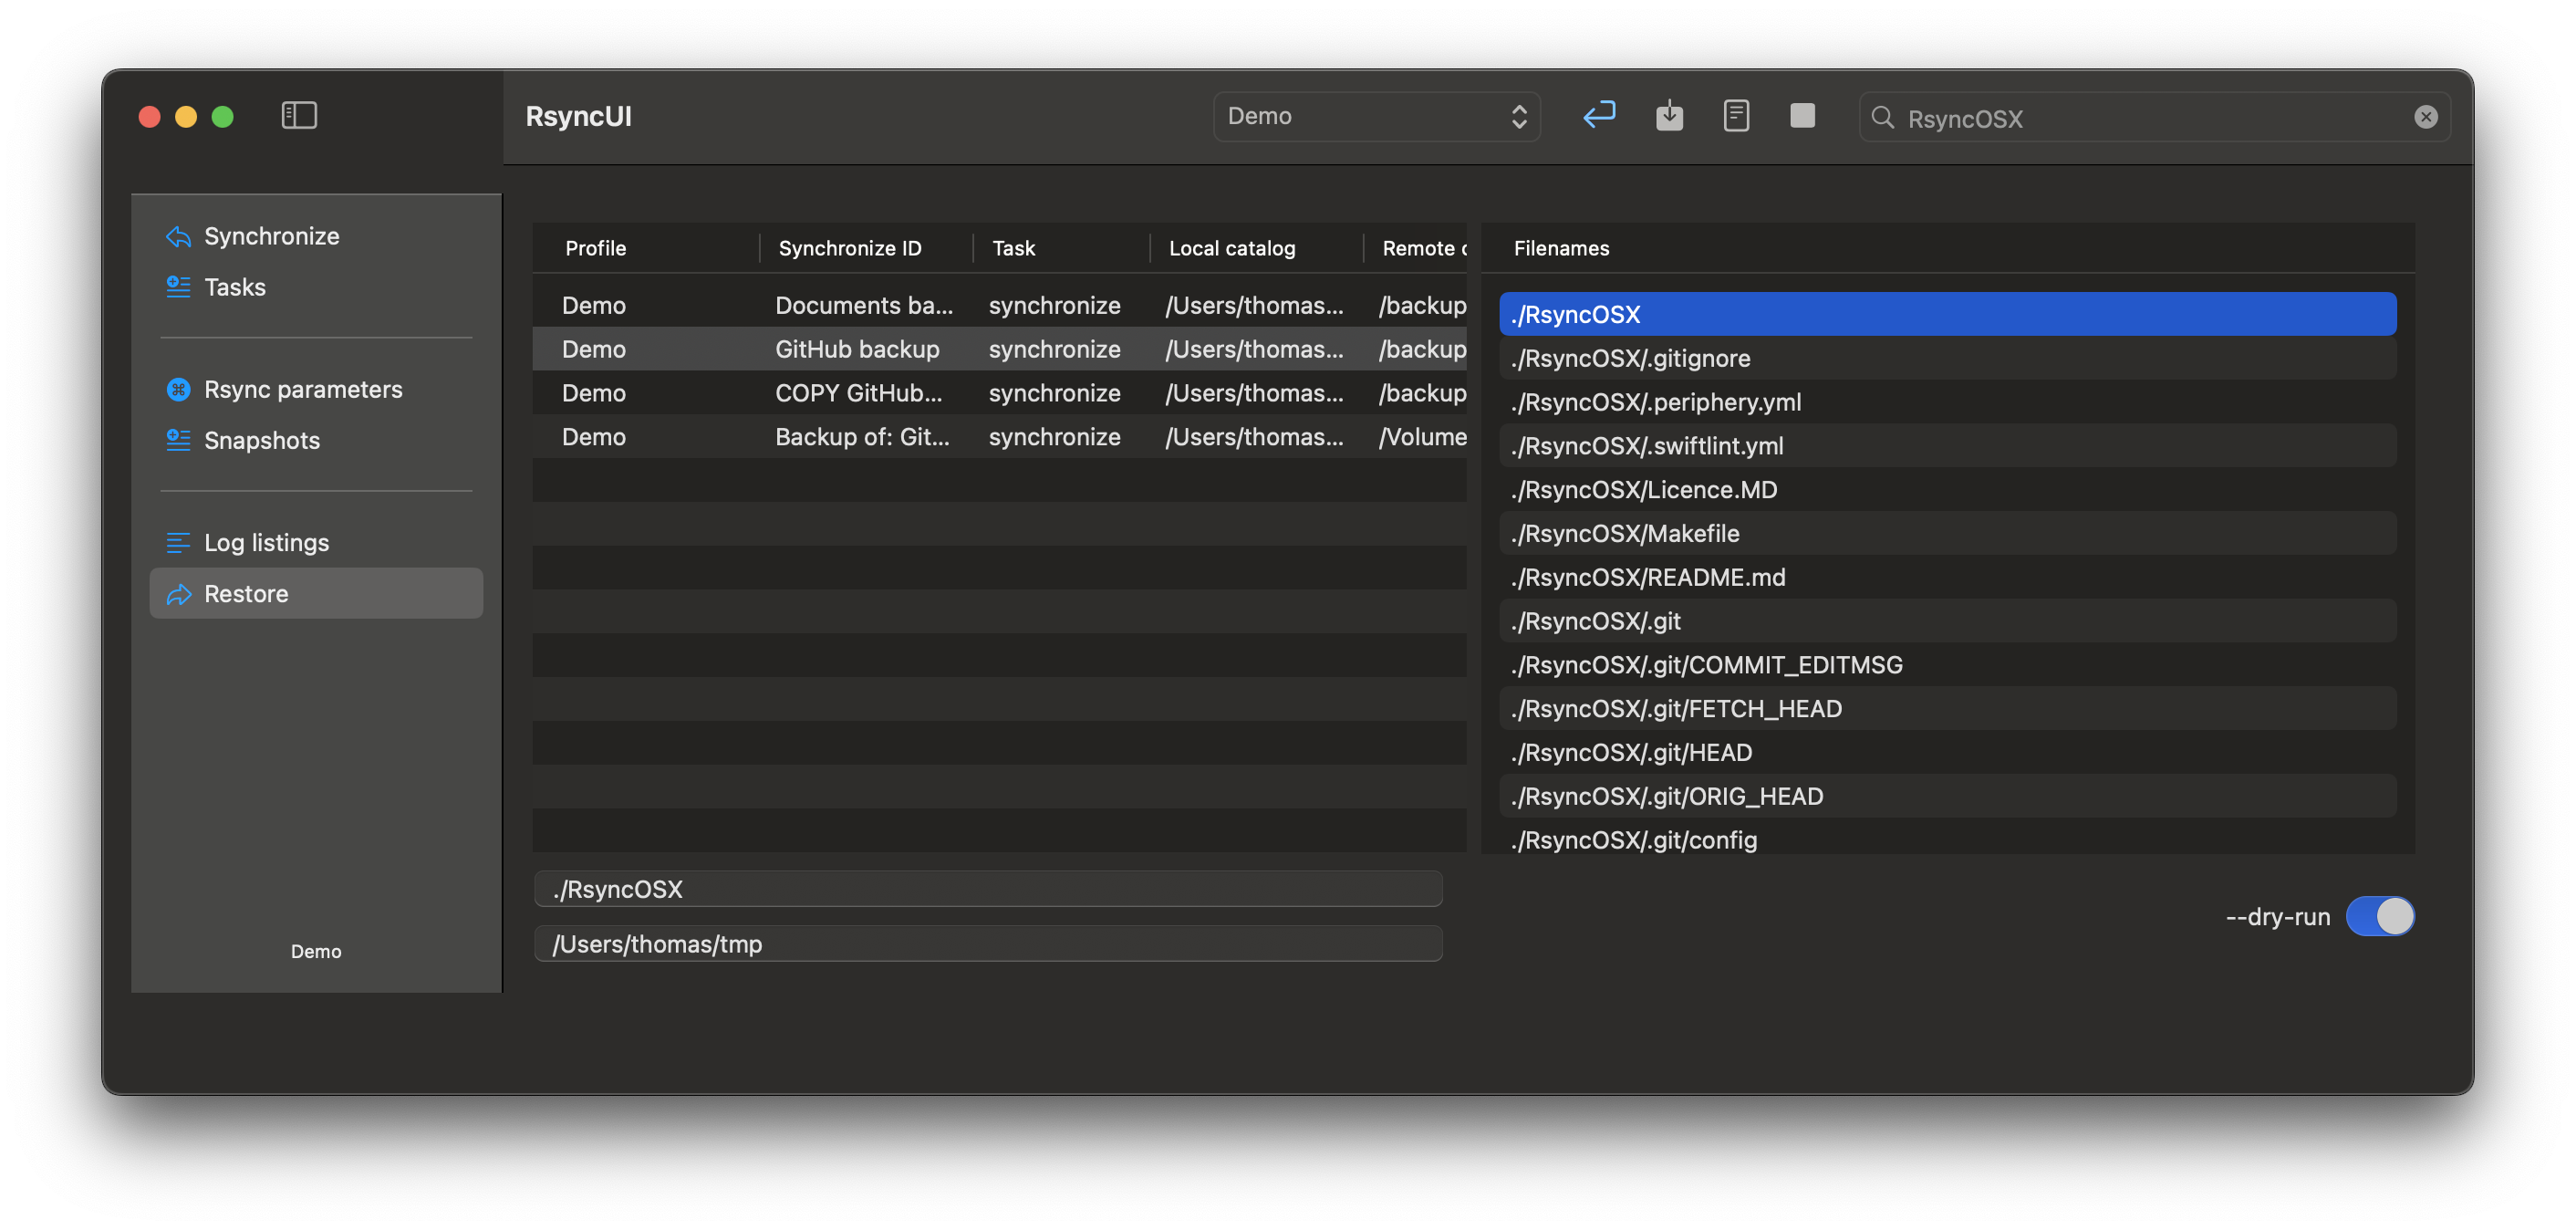
3.7 - Restore data
RsyncUI restores only from remote servers. For local attached volumes, use Finder. Always restore to a temporary path to avoid overwriting your original data.
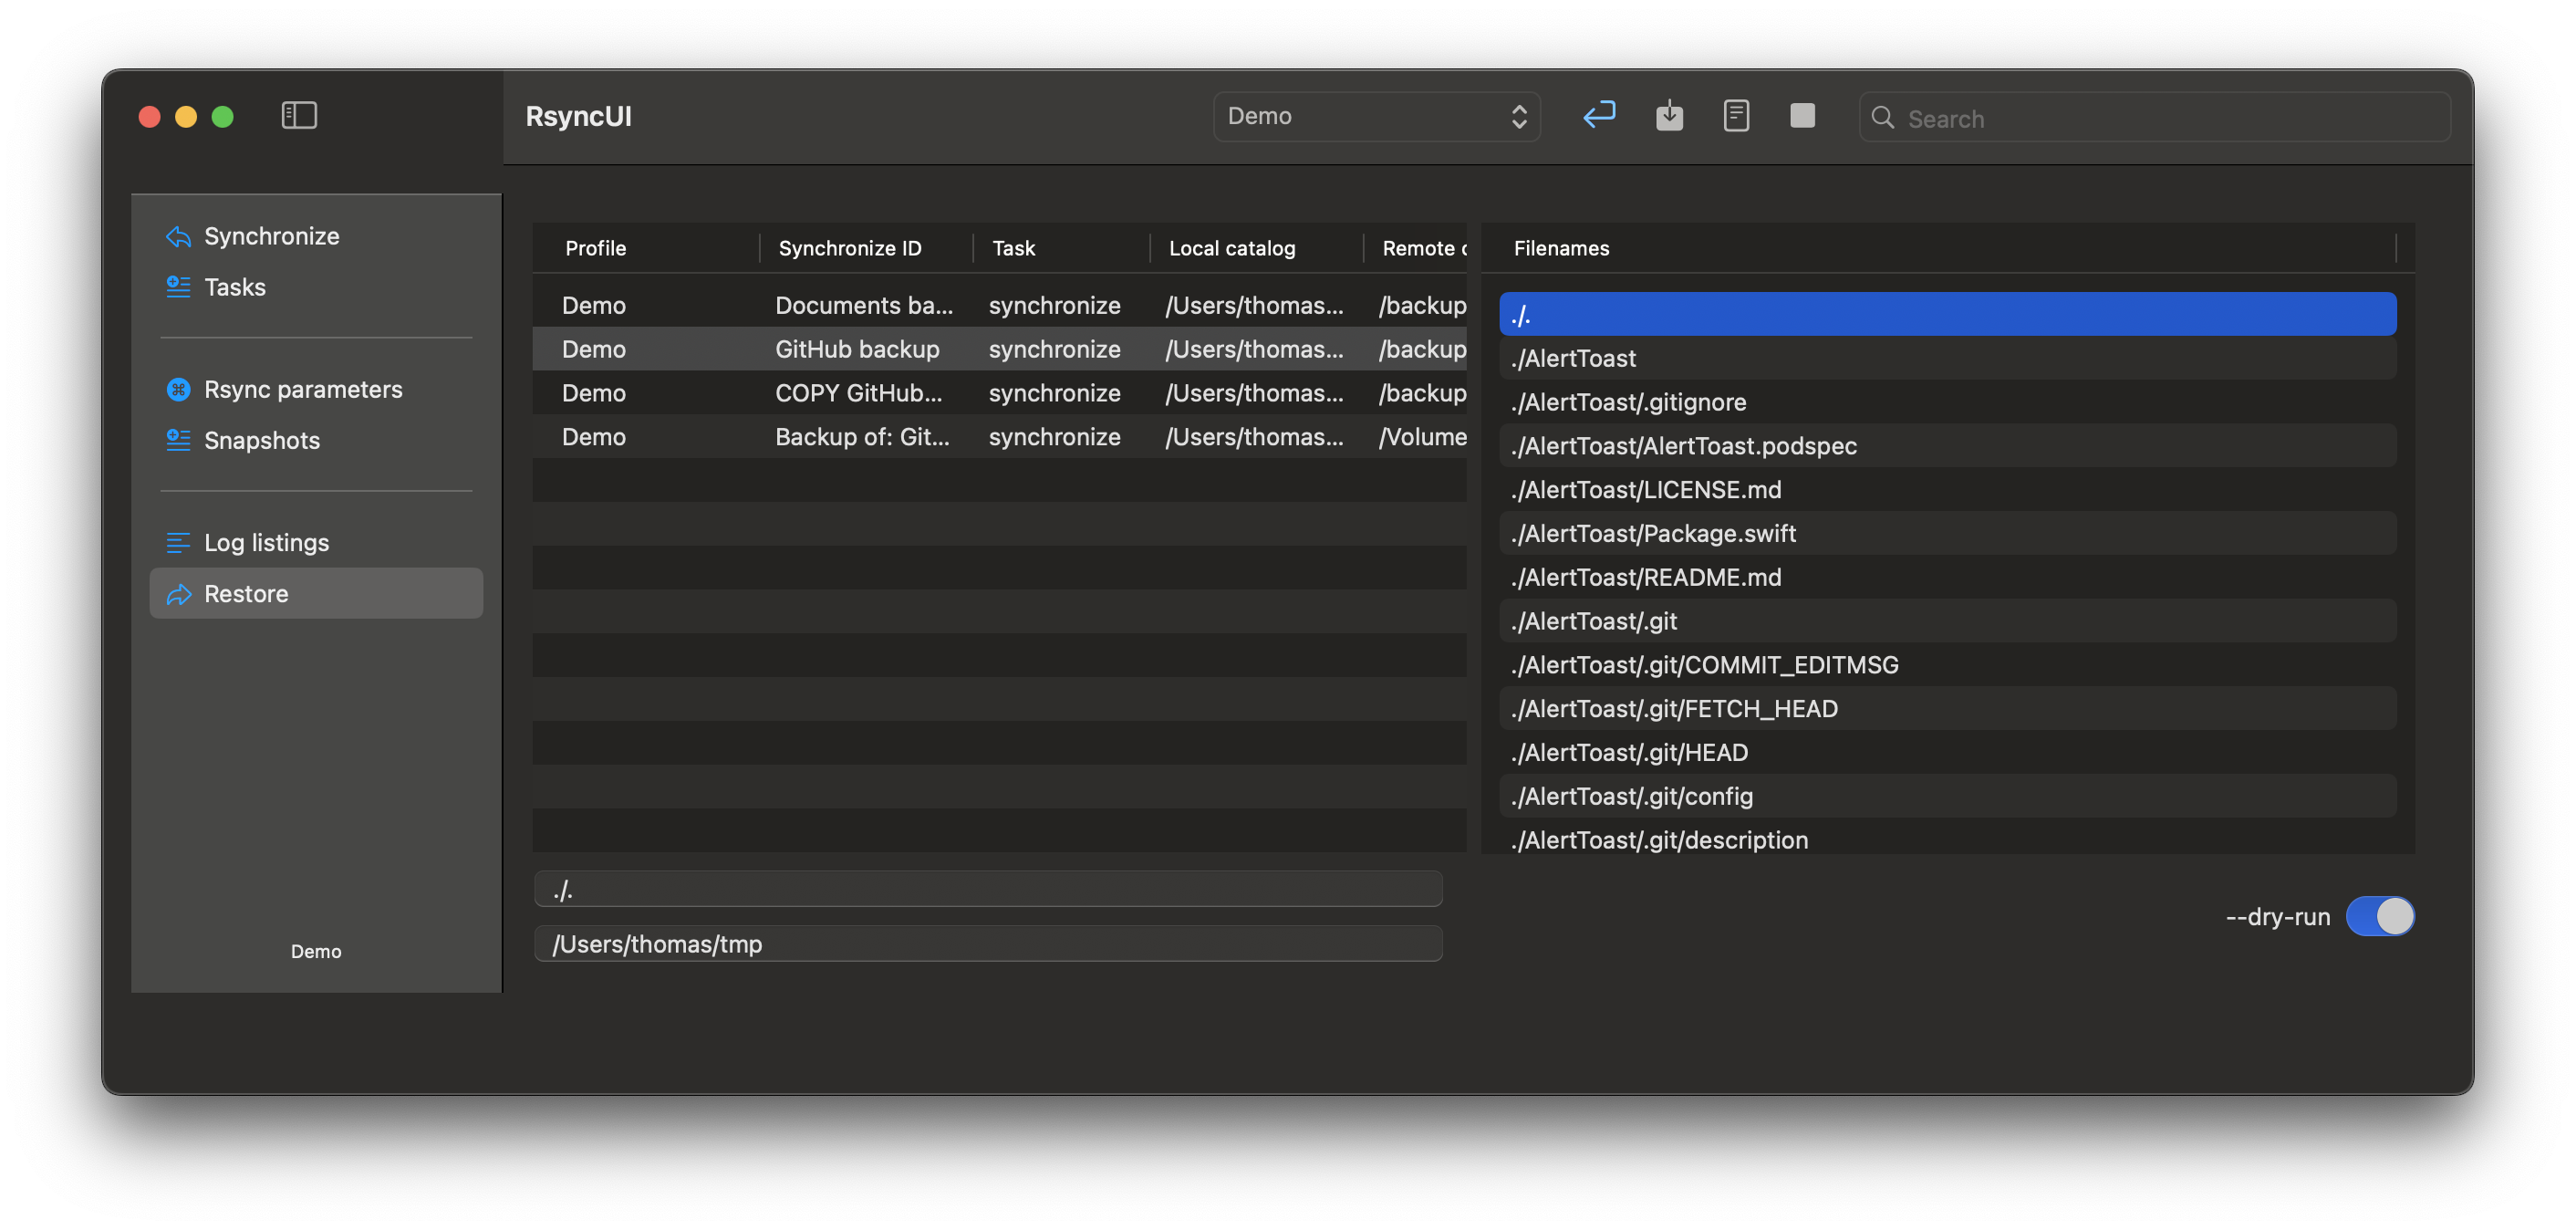
How to Restore Files
Filter files: Use the filter field to search for files or directories. The filter shows only filenames containing the search string.
Select files: Choose either a file or a directory to restore.
View the command: Toggle the command switch to see the actual restore command that will be executed.
Preview the restore: Select restore to display a --dry-run preview of the restore operation.
Execute the restore: Turn off the --dry-run toggle to perform the actual restore.
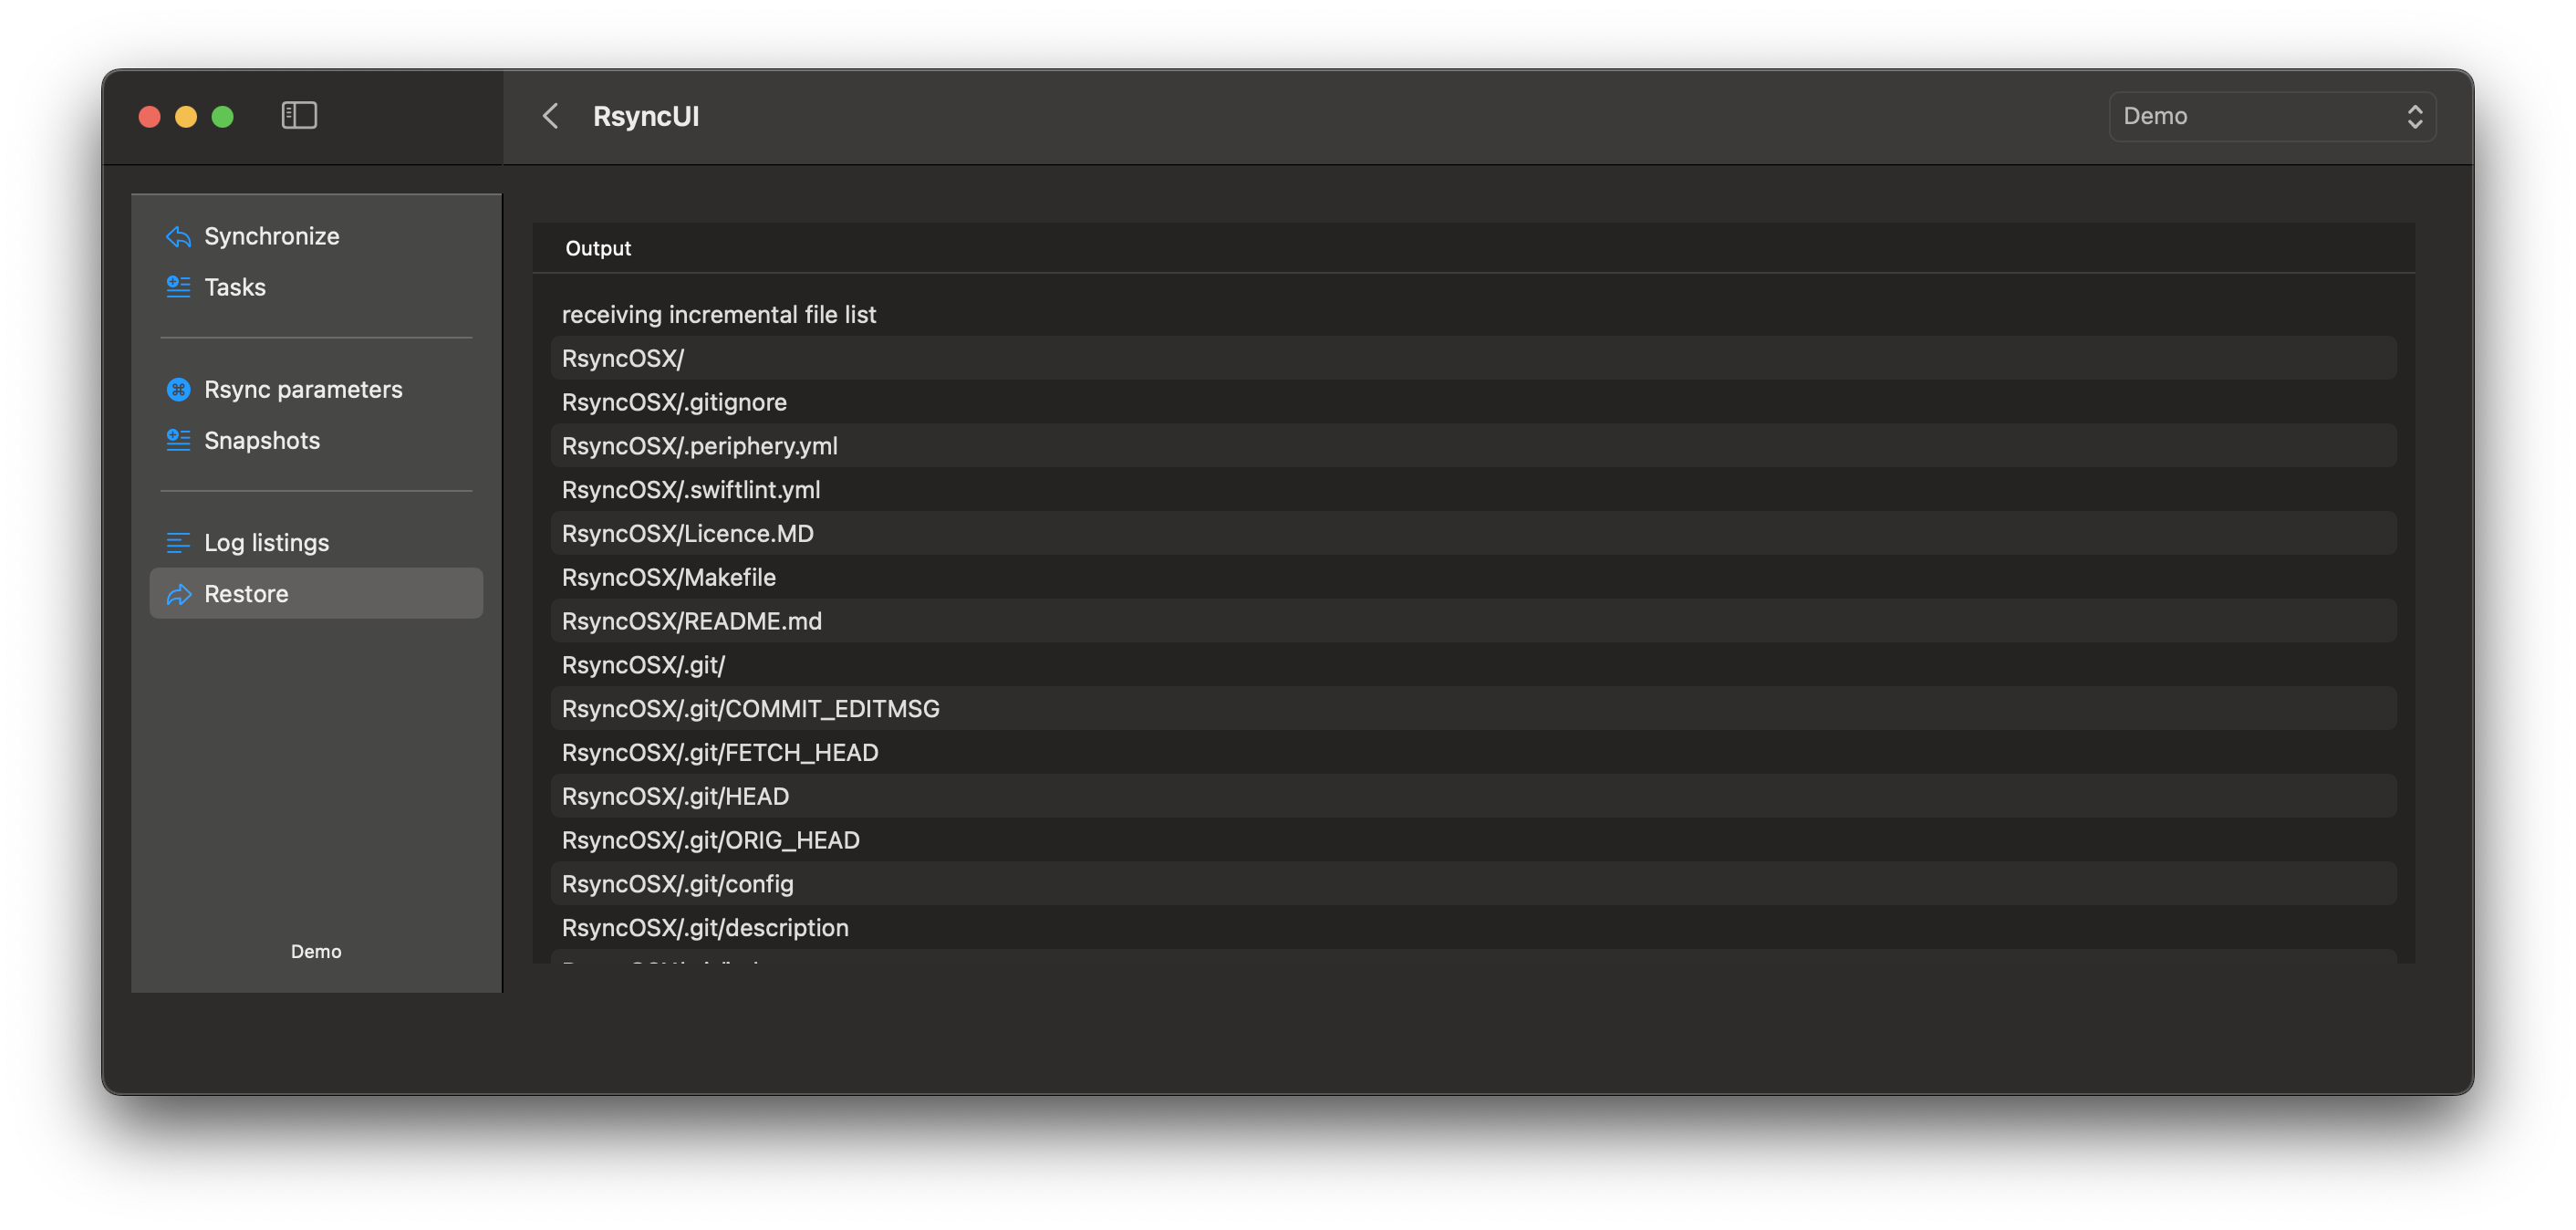
Review results: After the restore completes, RsyncUI displays the output from rsync.
4 - RsyncUI settings
Several settings can be adjusted. After changing a setting, save the changes to keep them next time you use RsyncUI. Access your settings with the shortcut ⌘,.
Rsync and path — settings for the rsync binary and paths
Log settings — logging behaviour and UI options
For SSH configuration, see the SSH Setup section.
The “About” section displays the version of rsync in use and the path for storing and retrieving configurations to the permanent storage location.
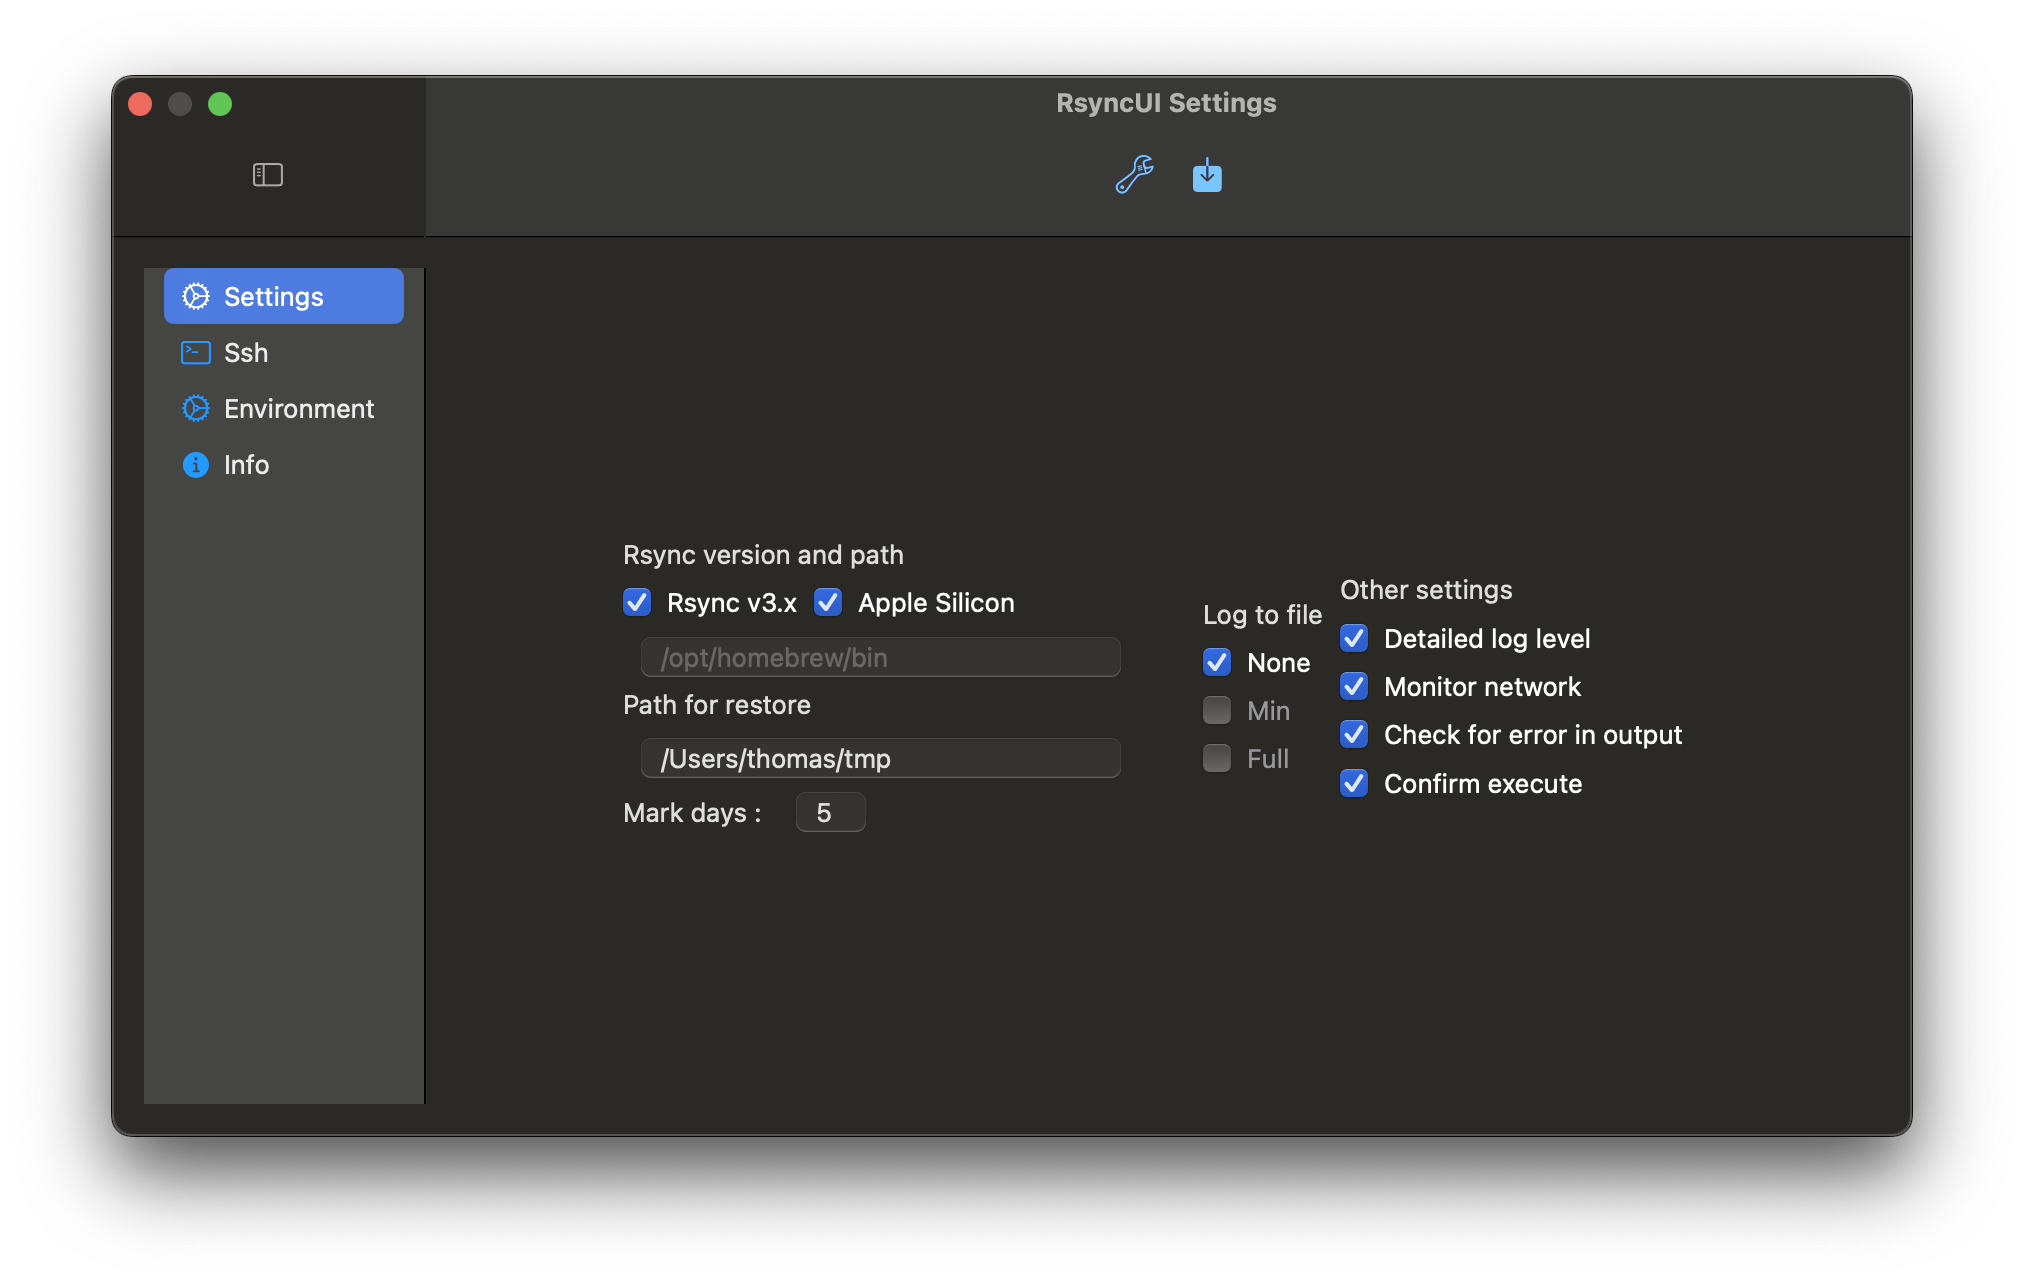
4.1 - Rsync and path
After changing a setting, save the changes to keep them next time you use RsyncUI.
Version rsync
It is recommended to install the latest version of rsync. RsyncUI provides direct path support for Homebrew on both Apple Silicon and Intel Macs. RsyncUI will determine the type of Mac you are using. The default path for Homebrew is:
Intel-based Mac: /usr/local/bin
Apple Silicon: /opt/homebrew/bin
Path rsync
The snapshot and syncremote features require the latest rsync. If an updated or new rsync is not installed by Homebrew, set the path manually.
If Rsync v3.x is enabled, set the optional path if not installed by Homebrew.
Any version of rsync will work, but only the default macOS versions and the latest rsync release have been tested
testing and verification ensure accurate parsing of rsync output
Path for restore
Preset temporary path for restoring single files and directory
Preset temporary path for a full restore
Mark days after
Tasks with an execution date older than the number of days are marked red.
Backup configurations
You can back up the current setup, configurations, and logs (including all profiles) at any time by clicking the wrench button. The backup is copied to your Documents directory with a timestamp: -month-day-year/hour/minute.
The backups are located in your Documents directory: $HOME/Documents/RsyncUIcopy-05-06-2024/08/21
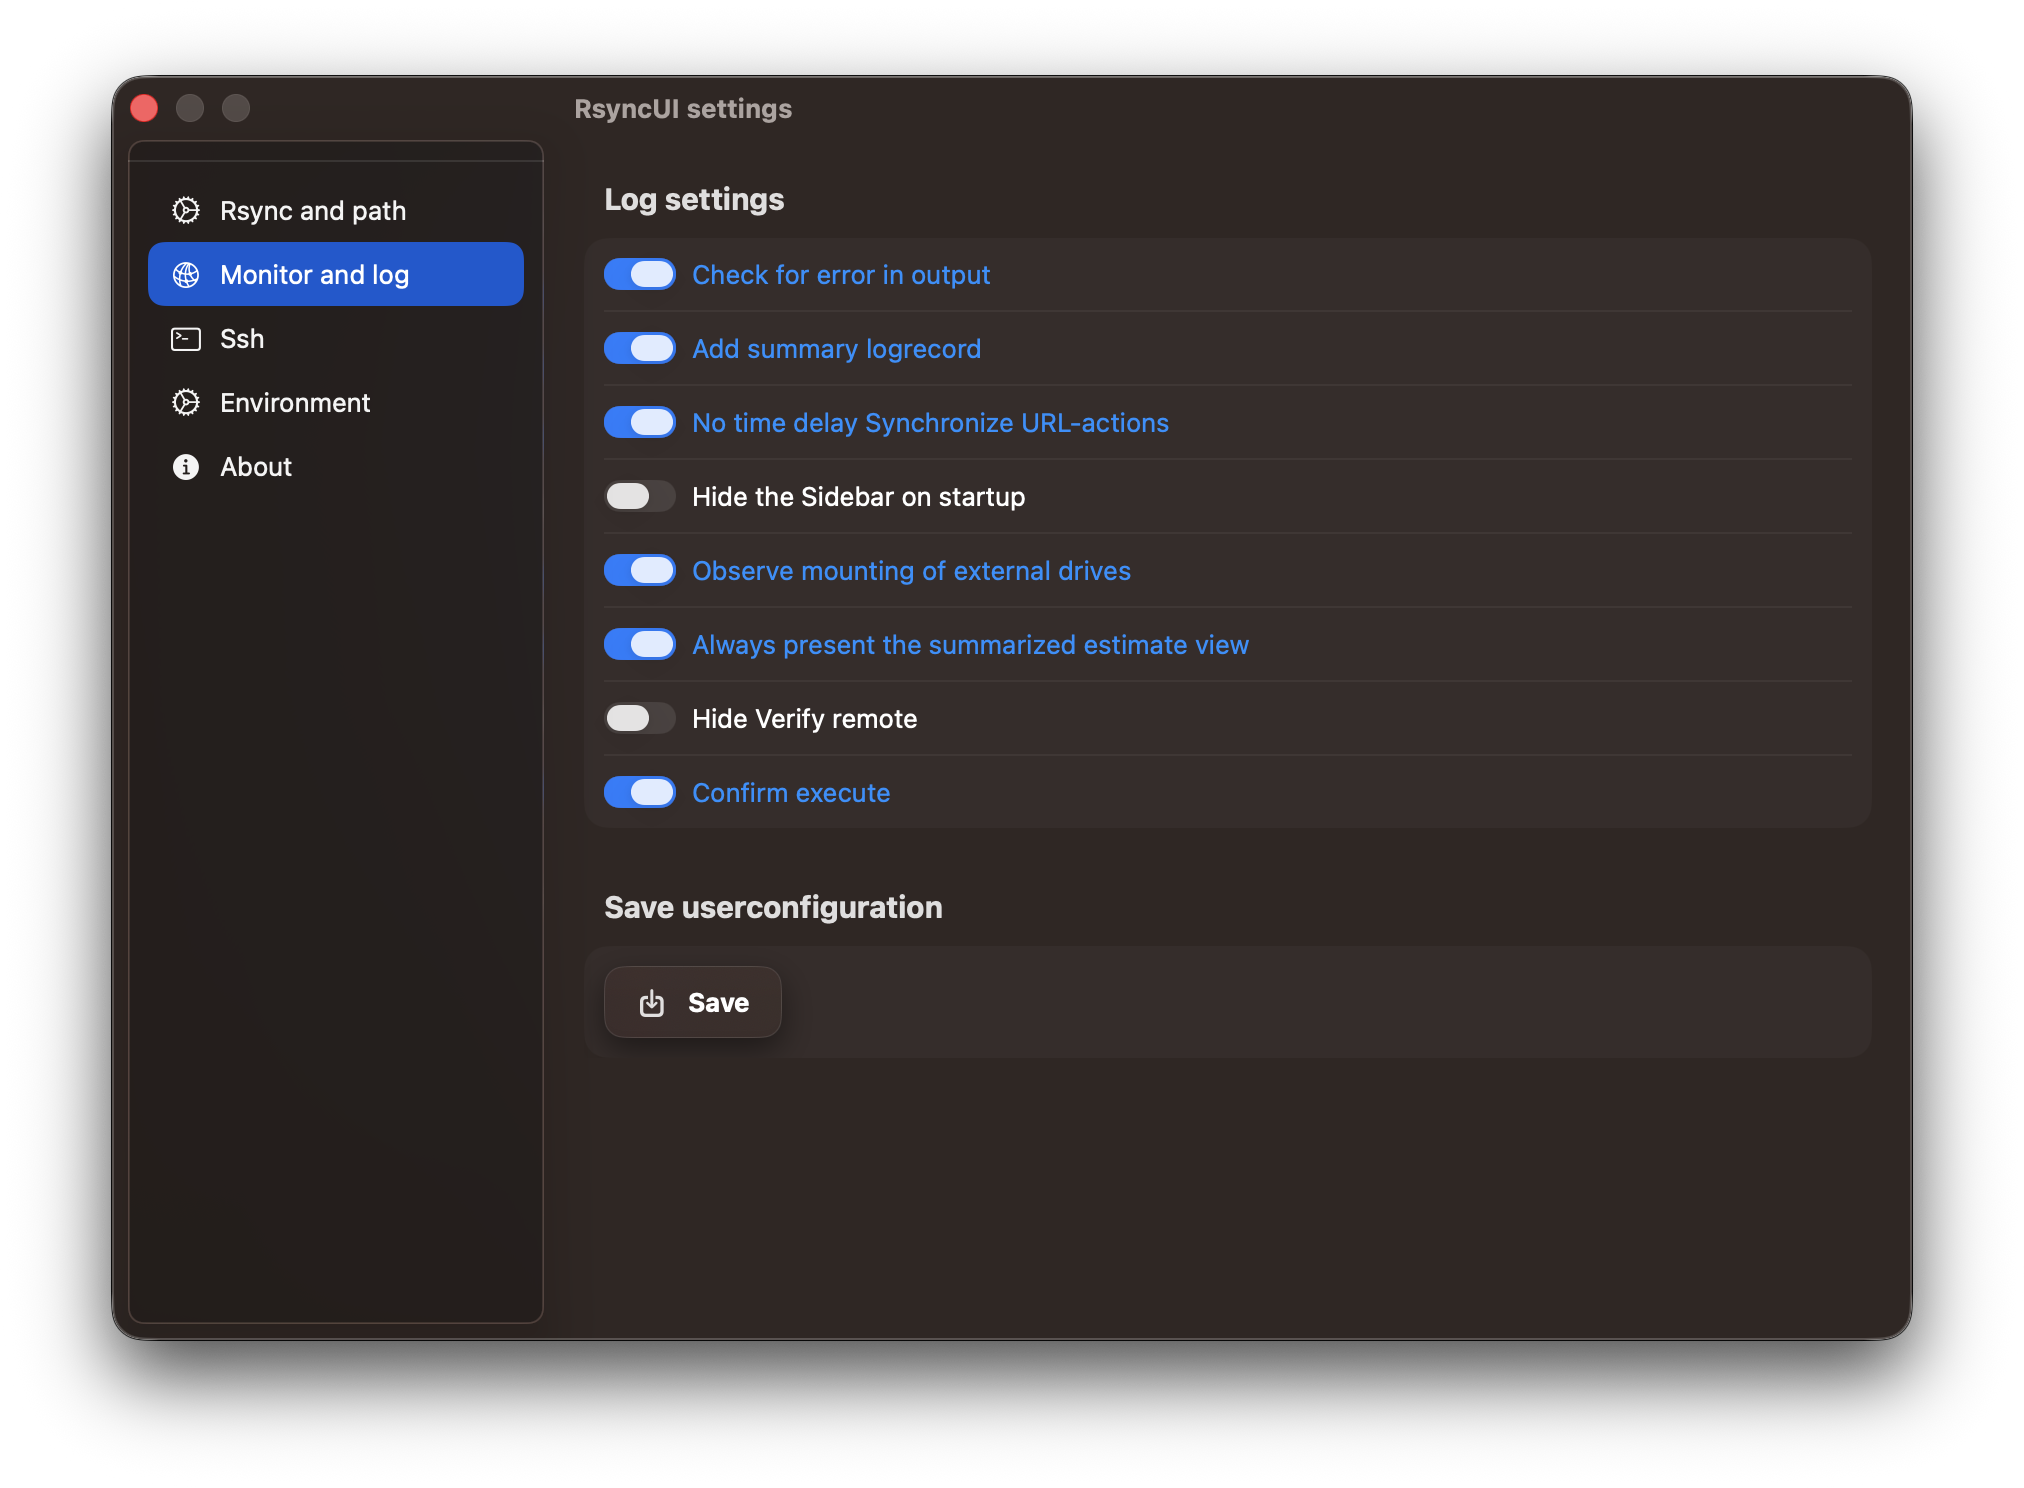
4.2 - Log settings
After changing a setting, save the changes to keep them next time you use RsyncUI.
Check for Errors in Output:
default: off
if the word “error” is found in rsync output, you are notified
Add Summary Log Record:
default: on
a summary of each synchronization is added to the log records; view “Log Listings” from the Sidebar
No time delay Synchronize URL-actions
default: off
if on, estimated tasks triggered by URL-actions will synchronize without any chance to abort
Hide the Sidebar on startup
default: off
the sidebar can be hidden; when on, the sidebar is hidden when RsyncUI starts
Observe mounting of external drives
default: off
automatic profile selection when RsyncUI detects a new mount of a local attached disk
Always present the summarized estimate view
default “on”
after an estimate, by selecting the Magic Wand on toolbar Synchronize task view, always present the summarized view
Hide Verify remote:
default “on”
refer to section “Verify remote”, this is a kind of special function, default not enabled
Use two tables Inspector:
applies to main Sidebar menu Tasks
utilize one or two tables to select Inspector for editing tasks and parameters
Silence missing stats
default: off
stats is the summarized output from rsync; if on, RsyncUI notifies if stats are missing after termination
in version 2.8.4, missing stats are unlikely due to the new RsyncProcessStreaming
Validate arguments
default: on - validates default parameters
if the --delete parameter is included in the task configuration, the validation checks its presence or absence based on the task’s state, which specifies whether a delete operation is required
other default validated parameters include --archive, --compress, and --dry-run
the --archive parameter is always enabled
the --compress parameter is only applicable for remote tasks
if the user requests an estimate, the validation checks that the --dry-run parameter is included within the arguments
Confirm Execute:
see below
Error Output from rsync:
Sample of an error in output from rsync. If the switch “Check for error in output” is enabled, RsyncUI writes the output to the log file and alerts the user about any errors in rsync.
The log file is stored at $HOME/.rsyncosx/macserial/rsyncui.txt. The log file can be opened from the main view.
Confirm Execute
This option is only available if version 3.x of rsync is enabled.
The confirm dialog appears when the number of files to synchronize is comparable to a new task. Sometimes a remote server or local disk becomes unavailable or you forget to attach it. If you start a synchronize task when the destination is unavailable, rsync may think it’s a new full sync and prompt you to confirm or abort.
If a remote server is unavailable, rsync will likely complain and generate an error. If the check for error in output option is enabled in the user settings, the rsync error messages written to the log and an Alert will be displayed.
If a local disk is not attached, rsync will attempt to synchronize the data to the /Volumes/ directory on your Mac. This directory is typically where macOS mounts local attached disks.
/dev/disk5s2 on /Volumes/Import bilder (apfs, local, nodev, nosuid, journaled, noowners)/dev/disk6s1 on /Volumes/Backups (apfs, local, nodev, nosuid, journaled, noowners)
Below the local attached volume is not connected, and the estimate may interpret this as a new synchronize task. If you have simply forgotten to attach the disk, you do not want RsyncUI to synchronize data to the /Volumes directory.
5 - SSH Setup
RsyncUI requires passwordless SSH key authentication to synchronize to remote servers. These pages guide you through creating SSH keys and configuring RsyncUI to use them.
5.1 - SSH settings
After changing a setting, save the changes to keep them next time you use RsyncUI.
This view configures the global SSH keypath and identity file used by RsyncUI for all remote tasks. For a guide on creating SSH keys, see SSH keys and passwordless login.
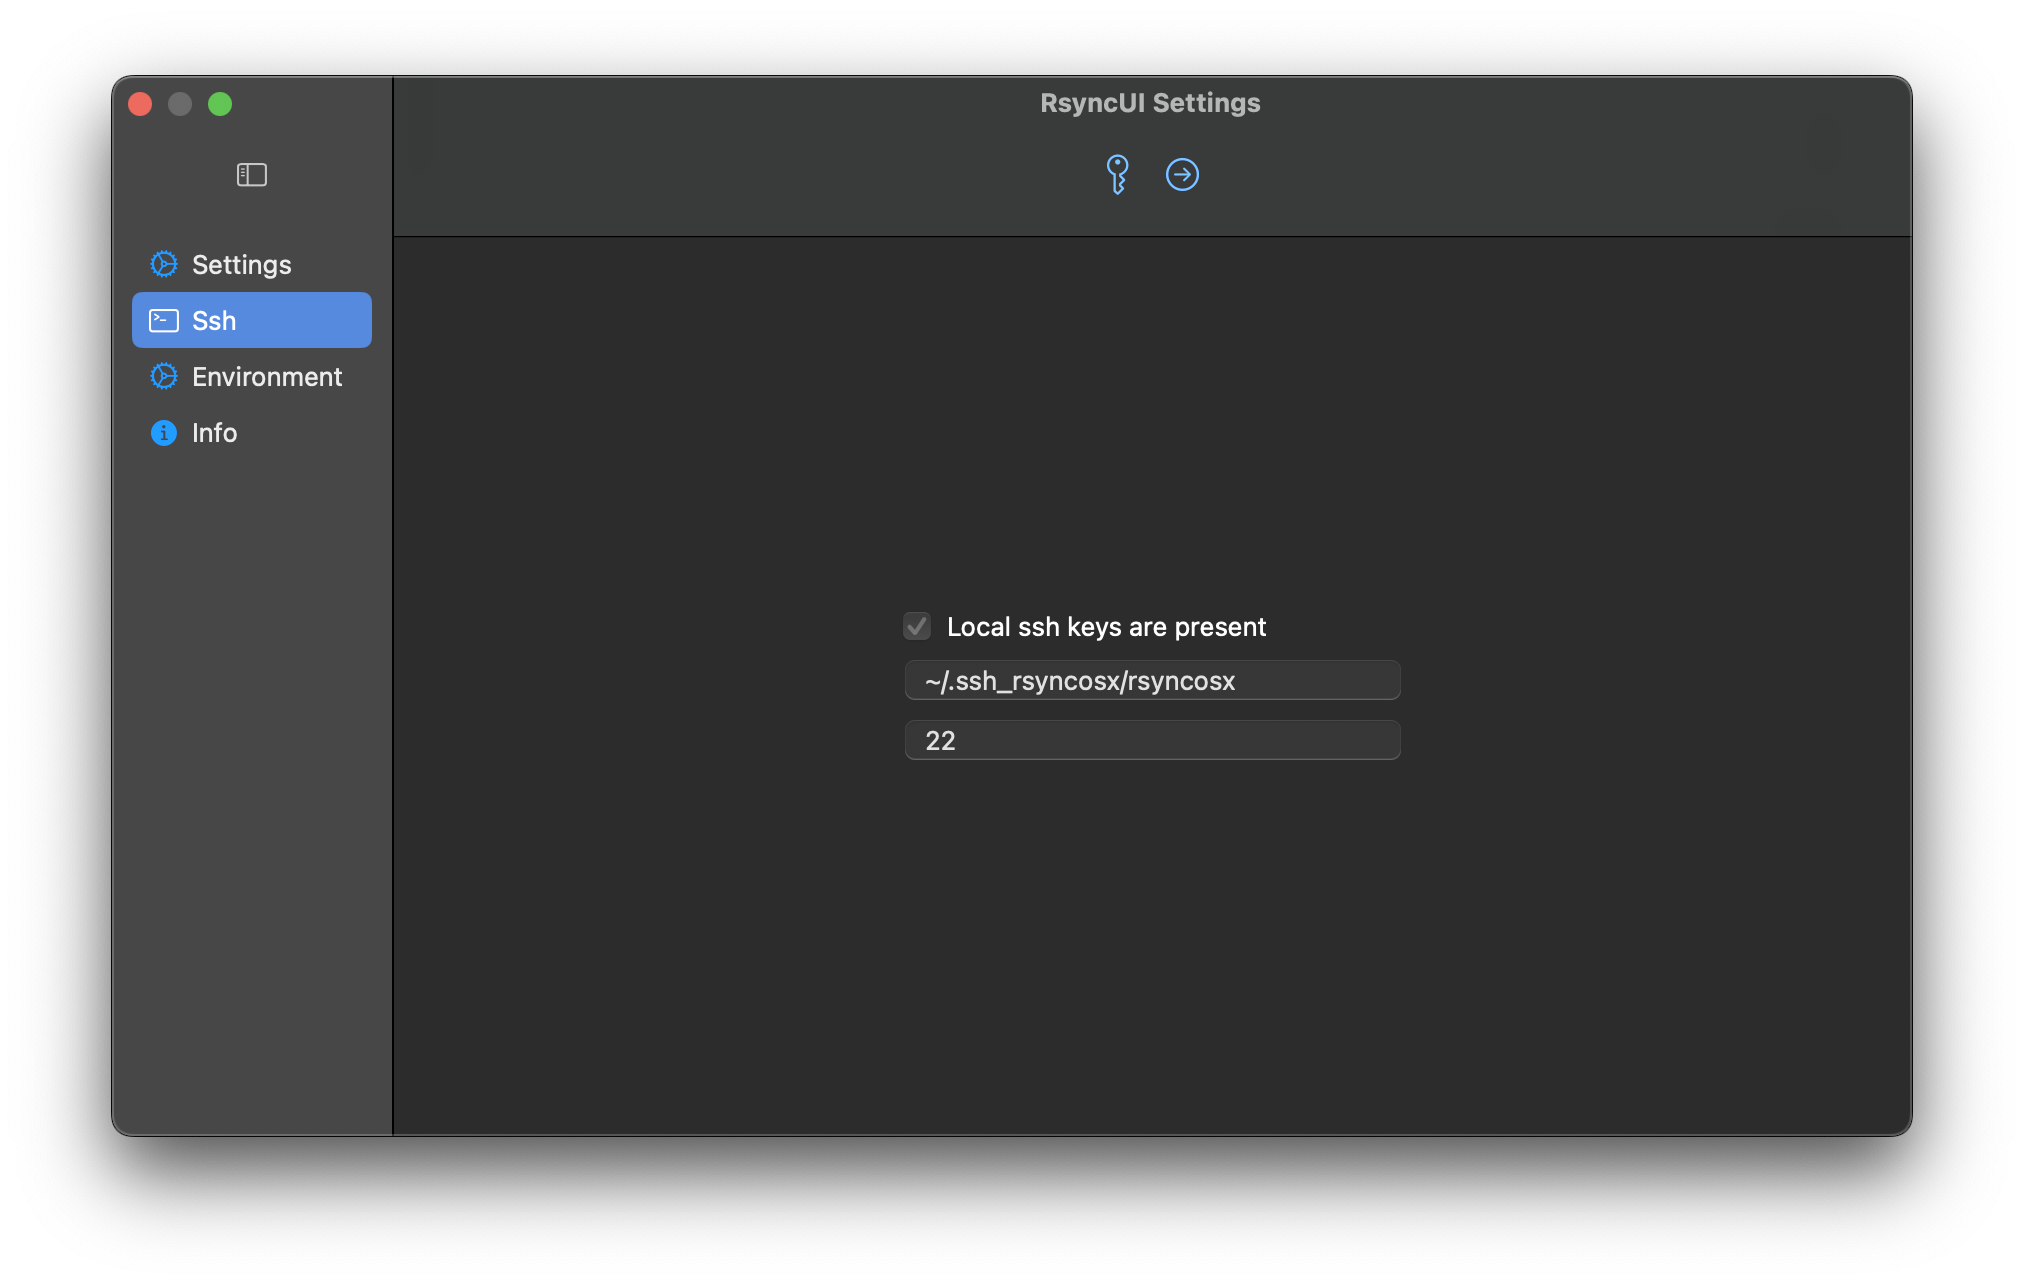
Local SSH Key Present
When this is “on”, RsyncUI has detected a local SSH key.
The default RSA-based SSH key values are ~/.ssh/id_rsa and port 22. These are not required if you use the defaults. If you do not specify your own keypath and identity file, RsyncUI uses the defaults. If a local SSH key is present, leave the settings as-is or set your own keypath and identity file. RsyncUI will mark the selected settings as default.
Set SSH Keypath and Identityfile
The user can specify a selected SSH keypath and identityfile that will apply to all configurations.
SSH Keypath and Identityfile: If the user selects a different keypath or identityfile from the default, it will be used for all configurations.
Port Number: The user can specify the port number through which SSH communicates. The default port number is 22.
If global SSH parameters are set, they will apply to all configurations. However, it is possible to specify different SSH parameters for individual tasks, which will override the global settings.
5.2 - SSH keys and passwordless login
To synchronize to a remote server, RsyncUI requires passwordless SSH key authentication. Password-based authentication is not supported. SSH keys are more secure than passwords and allow RsyncUI to run unattended tasks without prompting.
Default SSH keys
If you use the standard RSA key location (~/.ssh/id_rsa) and the default port 22, no extra configuration is needed in RsyncUI. RsyncUI detects the key automatically and appends -e ssh to the rsync command to tunnel and encrypt the transfer.
Custom SSH keys
If you prefer a non-default key location or a custom port, you must create the key pair manually and tell RsyncUI where to find it.
RsyncUI passes custom key settings to rsync as:
-e "ssh -i ~/.keypath/identityfile -p NN"
where:
-i ~/.keypath/identityfile is the SSH keypath and identity file
-p NN is the port number (default 22)
Custom keypaths must start with ~ followed by / and contain at least two forward slashes. RsyncUI validates this before saving.
For example, a custom keypath might look like:
~/.ssh_rsyncosx/rsyncosx
And the resulting rsync command RsyncUI builds would be:
RsyncUI uses the standard tools ssh-keygen and ssh-copy-id. Run the following steps in Terminal.
Custom SSH key pairs must follow the format ~/.ssh_keypath/identityfile, and the SSH port must be an integer value. RsyncUI validates these settings before saving.
-f ~/.ssh_rsyncosx/rsyncosx — specifies where to save the keys
Step 3: Copy the public key to the remote server
ssh-copy-id -i ~/.ssh_rsyncosx/rsyncosx.pub -p NN user@server
Replace NN with your SSH port (default 22), user with your remote username, and server with your server address.
Step 4: Set correct permissions
chmod 700 ~/.ssh_rsyncosx
Step 5: Verify the connection
/usr/bin/ssh -p NN -i ~/.ssh_rsyncosx/rsyncosx user@server
A successful login confirms the key pair is working. If it fails, check that ssh-copy-id completed without errors and that the permissions on ~/.ssh_rsyncosx are correct.
Step 6: Configure RsyncUI
Open Settings → SSH and enter your custom keypath and identity file. RsyncUI will apply these settings to all remote tasks. You can also set per-task SSH parameters in the task’s Parameters tab, which will override the global setting.
6 - Advanced
Advanced features for automation and task management. If you are new to RsyncUI or rsync, learn the basics before using these.
6.1 - URL commands
Deep links provide direct access to app features via URL. Using deep links, you can estimate and synchronize in a single click. Deep links in RsyncUI group actions that typically require multiple steps.
There are three methods of using deep links:
enable RsyncUI widgets
use URL functions direct within RsyncUI
save a URL link in e.g., Notes
RsyncUI Widget
One widget is embedded in RsyncUI:
estimating and synchronizing
The widget retrieves a saved URL from storage. In the Tasks view, there is a URL view where you can save the required URL. The widget shows whether a validated URL is present. To enable the widget on macOS, click the date and time icon in the upper right corner of your screen. Edit widgets and select RsyncUI, then add the widget.
After enabling the widget, a single click on the widget will launch RsyncUI and execute the corresponding action. To modify the URL, update and save the new URL.
Execute URLs from within RsyncUI
Deep links also enable automation of actions within RsyncUI. A single click on the toolbar icon executes the URL action. RsyncUI generates the necessary URL based on the loaded profile and the required action. The yellow toolbar icon allow execution of URL commands from within RsyncUI, as demonstrated in section above.
URLs and Notepad
Action
URL
Estimate all tasks, automatically synchronize data
Estimate all tasks and automatically synchronize data
load profile, estimate all tasks and automatically synchronize data
View URL
You can copy the correct URLs and save them in an application like Notes for easy access to start a synchronization task.
Errors in URL link
If RsyncUI encounters an invalid URL link, it will generate errors. Only well-defined URLs (specifically those supported by RsyncUI) are processed and executed. All URLs are validated as valid, but only defined URLs for RsyncUI are actually executed.
6.2 - Export and import
Tasks can be exported and imported between profiles and to new Macs. Select the “File” menu and then “Export and import.”
Export
Exporting saves all tasks in the current profile to a JSON file. Choose a location to save the file — for example, your Documents folder or a shared drive accessible from another Mac.
Import
Importing reads a previously exported JSON file and adds those tasks to the selected profile. You can import into an existing profile or a new one. Duplicate tasks are not filtered automatically, so review the task list after importing.
Typical use cases
New Mac: export tasks from the old Mac and import them on the new one to avoid re-entering every task manually.
Profile reorganization: move a subset of tasks from one profile to another by exporting from the source profile and importing into the target profile.
7 - Reference
License, signing, notarization, and configuration file locations for RsyncUI.
7.1 - MIT License
The MIT License (MIT), also explained on Wikipedia.
Copyright (c) 2020 - 2025 - Thomas Evensen

Permission is hereby granted, free of charge, to any person
obtaining a copy of this software and associated documentation
files (the "Software"), to deal in the Software without restriction,
including without limitation the rights to use, copy, modify, merge,
publish, distribute, sublicense, and/or sell copies of the Software,
and to permit persons to whom the Software is furnished to do so, subject
to the following conditions:

The above copyright notice and this permission notice shall be included
in all copies or substantial portions of the Software.

THE SOFTWARE IS PROVIDED "AS IS", WITHOUT WARRANTY OF ANY KIND, EXPRESS OR
IMPLIED, INCLUDING BUT NOT LIMITED TO THE WARRANTIES OF MERCHANTABILITY, FITNESS
FOR A PARTICULAR PURPOSE AND NONINFRINGEMENT. IN NO EVENT SHALL THE AUTHORS OR
COPYRIGHT HOLDERS BE LIABLE FOR ANY CLAIM, DAMAGES OR OTHER LIABILITY, WHETHER IN
AN ACTION OF CONTRACT, TORT OR OTHERWISE, ARISING FROM, OUT OF OR IN CONNECTION
WITH THE SOFTWARE OR THE USE OR OTHER DEALINGS IN THE SOFTWARE.
7.2 - RsyncUI files, JSON
RsyncUI stores all data locally on your Mac in JSON format, including task configurations, logs, and settings. Understanding the file structure helps with backup and troubleshooting.
Due to historical reasons, the location of configuration files is .rsyncosx and not .rsyncui. This is because the development of RsyncUI commenced with the now-archived application RsyncOSX.
File Locations
All RsyncUI files are stored in: $HOME/.rsyncosx/<macserialnumber>, where <macserialnumber> is your Mac’s serial number, which is retrieved at startup.
At startup, RsyncUI reads user settings and the default configuration from JSON files. Log records load only when viewing or updating logs.
The application log file is a text file that can be viewed within RsyncUI:
$HOME/.rsyncosx/<macserialnumber>/rsyncui.txt
7.3 - Signing and notarization
RsyncUI is digitally signed with my Apple Developer Certificate and notarized by Apple. This verification ensures the application is free from malicious code and works with Gatekeeper. When opening a new or updated app for the first time, Apple will display a notification.
What this means for you
Gatekeeper will allow RsyncUI to run without warnings, because Apple has verified the developer signature.
No quarantine prompt — you will not be asked to confirm that you want to open a downloaded app from an unknown developer.
The SHA-256 hash published with each release lets you independently verify that the downloaded binary matches what was signed and notarized.
If installed via Homebrew, the hash is verified automatically. For direct downloads from GitHub, verify the hash manually before running the app.